
Macros are sequences of events (such as keystrokes, mouse clicks, and delays) that can be played back to help with repetitive tasks. They can also be used to replay sequences that are long or difficult to run. You can assign a macro recorded in Microsoft Mouse and Keyboard Center to a key or a mouse button. You can also use the Macro Repeat feature to play and repeat a macro continuously, and then stop it at any time.
Microsoft Mouse and Keyboard Center macros use a .mhm extension and are saved as individual files in your default Documents\Microsoft Hardware\Macros subfolder. Macros recorded in keyboard and mouse are interchangeable. You can run them or edit them from either program.
Caution: Do not save passwords or other sensitive information in macros.
-
Using the mouse that you want to configure, start Microsoft Mouse and Keyboard Center.
-
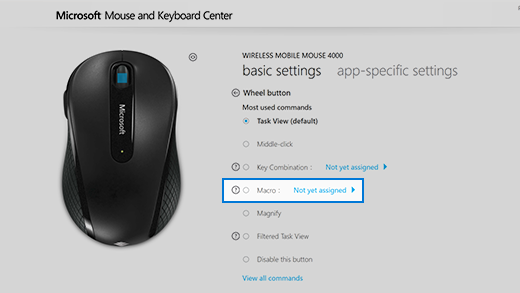
In the list under the button that you want to reassign, select Macro.
-
Click Create a new Macro.
An empty macro is created and added to the macro list. -
In the Name box, type the name of the new macro.
-
Click in Editor, and enter your macro.
You can record events such as keystrokes, mouse clicks, and delays between actions. You cannot capture mouse movement or actions performed through macros assigned to reassignable keys. -
In the Available Macros list, make sure that the new macro is selected.
To record two or more events at the same time
-
Enter the first event (for example: press the SHIFT key).
-
Right-click the selected event and then select Split. The event will split into three separate events: a button press-and-hold, a time delay, and a button release.
-
Click between the two separate events (either before or after the delay).
-
Enter the second event (for example: Mouse Button 1).
To edit an existing macro
-
Using the mouse that you want to configure, start Microsoft Mouse and Keyboard Center.
-
In the list under the button that you want to reassign, select Macro.
-
From the Available Macros list, select the macro you want to edit.
-
Click in Editor and edit the macro or enter new events.
To play a macro
-
Click the button assigned to the macro.
To cancel a macro during playback
-
Click the button assigned to the macro again, or start another macro
To enable Macro Repeat (play a macro repeatedly)
-
In the Macro Editor, select a macro from the Available Macros.
-
Click Edit Macro icon
-
Turn on the Repeat.
Notes: Macro Repeat does not support switching applications. For example, if you open your Web browser while a macro is repeating in a game, the macro stops repeating. Likewise, if you include a command in a macro to switch to a different application, Macro Repeat does not take effect, and the macro runs once only.
-
If you press a button assigned to start a repeating macro and then press a button assigned to a different macro, the repeating macro stops.
-
A repeating macro does not include a time delay at the end of a sequence. If you want to add a delay, you can add one in The Editor box.
To toggle a repeating macro
-
After you enable Macro Repeat for a macro, press the key assigned to the macro to start it.
Press the button again to stop the macro from repeating.
Or, to stop the repeating macro and start another macro, press the key assigned to the other macro.


