
You can insert a picture into a shape and give the appearance of a picture that has been cropped to a specific shape, such as a star or circle.

Insert a picture into a shape
-
Click the shape for which you want to add a picture.
-
On the Format tab, in the Shape Styles group, click the arrow next to Shape Fill.
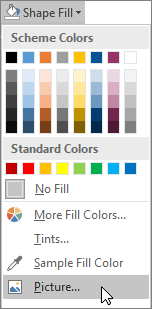
-
In the folder or location that the contains the picture you want to use, click the picture file, and then click Insert.
Note: You cannot move the position of the picture inside the shape.
Read on for tips and tricks to get the best results.
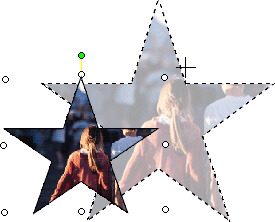
Consider the choice of shape that will work with your picture. If your picture is square, you can insert it into a circle. If your picture is rectangular, an oval shape may be interesting and aesthetically pleasing. If you want to focus on the center of your picture, a star shape may help direct the viewer's attention.
You may want to remove extra space by cropping it from the sides, top, or bottom of your picture so that it fits appropriately inside the shape that you want. Learn how to crop a picture before you insert it into a shape.
To change the size of your picture, select the shape, position the pointer over one of the points, and then click and drag the size handle.
Insert a picture into a shape
-
With your shape selected, click AutoShape on the Format menu, and then click the Colors and Lines tab.
-
In the Color list under Fill, click Fill Effects > Picture tab > Select Picture.
-
In the Select Picture dialog box, locate the folder that contains the picture that you want to insert, select the picture file, and then click Insert.
-
To maintain your picture's proportions (to prevent distortion) when it is inserted into the shape, check the Lock picture aspect ratio box, and then click OK.
-
In the Format AutoShape dialog box, click the Size tab, and then select the Lock aspect ratio check box to maintain the shape's proportions when you change the size of the shape. Click OK.
Read on for tips and tricks to get the best results.
Consider the choice of shape that will work with your picture. If your picture is square, you can insert it into a circle. If your picture is rectangular, an oval shape may be interesting and aesthetically pleasing. If you want to focus on the center of your picture, a star shape may help direct the viewer's attention.
You may want to remove extra space by cropping it from the sides, top, or bottom of your picture so that it fits appropriately inside the shape that you want. Learn how to crop a picture before you insert it into a shape.
To change the size of your picture, select the shape, position the pointer over one of the points, and then click and drag the size handle.
Tip: If you selected the Lock aspect ratio check box to maintain the picture's placement inside the shape relative to the size of the shape, use one of the corner handles to change the size of the picture.


