
At any time, you can change the time zone in Outlook so that it matches your current geographic location. Changing the time zone in Outlook is the same as changing it in the Windows Control Panel, and the change is reflected in the time displays in all other Microsoft Windows-based programs.
Change your time zone
When you change the time zone setting in Outlook, all Calendar views are updated so that they display the new time zone, and all Calendar items reflect the new time zone.
-
Click the File tab.
-
Click Options.
-
On the Calendar tab, under Time zones, type a name for the current time zone in the Label box.
-
In the Time zone list, click the time zone that you want to use.
Notes:
-
When you adjust time zone and daylight-saving time settings in Outlook, Windows clock settings are also adjusted.
-
When Outlook is set to a time zone that observes daylight saving time, the clock adjusts for daylight saving time by default. You can turn off the adjustment. However, this is not recommended.
-
Some time zones do not have daylight saving time. When Outlook is set to time zone that doesn’t observe daylight saving time, such as Arizona in the United States, the daylight-saving time adjustment cannot be turned on.
-
In the latest versions of Outlook for Microsoft 365, three separate time zones can be displayed in the Calendar.
In other versions of Outlook, including Outlook 2019 Volume License, Outlook 2016, Outlook 2013, and Outlook 2010 you can display two time zones.
The time zones can be, for example, your local time zone, the time zone of another business location, and the time zone of a city that you often travel to. The second and third time zones are used only to show a second and third time bar in Calendar view, and do not affect the way in which Calendar items are stored or displayed.
-
Click the File tab.
-
Click Options.
-
On the Calendar tab, under Time zones, select the Show a second time zone check box and, if needed, the Show a third time zone check box.
-
In the Label box for each time zone, type a name for the additional time zone.
-
In the Time zone list, click the time zone that you want to add.
-
If you want your computer clock to automatically adjust for daylight saving time (DST) changes, select the Adjust for daylight saving time check box. This option is available only in time zones that use daylight saving time (DST).
When you have two or three time zones displayed in Calendar, you can swap their positions.
-
In Calendar, right-click in the time bar, and then click Change Time Zone.
-
Under Time zones, click Swap Time Zones.
-
Click the File tab.
-
Click Options.
-
On the Calendar tab, under Time zones, clear the Show a second time zone check box and/or the Show a third time zone check box.
More about time zones in Outlook
The start and end times for items in the Outlook Calendar are saved in the Coordinated Universal Time (UTC) format, an international time standard similar to Greenwich Mean Time.
When you send a meeting request to an attendee in a different time zone, the meeting item is displayed at the respective local times on each person's calendar but saved in UTC.
For example, a meeting organizer in the United States Pacific time zone sends a meeting request for 2:00 P.M. Pacific time to an attendee in the United States Mountain time zone. The attendee sees the meeting as starting at 3:00 P.M. Mountain time. In both cases, the meeting is saved as starting at the same UTC time of 10:00 P.M.
If two time zones are shown, the meeting organizer's time zone is used as the reference point. If you organize a meeting and display free/busy time for invitees from other time zones, their busy times are adjusted so that they appear correctly in your time zone. The second time zone is visible only when you view the calendar in day or week view.
Outlook on the web allows you to change your time zone to match your current geographic location. It also allows you to display additional time zones, making it easier to schedule events across different time zones.
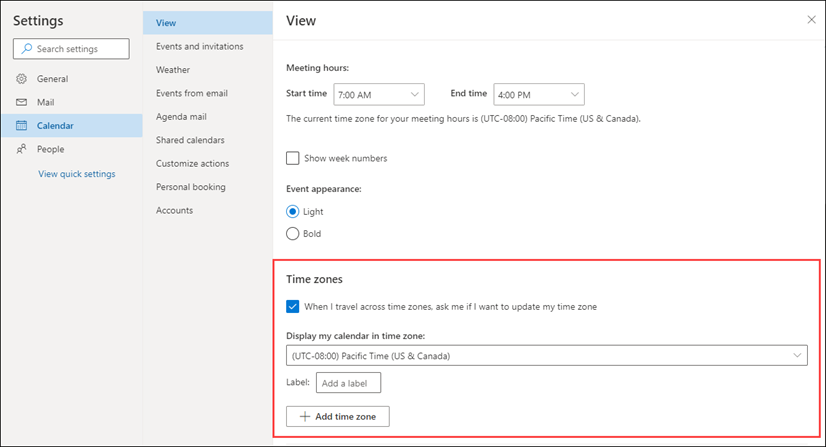
To change your home time zone or to add other time zones, you'll need to open the time zone settings in Outlook for the web. Click the gear icon on the right side of the ribbon and select:
Settings > Calendar > View > Time zones
 |
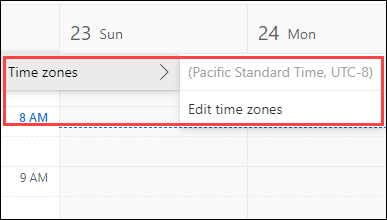
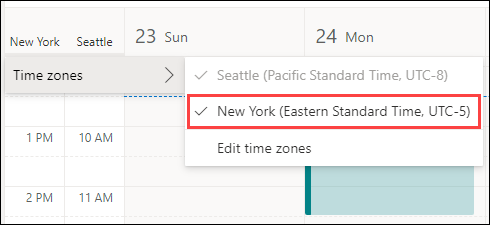
You can also reach this setting by clicking at the top of the time strip to the left of the calendar and select Time zones > Edit time zones.
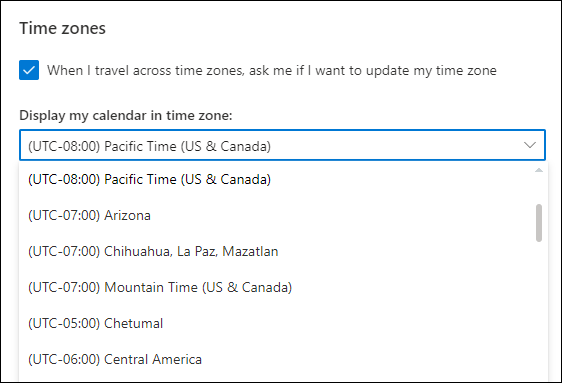
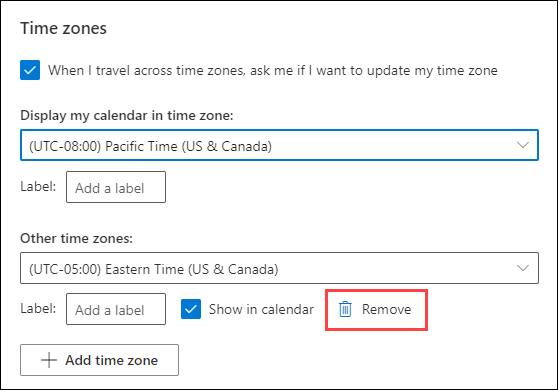
Open the time zone settings and select the time zone you want to use for your calendar from the dropdown list.
Open the time zone settings.
Click Add time zone add additional time zones to your calendar. Use the dropdown to select the time zone you want to add. If you wish to add a label, enter it in the Label box.
You can add additional time zones using the same process.
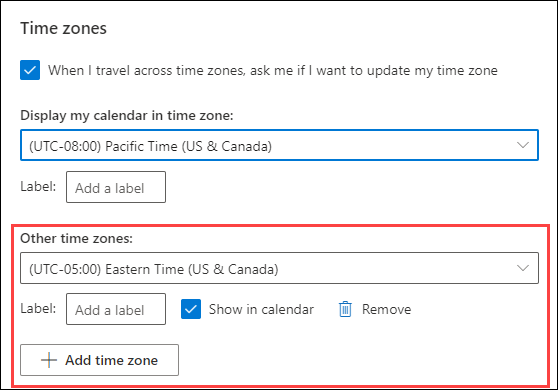
Once you've added at least one additional time zone, a time strip will display to the left of your calendar. The strip shows your main time zone and any additional time zones you've added, along with their labels. This lets you to see the time a calendar event is scheduled for in any of your time zones.

If you don't want to display any additional time zones you've added to your calendar, click the top of the time strip and remove the mark in the checkbox Show in calendar.
When viewing your calendar in Board view, you can access the time zone options from the three dot menu at the top right of the calendar.

You can remove any time zone you've added by opening the time zone settings and clicking the Remove button.
Learn more about customizing your calendar.


