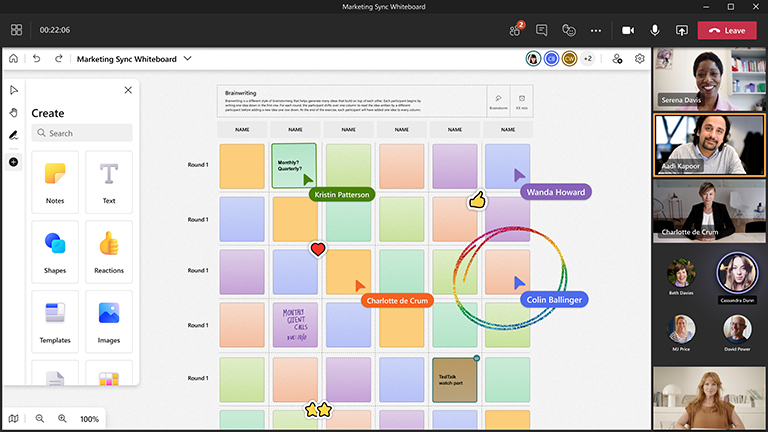
Brainstorming is the starting point to any great idea or product, and with Microsoft Whiteboard, the process is collaborative and fun.
The visual collaboration workspace provided by Whiteboard creates the perfect place where employees (or students) can come together and create ideas.
Key features:
-
Templates for a variety of brainstorming formats
-
Colorful sticky notes to promote organization
-
Smart inking that stays looking nice
-
Ink to shape features that quickly get your ideas on the board
-
Reactions that allow everyone to voice their opinion
Prepare the board
-
Schedule a Microsoft Teams meeting.
-
Navigate to the Teams meeting and select Whiteboard from the list at the top. Alternately, create a whiteboard and then share a link to it from the Whiteboard Windows App or in your browser at whiteboard.office.com.
-
In the Create panel, select Templates > Brainstorming, and then choose a template.
-
Add your session goals, and label anything else, as needed.
-
If others are helping you to prepare the board, you can share a link with them.
During the session
-
Ensure all attendees have the Teams meeting link.
-
Once the meeting has started, share the whiteboard from the Share tray in Teams, or send the link to the prepared board from the Whiteboard Windows app or from whiteboard.office.com.
-
Introduce the goal of the session and ensure everyone is familiar with how to utilize Whiteboard.
-
Consider how you would like to organize the session (i.e. dedicated sticky note colors for people, specific reactions representing different ideas, etc.).
-
Run the brainstorming session how you normally would, encouraging participation both through Teams and directly on the whiteboard.
-
Utilize the Teams hand raise functionality to organize the order of individuals speaking.
-
Keep an eye on the time to make sure you will be able to cover all topics.
After the session
-
Send a message to attendees with the link to the whiteboard so everyone has access.
-
If anyone external was involved that you would like to send a summary to, export a PNG image to share from the settings menu.
-
Translate the finalized brainstorm work to the tool of your choice to action on and track follow-up items.
See also
Check out our other Whiteboard guides to learn more!


