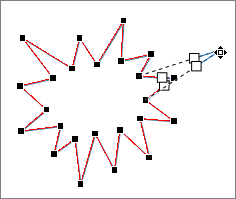
You can draw shapes in Office by using the freeform Shape and Scribble tools.
You can customize the look of a standard shape by using edit points.
Note: For information about connecting shapes with lines, see Draw or delete a line or connector.
Draw a freeform shape
-
On the Insert tab, in the Illustrations group, click Shapes.
-
Under Lines, do one of the following:
-
To draw a shape that has both curved and straight segments, click Freeform
-
To draw a shape that looks like it was drawn with a pen by hand, or to create smooth curves, click Scribble
-
-
Click anywhere in the document, and then drag to draw.
To draw a straight segment with the Freeform tool, click one location, move your pointer to a different location, and then click again; to draw a curved segment, keep your mouse button pressed as you drag to draw.
-
To finish drawing the shape, do one of the following:
-
To leave the shape open, double-click at any time.
-
To close the shape, click near its starting point.
-
Edit points in a shape
You can edit the points of most shapes. For example, you edit points when you need to lean a triangle over to the right.
-
Select the shape that you want to edit.
-
On the Shape Format (or Format) tab, click Edit Shape
-
Drag one of the vertexes that outline the shape. A vertex is the point, indicated by a black dot, where a curve ends or the point where two line segments meet in a freeform shape.
Working with editing points
-
To add a point, click the shape outline while pressing Ctrl.
-
To delete a point, click the point while pressing Ctrl.
-
To have the point treated as a smooth point, press Shift while dragging either of the handles attached to the point. Once you stop dragging, the point will be changed to a smooth point. A smooth point joins two line segments of equal length.
-
To have the point treated as a straight point, press Ctrl while dragging either of the handles attached to the point. Once you stop dragging the point will be changed to a straight point. A straight point joins two line segments of different lengths.
-
To have the point treated as a corner point, press Alt while dragging either of the handles attached to the point. Once you stop dragging the point will be changed to a corner point. A corner point joins two line segments with one segment going off in a different direction.
-
To cancel the change to the point and line segments, press Esc before releasing the mouse button.
-
To open Edit Points mode with keyboard shortcuts, select the shape and then press Alt + JD, E, E.
Delete shapes
-
Click the shape that you want to delete, and then press Delete. If you want to delete multiple shapes, select the first shape, press and hold Ctrl while you select the other shapes, and then press Delete.


