You can insert a table in your Outlook.com email messages or calendars to help you organize your data.
-
Create a new message or reply to an existing message.
-
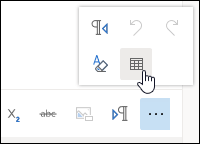
At the bottom of the compose pane, select
-
Drag the pointer to choose the number of columns and rows you want in your table.
Note: If you don't see the formatting options menu at the bottom of the compose pane, select
To insert or delete rows or columns, merge or split cells, add a style, or delete a table:
-
Right-click any cell in the table.
-
Select an option.
Still need help?
|
|
To get support in Outlook.com, click here or select Help on the menu bar and enter your query. If the self-help doesn't solve your problem, scroll down to Still need help? and select Yes. To contact us in Outlook.com, you'll need to sign in. If you can't sign in, click here. |
|
|
|
For other help with your Microsoft account and subscriptions, visit Account & Billing Help. |
|
|
|
To get help and troubleshoot other Microsoft products and services, enter your problem here. |
|
|
|
Post questions, follow discussions and share your knowledge in the Outlook.com Community. |


