Sending an email when a list item was added in some versions of SharePoint requires many steps, whose details follow. However, if you are using the most current version of SharePoint, you can add a flow directly from your list. A flow template to send an email when a list item is added includes the basic steps needed to get you started quickly.
Notes:
-
SharePoint 2010 workflows have been retired since August 1, 2020 for new tenants and removed from existing tenants on November 1, 2020. If you’re using SharePoint 2010 workflows, we recommend migrating to Power Automate or other supported solutions. For more info, see SharePoint 2010 workflow retirement.
-
SharePoint 2013 workflow has been deprecated since April 2023 and will be turned off for new tenants as of April 2, 2024. It will be removed from existing tenants and will be fully retired as of April 2, 2026. If you’re using SharePoint 2013 workflow, we recommend migrating to Power Automate or other supported solutions. For more info, see SharePoint 2013 workflow retirement in Microsoft 365.
-
Notifications may take up to 4 hours to be received.
Sending email from workflow
Send a basic email message from a workflow
By using the Send an Email action in the Workflow Designer, you can set up your custom workflow to send emails to you or to any other specified user or group. The available fields for an email are To, CC, Subject, and Body. These fields can contain both static text and text that is generated dynamically from workflow lookups.
You can use the Send an Email action to generate many kinds of emails, including notifications when the workflow reaches specified stages or performs specified actions (including the overall starting and stopping of the workflow) and reminders about tasks that are not complete by their due date.
Note: Outgoing email settings must be configured on the server before your workflow can send emails. If you are unsure about the server's current email settings, check with your server administrator. For more info about outgoing email settings, see the See Also section.
In this example, you will set up your workflow to send you an email notification each time that it starts to run on a new item. Use the version of SharePoint Designer that matches your SharePoint Server version. For example, for SharePoint Server 2010 use SharePoint Designer 2010. And, for all version after SharePoint Server 2010, including SharePoint Server 2016 and SharePoint in Microsoft 365, use SharePoint Designer 2013. Download SharePoint Designer 2013 from the Microsoft Download Center. For more information, see See Also.
Open SharePoint Designer 2013 and connect to a SharePoint site
SharePoint Designer 2013 installs as an Office 2013 app. To open SharePoint Designer 2013 and connect to a SharePoint site, follow these steps:
-
To open SharePoint Designer 2013, select it on the Start menu. Select Start icon>All Programs>Microsoft Office 2013>SharePoint Designer 2013.
-
On the SharePoint Designer 2013 start page, select Open Site.
-
Enter the SharePoint site that you want to connect to, for example, http://www.contoso.com/sites/a-sharepoint-site.
-
To open the site, select Open.
-
If prompted, enter your credentials. (If security is not integrated with the computer you signed in, you are prompted to enter your credentials.) Make sure to use credentials that have access to the SharePoint site.
Create a List workflow based on the SharePoint Workflow platform
-
In the nav pane, select Workflows node.
-
In the New section of the Workflows tab, select the List Workflow dropdown.
-
Select the list that you want to associate with the new workflow.
-
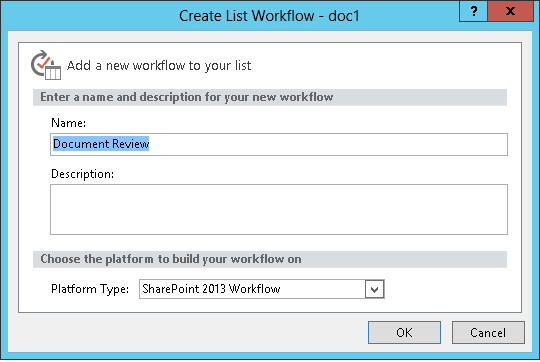
On the Create List Workflow dialog, enter a name and description for the workflow, and then make sure to set the Platform Type to SharePoint 2013 Workflow.
-
To create the workflow, select OK.
Now that the workflow is created, you can add Actions, Conditions, Stages, Steps and Loops to build your workflow. These workflow components are available in the SharePoint Designer 2013 ribbon.
Note: If you do not see SharePoint 2013 Workflow as an available platform type, then Workflow Manager is not configured to work with the SharePoint farm. To resolve, see Configure Workflow Manger to work with the SharePoint Server 2013 Farm.
For more info about the available list of workflow actions, see See Also.
Create the action to send the an email
-
Select Actions, and then select Send an Email.
-
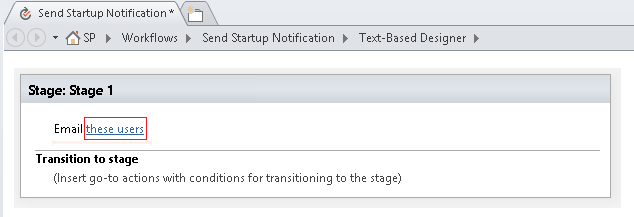
In the action, select these users.
-
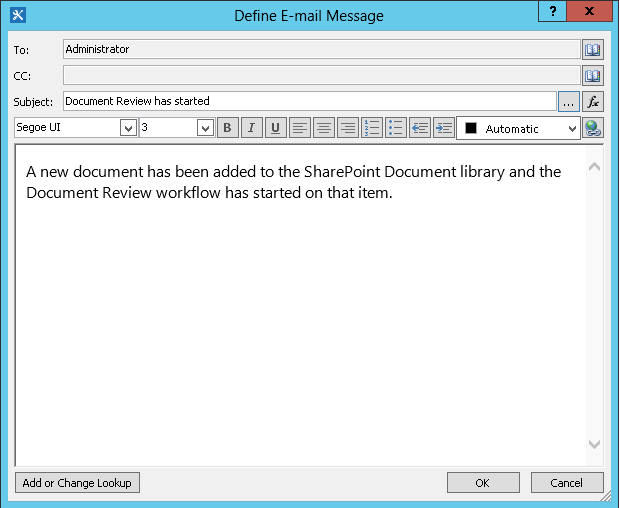
In the Define Email Message dialog, select users from the existing Users and Groups, or enter your own email address in the To field.
Notes:
-
In order to send an email to an external email address. you must be able to retrieve information from the respective email server.
-
The To address of an email can either be a specific, static address (for example, NORTHWINDTRADERS\junmin or junmin@northwindtraders.com), or a workflow lookup to variable information. For more info about using workflow lookups to dynamically address emails sent from the workflow instead of using static addresses, see Dynamically select users or groups to receive the message.
-
The sender address of the rendered email will always be the email address of the server administrator, unless the server administrator changes the sender address for either the current web app or all web apps. To learn more, read Configure Outgoing Email for a specific web app.
-
-
In the Subject field, enter a subject for the email, or to define a workflow lookup to the text you want here, select Display data binding
Note: For the workflow to compile correctly, you must make some entry in the Subject field.
-
In the large box under the Subject field, enter or paste the body text of the email.
-
Select OK.
-
Select Action>Go to a stage.
-
Select End of Workflow.
-
Select Publish.
For more advanced options to modify the contents of the email, see the following sections.
Dynamically select users or groups to receive the message
If you supply static addresses in the To and Cc fields of your email, then any time that you need to change the recipients, you must open the workflow in the Workflow Designer and make the changes manually. If the addresses will change frequently, it is a better practice to use workflow lookups in the To and Cc fields. Lookups can reference addresses from a field in the current item, from a field in an item in another list or library, or from workflow variables.
Use a custom list to store recipient addresses
If the recipients change periodically, but not often enough that they must be specified on an initiation form each time that the workflow is started, you can create a custom Recipients list that contains one list item for each workflow that references it, and then create columns in which you can store the addresses to which each email from each workflow is to be sent. When the recipients for any workflow message change, all you have to do is change the addresses in the appropriate field in the Recipients list item for that workflow.
Important: The columns in which you store addresses for workflow emails can be either Single line of text, Multiple lines of text, or Person or Group type columns. If you use a Person or Group column, only one entry can be made in each field that the workflow will reference for email addresses. When creating the column, be sure to select No under Allow multiple selections. If you want to use this type of column to specify multiple recipients, you can create a SharePoint group that includes the people that you want the workflow to address the email to, and then specify the group in the field. When creating the column, be sure to select People and Groups under Allow selection of. For more info about creating lists and adding columns, see See Also.
Note: When creating SharePoint groups, make sure that each group has at least Read permissions for the site, and that in the Group Settings area of the New Group page, under Who can view the membership of the group, you select Everyone.
To use a workflow lookup to a custom Recipients list:
-
In the browser, create a custom list named Recipients with the following three columns:
-
Change the name of the default Title column to Workflow Name. Leave all the other options as is. For more info about changing column in a list or library, see See Also.
-
Add a Person or Group column named To. In this column, allow selection of both People and Groups, but do not allow multiple selections. Leave all the other options as is. For more info about creating column in a list or library, see See Also.
-
Add a Single line of text column named Cc. Leave all the other options as is.
-
-
In the Recipients list, create a new item, and then do the following:
-
In the Workflow Name field, enter Document Review which is the name of the example workflow used here.
-
In the To field, select Address Book
-
In the Cc field, enter the email addresses of the recipients to address copies to, separating multiple addresses with semicolons.
-
-
Select Actions, and then select Send an Email.
-
In the Action, select these users.
-
In the Define Email Message dialog, at the end of the To box, click Address Book
-
In the Select Users dialog, in the Or select from existing Users and Groups list, select Workflow Lookup for a User, and then select Add.
-
In the Lookup for Person or Group dialog, select the following options:
-
Data Source: Recipients, or the name of your custom list.
-
Field from source: To, or the field that holds the address you want in the To line.
-
Return field as: Login Name. This decides the "To" field format in the email.
-
Field: Recipients: Workflow Name
-
Value: Enter Document Review, or the name of the current workflow.
This lookup states, "From the Recipients list, select the value of the To field where the Workflow Name equals Document Review."
The top half of the dialog specifies the list and the column; the bottom half of the dialog specifies the row.
-
-
In the Lookup for Person or Group dialog box, select OK.
-
In the email about ensuring unique lookups, select OK.
-
To close the Select Users dialog, select OK again.
-
In the Define Email Message dialog, at the end of the CC field, select Address Book
-
In the Select Users dialog, in the Or select from existing Users and Groups list, select Workflow Lookup for a User, and then select Add.
-
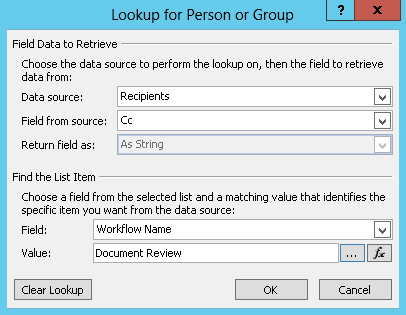
In the Define Workflow Lookup dialog, select the following options:
-
Data Source: Recipients, or the name of your custom list.
-
Field from source: Cc, or the field that holds the address you want in the Cc line.
-
Return field as: Login Name. This decides the "To" field format in the email.
-
Field: Recipients: Workflow Name
-
Value: Enter Document Review, or the name of the current workflow.
This lookup states, "From the Recipients list, select the value of the Cc field where the Workflow Name equals Document Review."
-
-
Select OK, and in the warning message, select OK again.
-
To close the Select Users dialog, select OK.
Now, when the workflow sends this email, it sends it to the addresses listed in the To and Cc fields of the Document Review item in the custom Recipients list. To change recipients, simply make the changes you want in the list item.
A single workflow may send multiple emails, and the emails may not all be sent to the same recipients. To store other addresses for additional emails sent by this workflow, you can add columns to the list to store the other addresses. In this case, you may want to name the columns "First message To," "Second message To," and so on.
Alternatively, you can design the list so that you create one item for each email that the workflow sends, instead of one item for each workflow. In this case, make sure that the name used to identify each email is unique, so that the lookups that retrieve the addresses return the unique value that you want.
Use the workflow initiation form to specify recipients
If you want recipients to be specified each time that a workflow is started manually, you can customize the workflow initiation form to collect the addresses from the person who starts the workflow. The workflow can then either simply use the entered addresses directly, or copy them into fields in the current item — where they will still be available for reference after the workflow has completed its current instance. If the workflow is set up so that it also starts automatically, you can specify default addresses in the initiation form for whenever an automatic start occurs.
Include information about the current item
So far, the body text in the example email is static: Every time the workflow creates an instance of the email, the text will be exactly the same.
It can be useful, however, to include text that changes in relation to the item on which the workflow is currently running. For example, it might be useful to include the title of the document needing review in the body of your email. To include this sort of dynamic information, you use a workflow lookup. Lookups retrieve data from different data sources such as lists, libraries, and workflow data.
To add the title of the document to the email text:
-
Enter or paste the static text within which you want the lookup information to appear.
-
Position the insertion point where you want the lookup to be located.
Tip: After you insert a lookup, you cannot drag it to a new location. (It is possible, however, to "relocate" a lookup by dragging other text around it.) Similarly, it is not possible to cut, to copy, or to paste either a lookup or any text that includes a lookup.
-
Select Add or Change Lookup.
-
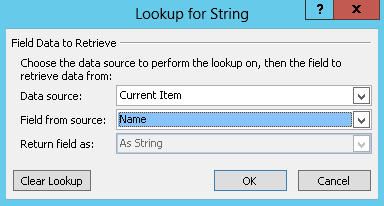
In the Lookupfor String dialog, in the Data Source field, select Current Item, and in the Field from source field, select Name.
-
Select OK.
-
The inserted lookup appears in the email body.
-
To publish the workflow, select Publish.
When the workflow runs and the email is generated, the lookup is replaced by the title of the document.
Including the title of the document is useful, but it might be even more useful to include a hyperlink that would take you directly to the document itself. To do this, you include a lookup in the hyperlink.
Include a static hyperlink
To include a static hyperlink — one that always links to the same address or location — in the body of your workflow email, in the upper right corner of the formatting tool panel in Define Email Message dialog, select the Edit Hyperlink button.
-
Enter or paste the static text within which you want the link to appear.
-
Select the text, and select Edit Hyperlink.
-
In the Edit Hyperlink dialog, enter the address of the website.
-
Select OK.
The inserted hyperlink appears in the email's body.
Note: Text-based email programs do not render the hyperlink.
To learn about how to use a workflow lookup to create a dynamic hyperlink that points to varying addresses depending on the item on which the workflow is currently running, see Include a hyperlink to the current item.
Include a hyperlink to the current item
In the previous section, Include a static hyperlink, the address in the example hyperlink includes no variable information: Every time that the workflow sends the email, the hyperlink points to the same page.
By using a workflow lookup, however, you can create a dynamic link that uses information about the current item to decide which URL to point to.
If the current item is a document in a document library
In the workflow startup notification example, you might want to provide a link to the new document itself:
-
Enter or paste the static text within which you want the link to appear.
-
Select the text, and select Edit Hyperlink.
-
In the Edit Hyperlink dialog, select function (fx).
Tip: After you insert a lookup, you cannot drag it to a new location. (It is possible, however, to "relocate" a lookup by dragging other text around it.) Similarly, it is not possible to cut, to copy, or to paste either a lookup or any text that includes a lookup.
-
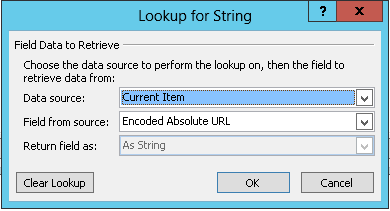
In the Lookup for String dialog, in the DataSource field, select Current Item.
-
In the Field from source field, select Encoded Absolute URL, and then select OK.
When the recipient of the email selects the link, the document opens for viewing or editing.
If the current item is a list item
When you create a link to a list item — for example, an announcement or a calendar event — you can choose to have the link open either the display form (DispForm.aspx), or the edit form (EditForm.aspx) of the list item.
To create a link that opens the list item:
-
In the browser, navigate to the list on which you want to create this workflow.
-
Open the list item for any existing document in the library, using View Item if you want your link to open the display form, or Edit Item if you want your link to open the edit form.
-
Copy the address in the address bar from the beginning http: or https: through the first equal sign (=).
-
The ?ID= text is a query string parameter that instructs the page to display the form for whichever item in the current list or library has the list ID that follows the equal sign (=) — which in this example will be the list ID of the current item, as identified by the workflow lookup.
Note: If the current item is a task that is created by one of the three workflow task actions, and if you want the link to open the custom task form (and not the default display or edit form for the Tasks list), see If the current item is a custom task form. For tasks not created by a workflow task action, and for the display forms of even those tasks created by one of the workflow task actions, the current procedure is all that you need.
-
In the Define Email Message dialog, enter or paste the static text within which you want the link to appear, for example - To view the list item, click here.
-
Select the text, and select Edit Hyperlink.
-
In Edit Hyperlink box, for the address field, select String Builder.
-
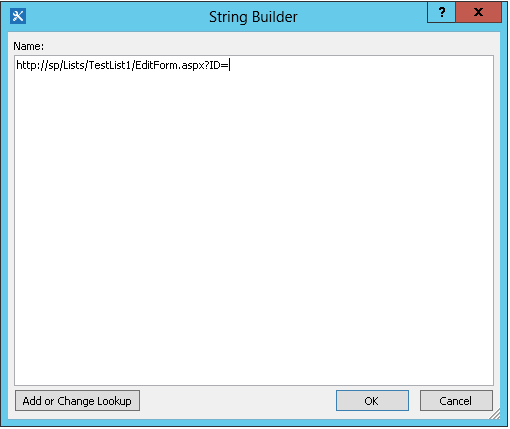
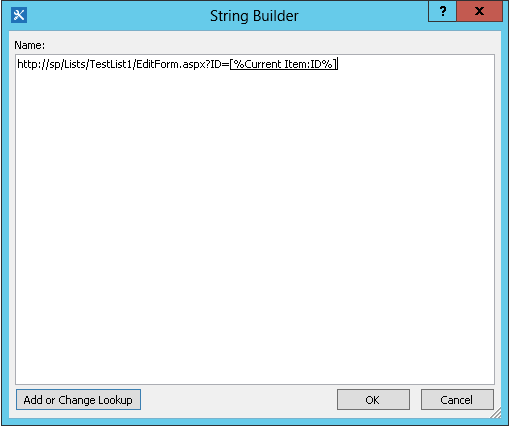
In the String Builder dialog, paste the address.
-
Position the insertion point directly after the equal sign (=), and then select Add or Change Lookup.
-
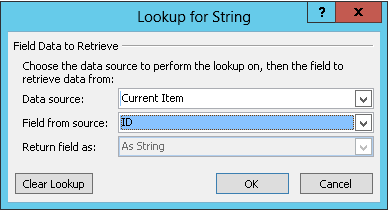
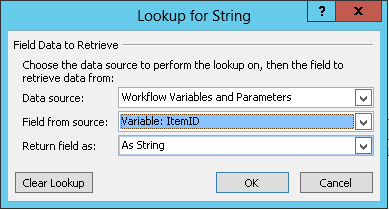
In the Lookup for String dialog, in the Source field, select Current Item, and in the Fieldfrom source field, select ID.
-
Select OK.
The final string in String Builder should start with http:// or https:// and end with [%Current Item:ID%].
Important: While the current item ID lookup is useful in building links to the current list item, the following lookups can present errors in the rendered path, and we do not recommend them for inclusion in email links: Path, Server Relative URL, Source URL, and URL path.
-
Select OK twice.
Your links will appear in blue text with an underline in the email.
If you plan to use the link more than once, continue to the next section.
Store a list item address as a workflow variable
You can store the URL of the display form or edit form of a list item in a workflow variable, so that you can use it in multiple locations in the same workflow.
-
In the Workflow Designer window, select Actions, and then select Extract Substring from Index of String.
-
In the stage, select string, and select ellipses button [...].
-
In the String Builder dialog, paste the static text portion of the URL (but not the lookup for the current item ID).
-
Position the insertion point after the equal sign (=), and then select Add or Change Lookup.
-
In the Lookup for String dialog, in the DataSource field, select Current Item, and in the Field from source field, select ID.
-
Select OK.
The lookup is added to the text in the dialog.
-
To close the String Builder dialog, select OK.
-
Select 0 in Starting at 0 and replace it with 1.
Note: When Starting at has a value greater than 1, the final string has characters removed.
-
Select Variable: substring or Variable: substring1 in Output to Variable: substring.
-
In the list, select Create a new variable and then, in the Edit Variable dialog, enter a name for the new variable.
-
Make sure that Type is set to String, and then select OK.
-
Select below the action you just created and Add the Send an email action to the Actions, and then select these users in the action.
-
To use the new variable in the Define Email Message dialog, enter or paste the text within which you want link to appear into the email body. Select the text, and from the formatting menu, select Edit Hyperlink. Select [fx] button, or select ellipses button [...], and then select Add or Change Lookup.
-
In the Lookup for String dialog, in the Data Source box list, select Workflow Variables and Parameters.
-
In the Fieldfrom source list, select Variable: name of variable, and then select OK, and select OK in the next box.
You can now insert this variable anywhere that you want it in the current workflow.
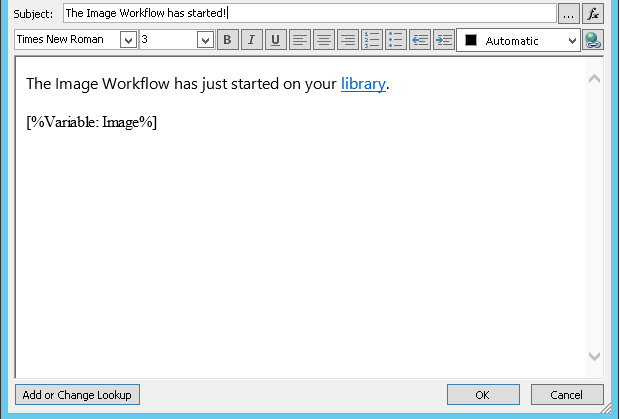
Include an image
You can include a graphic in your email by creating a variable and using the HTML image tag <img/> to link to an image that is stored as a JPEG (.jpg) file and uploaded to a picture library in your site.
-
In the Workflow Designer window, select Actions, and then select Set Workflow Variable.
-
Select workflow variable, and then select Create a new variable.
-
In the Edit Variable dialog, enter a name for the new variable and make sure that Type is set to String, and then select OK.
-
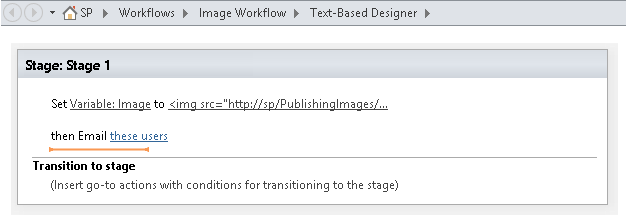
Select value and then select the ellipses button [...]. In the String Builderwindow, enter or paste the URL for the JPEG image file in HTML tag format - <img src ="URL"/>
-
Select OK.
-
The inserted Action appears like this.
-
Select below the action you just created and add the Send an email action to the action, and then select these users in the action.
-
In the Define Email Message dialog, select Add or Change Lookup.
-
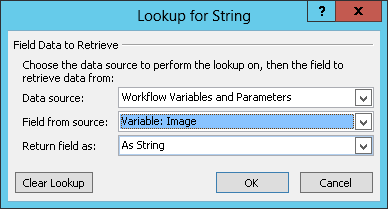
In the Lookup for String dialog, in the Data Source list, select Workflow Variables and Parameters.
-
In the Field from source list, select Variable: Name of Variable, and then select OK.
-
To close the Define Email Message window and publish the workflow, select OK again.
When the email is sent, the image from the JPEG file appears instead of the link tag.
Identify options that are not supported
We do not support the following options by the current version of the Send an Email action:
-
Specifying an address on the From line. (Emails sent by the workflow always show the email address specified by the server administrator on the From line. Only the server administrator can change this, and it can only be changed for all notifications in the current web app, not per workflow.)
-
Using an embedded cascading style sheet (CSS) to format message content. Text can be formatted by using the style attribute, but we do not support the <style> tag and CSS classes.
-
Using a workflow lookup in either the To or CC box that references a column of the Person or Group type that contains multiple values.
-
Specifying a Bcc recipient for an email.
-
Including another file with a message as an attachment.
-
Embedding image or graphic files in a message. Instead, Include an image.
See Also
SharePoint 2013 Step by step: Setup for Outgoing Email Setting
Introducing SharePoint Designer
Configuring Outgoing email for a specific web app
Configure Workflow Manager to work with the SharePoint Server 2013 Farm
Workflow Actions Quick Reference
Create a column in a SharePoint list or library
Change a column in a list or library
Create an alert or subscribe to an RSS Feed in SharePoint 2010
Basic Troubleshooting Tips
The following list of questions may help determine the cause of an issue creating a workflow:
-
Are you able to create any other type of workflow on the same list? For example, try to create an approval workflow.
-
Are you able to create the same workflow:
-
on a different list on the same site?
-
on a different site under same site collection?
-
on a different site collection under same web application?
-
on a different web application?
-
logged in with a different account?
-
using a different computer?
-
Advanced Troubleshooting Tips
If none of the basic troubleshooting tips help determine the cause of a workflow issue, use these steps:
-
Ensure you have required permissions at site and workflow level. Go to Site Settings>Site Permissions>Check Permissions/List Settings>Permissions for this list, and verify Check Permissions results match the following:
-
Minimum permissions to design a workflow (save and publish):
-
on the SharePoint site: Design
-
on the SharePoint list: Edit
-
-
Minimum permissions to start a workflow:
-
on the SharePoint site: View Only/Read
-
on the SharePoint list: Contribute
-
-
-
Ensure outgoing email settings are set to the correct Exchange server.
-
Open Command Prompt as an administrator
-
Run nslookup <Exchange server address>. For example: nslookup exch.contoso.com
-
You should see the resolved IP address of the Exchange server in the output. If not, contact your Exchange administrator and ask for the correct Exchange fully qualified domain name (FDQN).
-
-
Send an email to the same person using the SendEmail function of the SPUtility class with SharePoint Management Shell using the following steps.
-
Open SharePoint Management Shell as an administrator. (Right-click SharePoint Management Shell>Run as administrator)
-
Run the following script. If the script responds with True, and the user receives an email from SharePoint, SMTP is configured correctly in SharePoint.
$Site = "Your Site Name"
$Email = "User to whom you are sending an email through the workflow"
$Subject = "Subject Line with the email"
$Body = "Test Email Body"
$web = Get-SPWeb $Site
[Microsoft.SharePoint.Utilities.SPUtility]::SendEmail($Web ,0,0,$Email,$Subject,$Body)

# Below is the same script with sample data
$Site = "http://sp/"
$Email = "User1@contoso.com"
$Subject = "Test Email from SharePoint"
$Body = "This is a Test Email"
$web = Get-SPWeb $Site
[Microsoft.SharePoint.Utilities.SPUtility]::SendEmail($Web ,0,0,$Email,$Subject,$Body)
-
-
Using SMTP functionality, send an email to the same user from the SharePoint server. Follow the steps in Use Telnet to test SMTP communication.
Note: By default, SharePoint does not create log entries for outgoing mails. SharePoint never sends email directly. The emails are relayed through the SMTP (Exchange) server configured in Central Administration. For troubleshooting this type of workflow, follow the previous steps.


