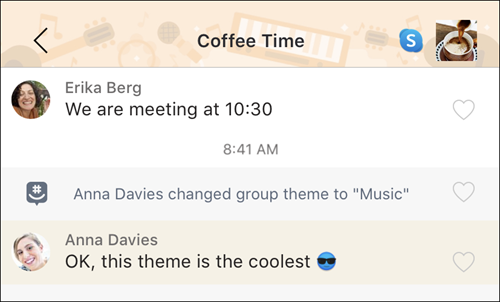
Give your groups a little life by changing their look with Themed Groups. With Themed Groups, you can easily change the group header, the color scheme, and more.
Make an existing group a Themed Group:
-
In the Chats tab, select the group you want to change.
-
Select the group’s avatar (profile picture).
-
Select Settings
-
Select Customize group, then tap Choose theme.
-
Choose your theme category, then choose the banner image you want to use.
-
Select Save.
Your group will now display your new theme banner and colors.
Create a new themed group:
-
In the Chats tab, select New chat
-
Select Start Group
-
Select Next
-
To add members, type their name, phone number, or email, or scroll through your current GroupMe contacts.
-
Select Done to create your group.
-
Choose a theme by tapping Customize Group, then tap Choose theme.
-
Choose your theme category, then choose the banner image you want to use.
-
Select Save.
Your new group will now display your theme banner and colors.
Make an existing group a Themed Group:
-
In the Chats tab, select the group you want to change.
-
Select the group’s avatar (profile picture).
Note: On iPad, simply select Settings
-
Select Settings
-
Select Customize group, then tap Choose theme again.
-
Choose your theme category, then choose the banner image you want to use.
-
Select Save.
Your group will now display your new theme banner and colors.
Create a new themed group:
-
In the Chats tab, select New chat
-
Select Start Group
-
Select Next.
-
To add members, type their name, phone number, or email, or scroll through your current GroupMe contacts.
-
Select Done to create your group.
-
Choose a theme by tapping Customize Group, then tap Choose theme.
-
Choose your theme category, then choose the banner image you want to use.
-
Select Save.
Your new group will now display your theme banner and colors.
Make an existing group a Themed Group:
-
In the Chats tab, select the group you want to change.
-
Select the group’s avatar (profile picture).
-
Select Settings
-
Next to Customize group select Choose Theme, then select Choose Theme again.
-
Choose your theme category, then choose the banner image you want to use.
-
Select Save.
Your group will now display your new theme banner and colors.
Create a new themed group:
-
In the Chats tab, select New chat
-
Select Start Group
-
Select Create Group.
-
To add members, type their name, phone number, or email, or scroll through your current GroupMe contacts.
-
Select Add member(s) to finish creating your group.
-
Next to Customize group select Choose Theme, then select Choose Theme again.
-
Choose your theme category, then choose the banner image you want to use.
-
Select Save.
Your group will now display your new theme banner and colors.


