

Use the Import Data dialog box to control how and where data is added to your workbook.
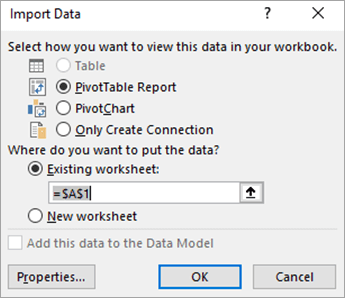
Under Select how you want to view this data in your workbook, do one of the following:
- To create just a PivotTable, select PivotTable Report.
- To create a PivotTable and a PivotChart, select PivotChart and PivotTable Report.
- To store the selected connection in the workbook without creating a PivotTable, select Only Create Connection.
Under Where do you want to put the data, do one of the following:
- To place the PivotTable in an existing worksheet, select Existing worksheet, and then enter the cell reference for where you want to place the PivotTable.
You can also select Collapse Dialog
 to temporarily hide the dialog box, select the beginning cell on the worksheet that you want to use, and then press Expand Dialog
 .
- To place the PivotTable in a new worksheet starting at cell A1, select New worksheet.
Under the separator line at the bottom of the dialog box:
- To use the data in Power Pivot, select Add this data to the Data Model. For more information, see Get started with Power Pivot in Microsoft Excel.
- To verify or change connection properties, select Properties, make the necessary changes in the Connection Properties dialog box, and then select OK. For more information, see Connection properties.