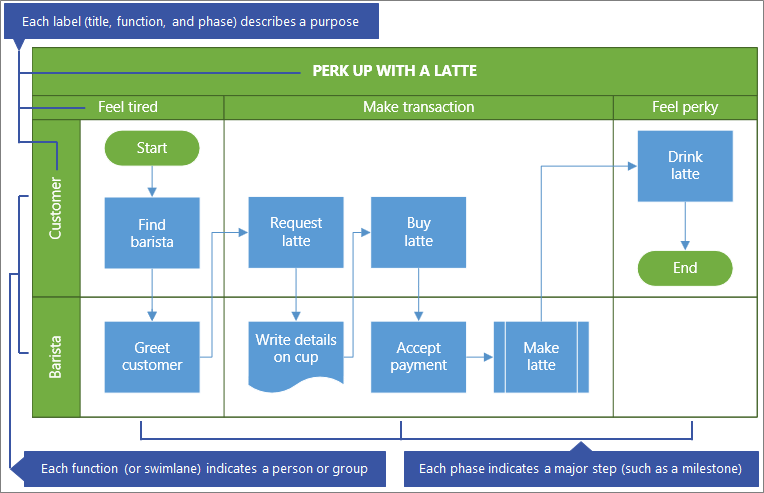
A cross-functional flowchart reveals who does what and when in a grid-like diagram organized into sections. It goes beyond a basic flowchart to show the relationships between functions (such as a stakeholder or department) and phases (such as milestones) in a process.

Before you begin
-
Create the diagram for editing. For more information, see View, create, and edit a diagram in Visio for the web.
-
In the Gallery, scroll down to the Cross Functional Flowchart row, and then select Create. The template opens with two functions and one phase.
Alternatively, you can open starter diagrams, such as Credit Approval Process or Event Planning Process, which may better suit your needs.
Decide the flow chart orientation
The default orientation is horizontal and uses the Swimlane and Separator shapes. But you can change the orientation to vertical by deleting the default diagram and then adding the Swimlane (vertical) and Separator (vertical) shapes.
Note Once you start, you can’t automatically convert from one orientation to another.
Add a swimlane or phase
-
In the Shapes palette on the Shape tabs region, select Cross-Functional Flow Chart Shapes
-
Drag the Swimlane shape
Make sure shapes are dropped on top the diagram.
Change the label text
-
Double-click the text that contains Title, Function, or Phase.
Visio Online switches to text editing and may zoom in on the shape.
-
Enter text that describes the purpose of each component. Function labels are always vertical in orientation.
-
To stop adding text, click outside the shape or press Esc.
Visio Online restores the original view if it automatically zoomed when you began typing.
Note You can’t rotate the label text.
Add flowchart shapes
-
In the Shapes palette on the Shape tabs region, select Basic Flowchart Shapes
-
Create the flow chart diagram. For more information, see Add and connect shapes in Visio for the web.
-
As you create the process diagram, make sure shapes are completely located in the correct swimlane and phase section. For more information, see Select, copy, and move shapes in Visio for the web.
Resize a swimlane or phase
You may want to adjust the size of a swimlane or phase, especially if the process grows larger.
-
To resize the Swimlane shape, select the Swimlane label, and then drag handles left, right, top or bottom.
-
To resize the Separator shape, select the Phase label, and then drag the handles left or right.
Move a swimlane or phase
You may want to move a swimlane or phase, to better organize the shapes in the process.
-
To a move a Swimlane shape, drag the label to a new location. Make sure you drop the shape on top the diagram.
Shapes within the swimlane move with it.
-
Although, you can’t move a Separator shape, you can delete it and then add a new one in a different location.
Delete a swimlane or phase
-
Select the label of the Swimlane shape or Separator shape, and then press DELETE.
All the shapes within the swimlane or phase are also deleted.
Tip To save the shapes, move them completely outside the cross-functional diagram before you delete the Swimlane shape or Separator shape.


