Use the Connect to Microsoft Excel Workbook pages to locate and select the Excel workbook that contains the data you want to import, and then to select the worksheet or range that you want to use.
What workbook do you want to import?
This box lists the most recently used Excel files. If the box is empty you can either type the name of your Excel workbook in the box or click the Browse button to locate it.
-
Type, select from the list, or browse to the Excel workbook that contains data that you want to import.
-
The remainder of the wizard may be optional for you. Do one of the following:
-
Click Finish if you want to import all of the data on the first worksheet of your workbook and let the wizard choose a unique identifier (a key column).
-
Click Next if you want to continue through the wizard to do any of the following:
-
Import data that is not on the first worksheet of the workbook. By default only the data on the first worksheet is imported.
-
Import only part of a very large set of data.
-
Choose a unique identifier (key column) instead of allowing the wizard to choose one for you.
If you click Next you can indicate which worksheet or range you want to use in the next page of the wizard.
-
-
What worksheet or range do you want to use?
This box lists all of the available worksheets and named ranges in the workbook that you selected. (A range is two or more cells in a workbook that have been selected in Excel and then given a name by which the range can be identified.)
Note: 3-D references (named ranges of cells from multiple worksheets) are not available.
Select Custom Range Click this button to select a particular set of cells. The workbook that you selected in the previous wizard page opens in Excel. The Import to Visio dialog box appears. You can either type a range into the Select Range box of the Import to Visio dialog box, or you can select the cells directly in the workbook. If you select the cells in the workbook, the dialog box stays on top of the open worksheet while you make your selection and the range appears in the Select Range box.
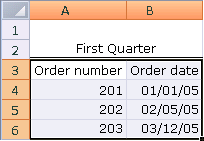
If you choose to select a custom range, be sure to include all of the column headings in your selection. The figure below shows an example of how to select the cells in such a worksheet.
First row of data contains column headings This check box is selected by default. It is a good idea to make sure that the top cell in each column in your Excel worksheet (or your custom range) contains column headings rather than a row of data. Headings are not required, but they make the imported data much easier to work with.
The remaining pages of the wizard may be optional for you. Do one of the following:
-
Click Finish if you want the wizard to choose a unique identifier (key column) for you.
-
Click Next to choose your own unique identifier (key columm).


