
You can manage records in your organization even if you don’t have a Records Center site. If your company has separate document storage areas—by division for example—where all important documents are kept, then it’s not always advantageous to store records in any one centralized repository. Instead, you may want to update documents and store records all in one collaborative environment. Declaring items as records “in place” enables you to work with your records and documents in any list or library, on any SharePoint site.
Declare an item as a record in SharePoint in Microsoft 365
In SharePoint in Microsoft 365, we've introduced using retention labels to declare content as records, which effectively replaces the need to use the Records Center. If you're using the Records Center, you can continue to use it alongside retention labels. But moving forward, for the purpose of records management, we recommend using retention labels instead of the Records Center. For more information, see Apply retention labels to files in SharePoint or OneDrive.
Declaring any list or library item as a record in SharePoint Server
Note: The information that follows assumes that you have already configured in-place records management at the site collection level.
With the proper permissions, you can declare most list or library items as records. This enables you to use all of records management features on any item in most lists or libraries and on any site.
Note: You must have at least Contribute permissions to declare items as records.
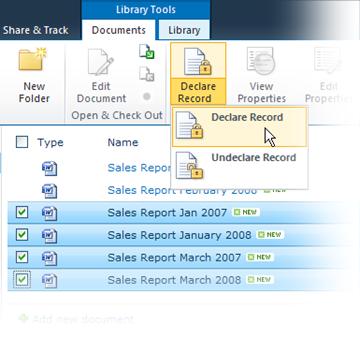
To declare an item as a record
-
Navigate to the site and list or library that contains the item(s) that you want to declare as a record.
-
Depending on whether you are working with a list or library, click the Items tab or the Documents tab on the Ribbon.

-
Move your cursor to the left of the item that you want to declare as a record, and select the checkbox that appears.
Tip: To declare several items as records simultaneously, select the check boxes next to multiple items.
-
Select Declare Record on the ribbon.
-
Items that have been declared as records are identified with a padlock symbol

Undeclaring a list or library item as a record in SharePoint Server
To undeclare an item as a record
-
Navigate to the site and list or library that contains the item(s) that you want to undeclare as a record.
-
Depending on whether you are working with a list or library, click the Items tab or the Documents tab on the Ribbon.
-
Move your cursor to the right of the item that you want to undeclare as a record, select the downward arrow that appears and then select Compliance Details.
-
Next to Record Status, click Undeclare Record. You are prompted to confirm that you want to undeclare the item as a record.
Note: The Undeclare option only appears for items previously declared as records.
-
Click OK.
Note: The padlock symbol is removed from undeclared records.


