Important: If you're looking for help with FindTime, please note that as announced in July 2022, scheduling poll has replaced the FindTime Outlook add-in. Learn more
Instead of dealing with endless email messages, chats, and calendar conflicts, use a scheduling poll to save time and reduce back-and-forth when trying to find a time that works for everyone.
To learn more about Outlook Scheduling Poll, select the version of Outlook you’re using:
Scheduling Poll for Outlook for Windows (latest version) and Outlook on the web
Important: This version of Scheduling Poll is currently being released. You may not see this feature as it's described until it's available in your region.
Before you get started, here are a few things to know about scheduling polls:
-
People outside your organization can vote using a secure website link that’s created when you set up a scheduling poll.
-
Scheduling polls aren’t supported with shared email accounts or group calendars.
-
Currently, calendar delegates cannot create new scheduling polls or vote on behalf of the main calendar owner.
-
When a new scheduling poll is created, temporary holds are placed on everyone’s calendars to help reserve time. Holds are removed when the organizer chooses the final time for the event.
Create a scheduling poll
To create a scheduling poll:
-
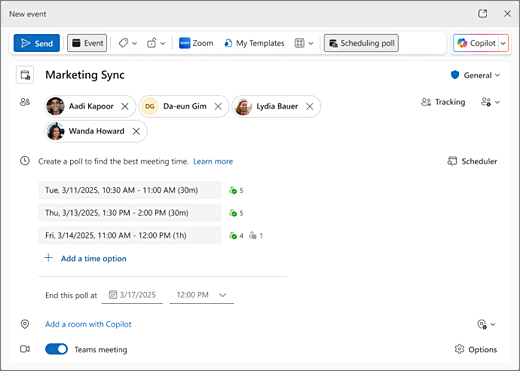
Select New event or right-click a time on your calendar and select New event.
-
Add attendees.
-
Select the date and time area and then select the first day that you would consider for your event. The date you select here will influence the poll time option recommendations that you get (recommendations will be after that date).
-
Select
-
Review the suggested time options (these times are based on the best attendee availability). To delete a suggested time option, hover over the time option and select
Note: Currently, you can include up to 15-time options in a poll, however 3-5 options are recommended, so attendees don’t get overwhelmed when voting.
-
Optional: Choose a poll end date and time.
-
Add the rest of your meeting information if you haven’t already (title, room, agenda, attachments) and select Send. The scheduling poll is sent to attendees, and a secure polling webpage is created.
Note: Time options aren’t editable once you’ve added them to a poll. Instead, just delete the time options you don’t want and add new time options by selecting
Holds are reserved on everyone's calendar for each scheduling poll time option
To make sure other meetings aren’t scheduled over your meeting’s time options, holds are created on everyone’s schedules as soon as a poll is sent.
For organizers, all time option holds appear as Busy.
For attendees, all time option holds appear as Tentative until they vote.
-
If an attendee votes Yes on a time option, the hold appears on their calendar as Busy.
-
If an attendee votes No on a time option, the hold appears on their calendar as Free.
-
If an attendee doesn’t vote on a time option, the hold appears on their calendar as Tentative.
Use filters to easily see scheduling poll time options on your calendar
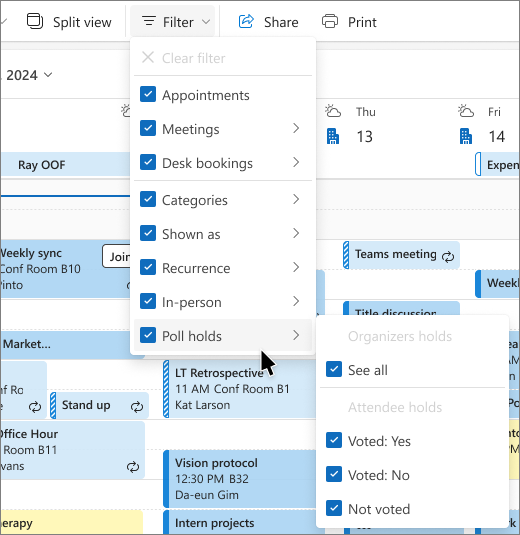
To quickly find your poll time option holds on your calendar, select
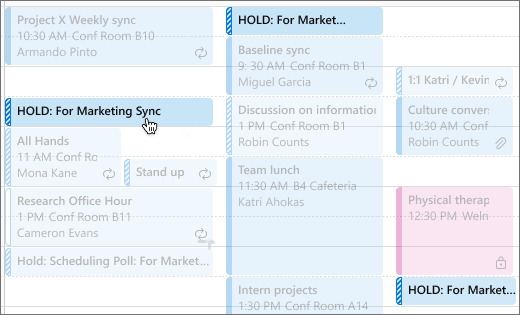
Alternatively, hover over any time option hold on your calendar and all holds for that poll will be highlighted temporarily.
How to vote in a scheduling poll
Once attendees receive the scheduling poll email in their inbox, they can vote on their preferred times. There are a few different ways to vote.
Note: The different ways to vote may differ depending on the version of Outlook you're using.
Vote from the scheduling poll invitation email
-
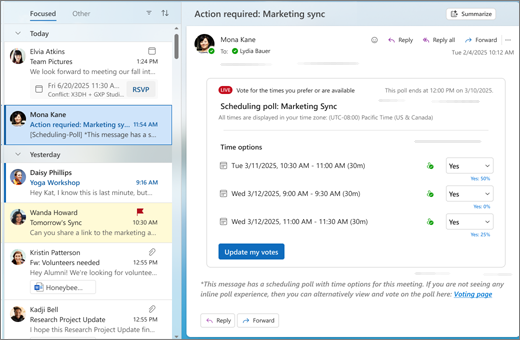
Open the scheduling poll email in your inbox.
-
Review the time options.
-
Vote Yes for times you like, and No for times that you don’t like or don’t work for your schedule.
Tip: The person icon next to a time option shows your own availability for that date and time.
Vote from your calendar
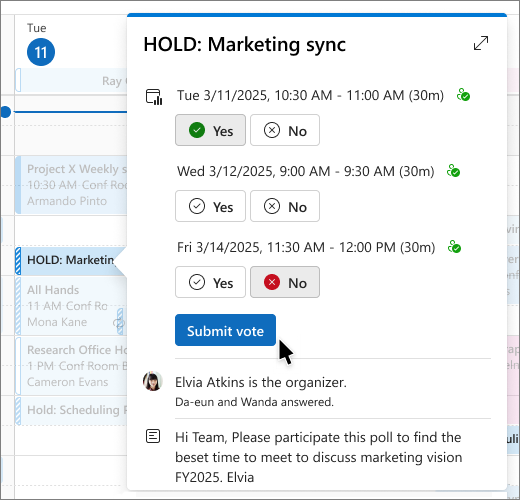
Once a scheduling poll is sent by the organizer, tentative holds are placed on attendees’ calendars and are labeled HOLD in the title. To vote, click the meeting on your calendar grid, select Yes or No for each time option, and then select Submit vote.
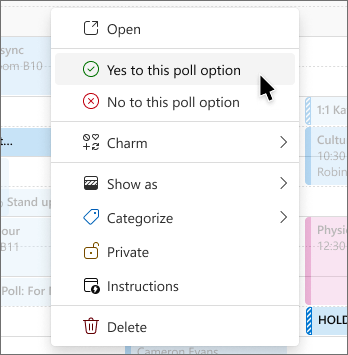
Another way to vote is to right-click any hold on your calendar.
Vote from the event
Attendees can vote on scheduling poll times directly from the event. Double-click the event on your calendar to open it and vote.
Vote from the secure scheduling poll voting webpage
When a scheduling poll is created, a corresponding secure webpage is also created and a link to that page is included in the scheduling poll email. Anyone can use the webpage to vote, and it’s the only way that people outside of your organization can vote for the times they prefer.
Make changes to a scheduling poll
The organizer can make changes to a scheduling poll from their calendar.
-
Double-click any poll time hold on your calendar.
-
Make your changes by adding or removing time options or attendees, or by updating the title, agenda, or event attachments, and then select Send.
Review voting results and choose a final time
After all attendees have voted, the organizer can choose the final event time(s).
-
Open the event.
-
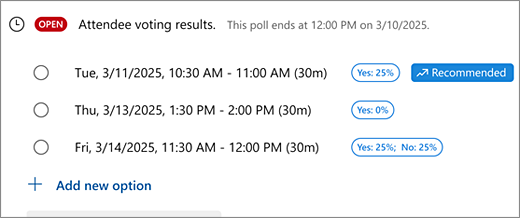
Choose the time with the most Yes votes.
-
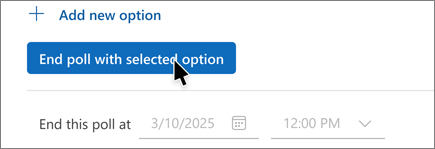
Select End poll with selected option.
All holds will be removed from everyone’s calendar, and the event will be updated with the final time.
Frequently asked questions (FAQs)
Can I create a scheduling poll with more than 15 time options? No. The current limit is 15.
Can attendees outside of my organization vote? Yes. They use the secure website link in the scheduling poll email.
Can I change my vote? Yes, until the organizer chooses a final time and ends the scheduling poll or until the poll expires.
Can I propose a new time? No, not at this time.
Will my calendar update automatically? Yes. Holds are added when you receive a scheduling poll and are removed when a final time is chosen by the organizer.
Can I forward a scheduling poll to others? No, attendees cannot forward scheduling polls. Only the organizer can add or remove attendees.
Scheduling Poll for classic Outlook for Windows and Outlook for Mac
The scheduling poll feature is used to schedule meetings via polling. The organizer can send multiple time options through the scheduling pollfeature and minimize the back-and-forth emails about scheduling.
The scheduling poll feature is currently available to users of Microsoft 365 Apps for business or enterprise plans that include Exchange Online. It is currently supported for GCC tenants, excluding GCC High.
A meeting organizer is required to have a mailbox in Microsoft 365 Exchange Online to be able to use the scheduling poll feature, while anyone with a valid email address can be an attendee in a meeting that utilizes the scheduling poll feature for polling. This feature is not available to organizers with mailboxes on an Exchange On-Premises server. It is also not supported for shared mailboxes.
Here's the list of Scheduling Poll articles:
Create a poll using scheduling poll
Scheduling poll organizer dashboard
Privacy and personal data protection
Notes:
-
For Microsoft 365 Tenant Admins:
-
If you have configured EWSApplicationAccessPolicy to enforce EWSAllowlist in your organization, you must add the following entries to your 'allow list' (please note that these entries are case-sensitive):
-
Set-OrganizationConfig -EwsAllowList @{Add="Microsoft.OWS.*"}
-
Set-OrganizationConfig -EwsAllowOutlook $true
-
Set-OrganizationConfig -EwsAllowMacOutlook $true


