
8/30/2012 7:16 AM
Sean Wallbridge and Jarrod Ferguson of itgroove (www.itgroove.net)
Note: This article is part of a collection of posts from four years of the Get the Point blog for SharePoint end-users.
This post aims to help SharePoint information workers facilitate business processes by using SharePoint and InfoPath in a creative and visual manner.
As an example, let's say you’re in running a busy medical clinic and it’s time for you to implement a more efficient system. You opt to install a touch-screen kiosk, allowing patients to enter their own information directly into the intake system. You decide that a SharePoint-integrated InfoPath form is the solution you need. Let’s lay out our requirements, as follows:
We must accommodate:
-
60 patients an hour
-
Each patient must receive a diagnosis
-
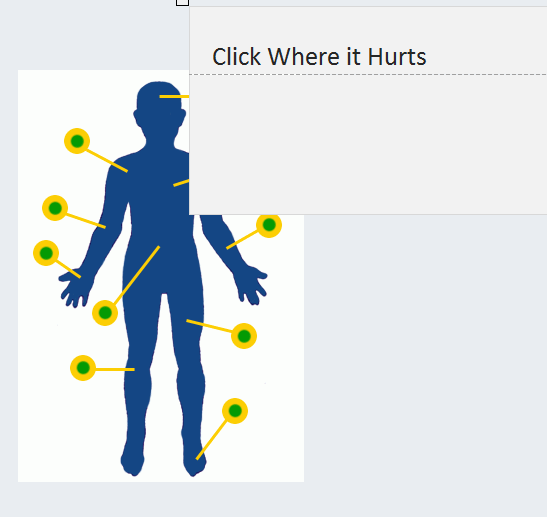
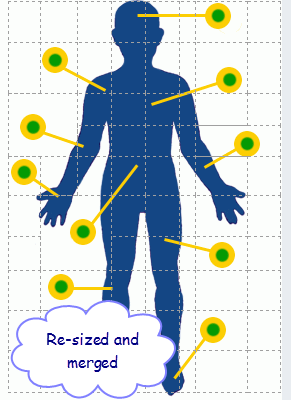
Patients suffering variously from injuries to any of the following areas: the Brain, Shoulders, the Chest, Elbows, Forearms, Hands/Wrists, the Belly, Thighs, Knees and Ankles/Feet
Our team:
-
10 Doctors (1 each for the 10 areas specified above)
-
Each specialist Doctor can successfully diagnose a typical patient suffering in their area of expertise in 10 minutes
-
Under certain circumstances, each Doctor takes 20 minutes to successfully diagnose the patient
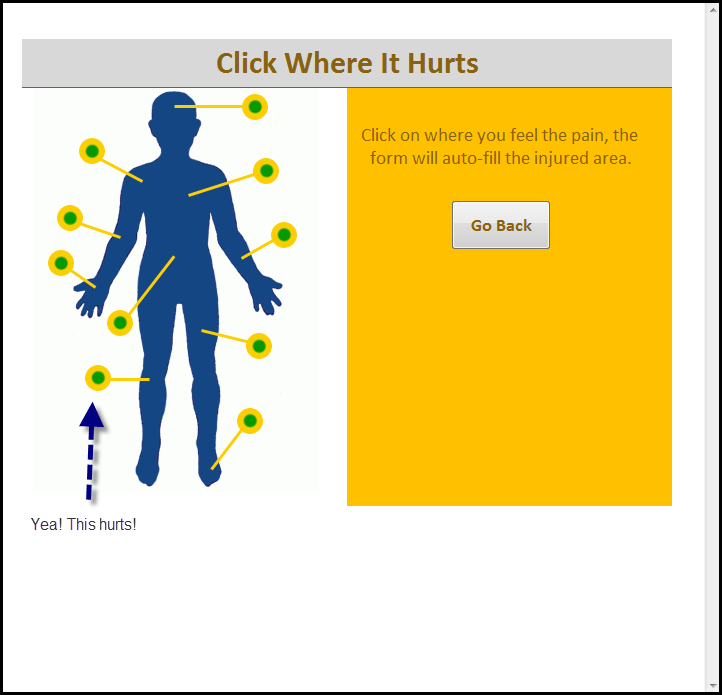
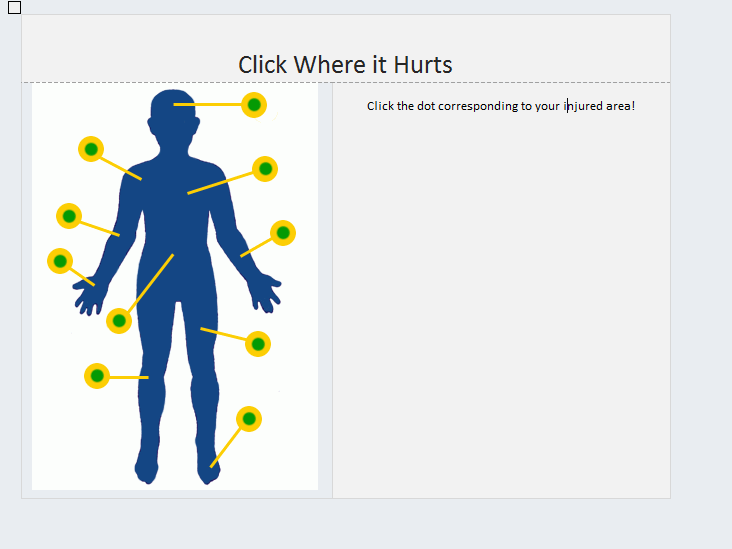
The legacy method with a human receptionist operated with a simple queue of patients - assigned first come, first serve to whichever Doctor was available at the time. If we send each patient to the proper specialist, at 6 patients per area every hour, 10 minutes per patient with the specialized Doctor, we’re 100% efficient. But in some cases, when a patient speaks a foreign language, for example, they don’t know what the injured body part is called and need guidance on classifying where their ailment is. In the old system, until their name was called and they got in the office with the Doctor, we could merely hope it was the correct specialist. Instituting a clickable InfoPath Form that shows and labels body parts can help solve that problem. Start with an empathetic introduction that matches the customer’s emotional state. Clearly state the intent. Then solve it or show them the path to the solution.

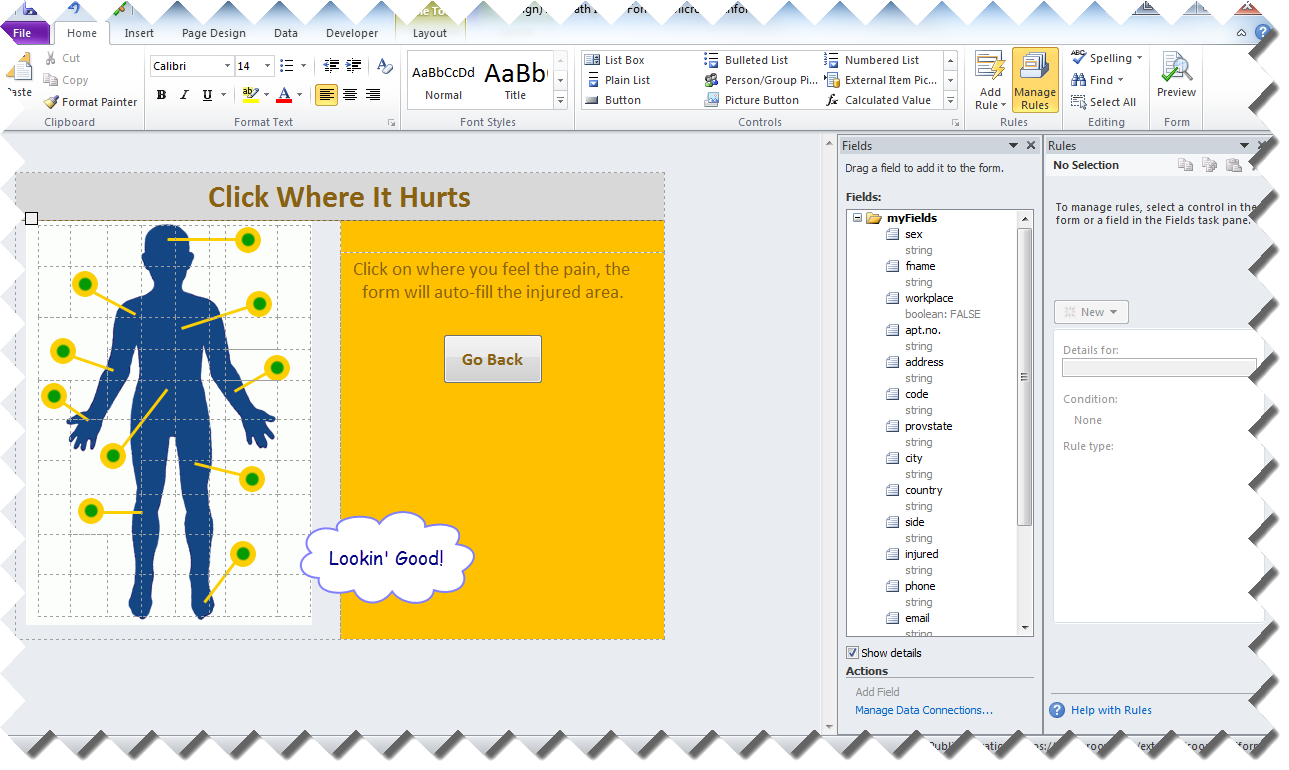
So, let’s see what happens when we click Show Us Where It Hurts…
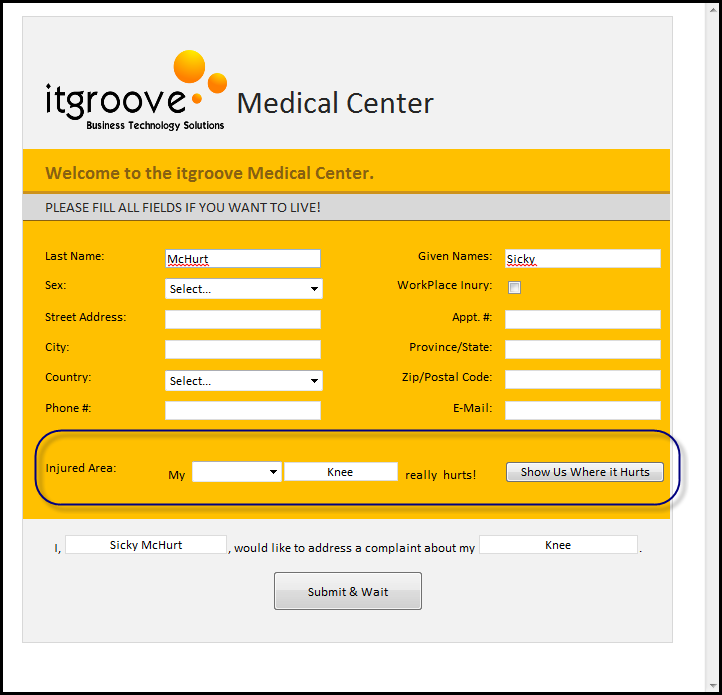
Now the patient can continue…
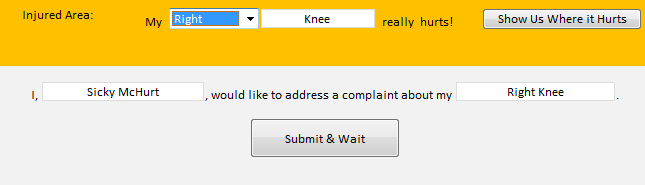
And finally...
As the documents are submitted, they enter a library in SharePoint that every Doctor will have access to. One view per body part, one specialist per view, and we have a list that each specialist can see, organized by submission time (first come, first serve), showing which patient to call from the waiting room next.

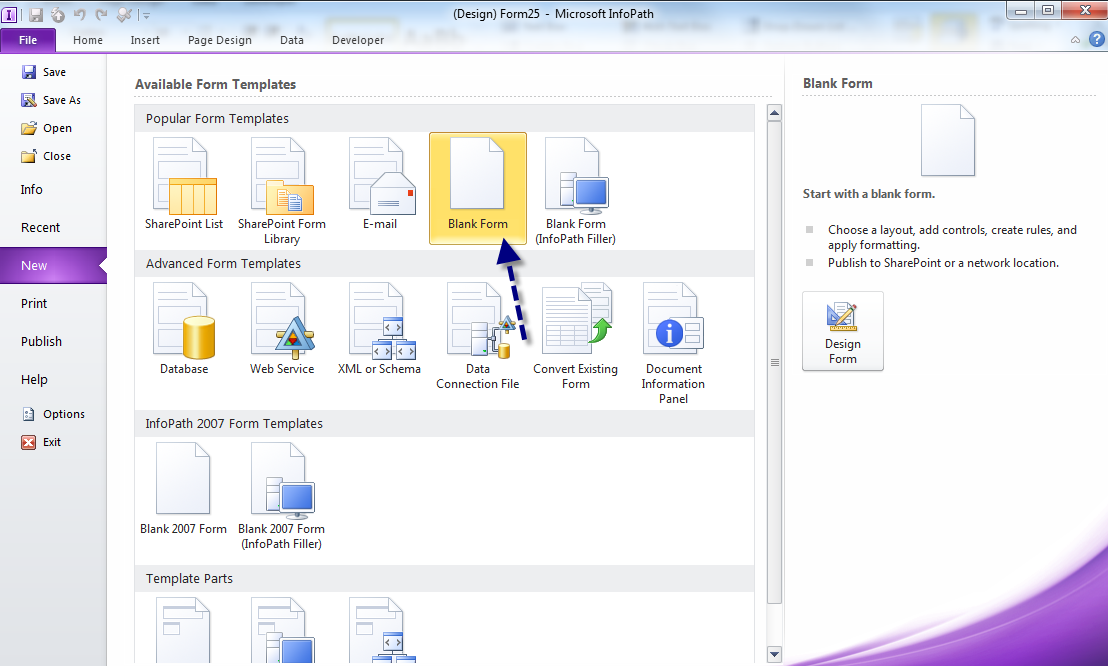
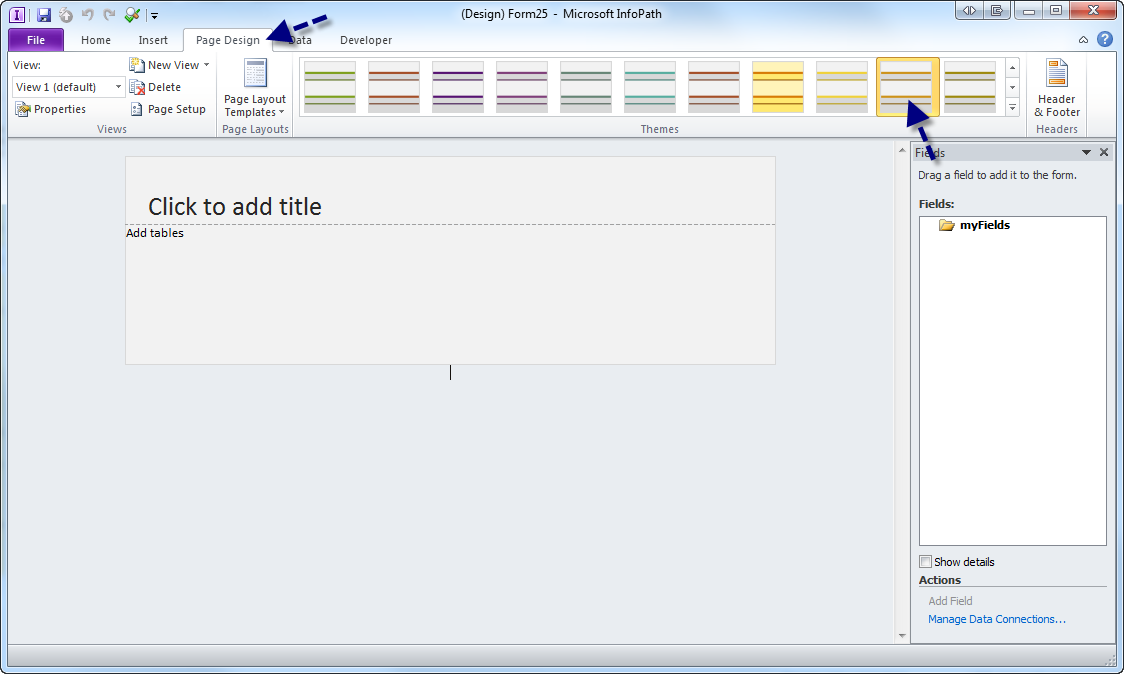
For a general look at how to set this up, start by opening InfoPath.
For information about using InfoPath, please visit https://msdn.microsoft.com/en-us/office/aa905434.aspx
-
Create a new ‘Blank’ InfoPath form.
-
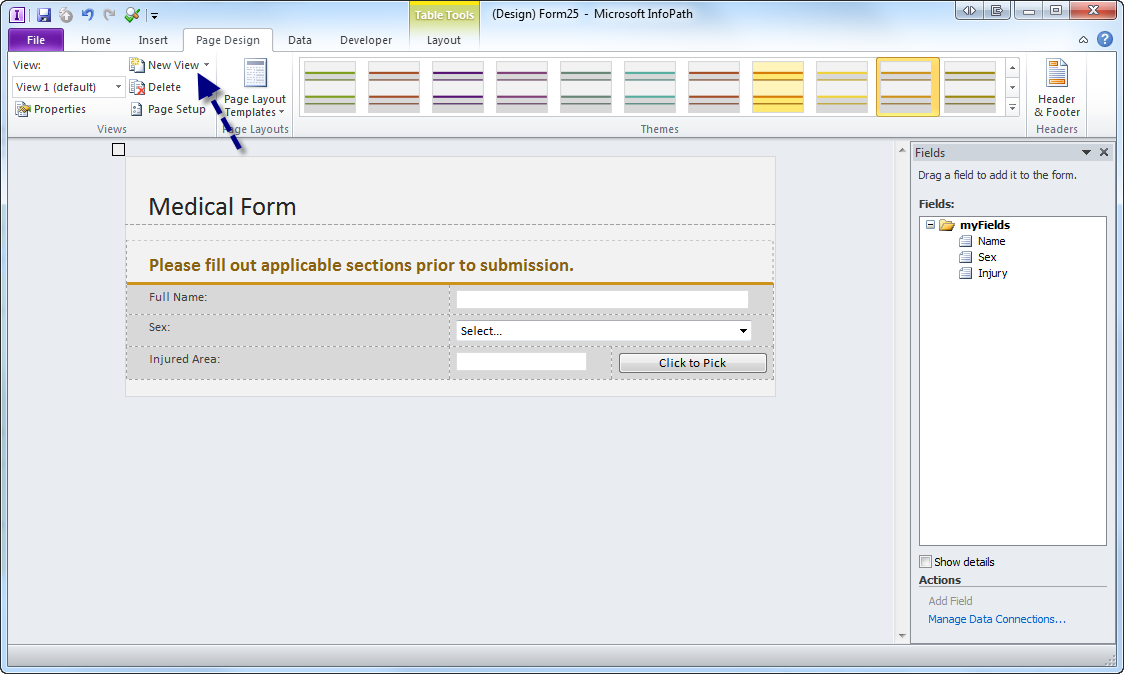
Design your form. For this, I used an orange-gray template.
-
Insert a table, again I used a template. Make any personalization with shading, borders, font as you would like- I try to keep it pretty uniform and tidy (except in my finished product, I put in a bit more orange and a logo). From here, fill out your labels and controls.

Hint: Be sure to name your control fields properly—do this by going to the control field’s Properties.
-
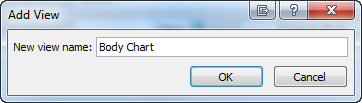
Create a new view, where we will have our clickable image. Go to Page Design and click New View, and name it.
-
Under the Page Design tab in your ribbon, select Page Setup. In the View Properties window that pops up, select the General Tab and check the “Use a background picture” box. Navigate to your picture and select Open.
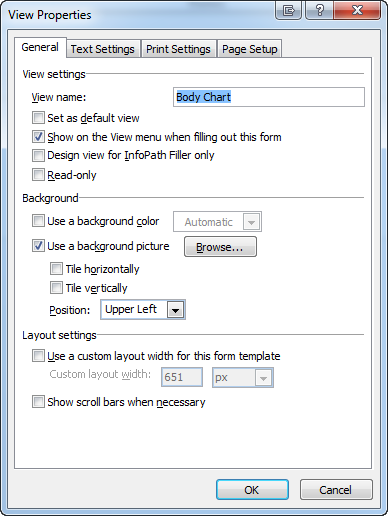
Note: When your image pops up, by default it will not tile and will be position in the Upper Left (both of these are changeable in the View Properties).
-
Align your form with your picture. I used Adobe Photoshop to create a transparent background around my image, so I am able to keep a title at the top of my page. Next, I will split the 2nd row (big column) in my table into two columns- one for the clickable image, one for anything else.
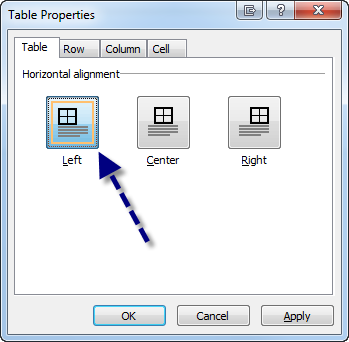
To start changing this, go to Table Properties.
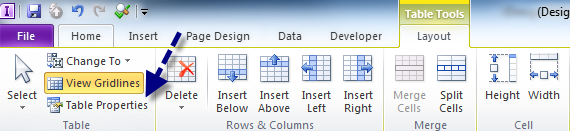
Align the table where you need it (in my case, it was to the left to the left).
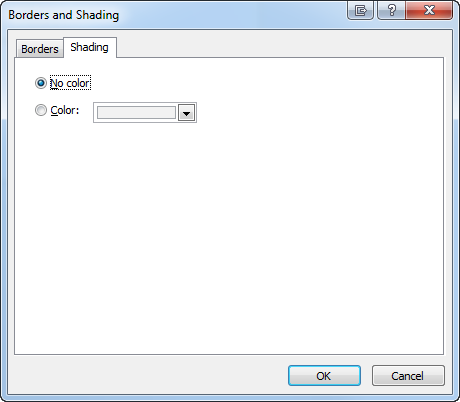
Now we will split our big cell, and we will change the background of the covering cell to transparent.
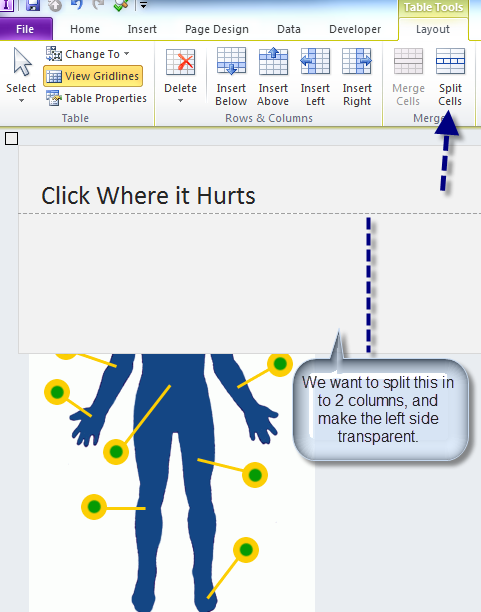
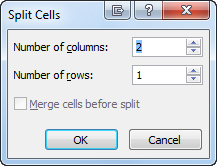
Right-click on your new left column, select Borders and Shading, then go to the Shading tab. Click the “No color” box and hit OK.
Now re-size your table as needed, and we have our table all set up- as so:
-
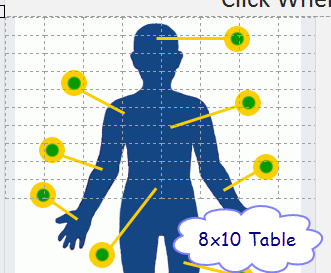
Time to build our clickable buttons. This can be accomplished in many ways, however a basic rule of thumb would be that the simpler the picture is, the easier this would be. For a relatively complicated picture like the one I am using (10 “buttons,” not lined up horizontally or vertically) I used a pretty clunky table. Again, this part is fully up to you- I do recommend using a table- but not necessarily as complex as mine.
-
I used an 8x10 table
-
Resize the table as needed (you want to fit your “Clickable Area” in to one square)
-
Merge Columns/Rows as needed
-
Get a transparent image ready (I used a 50 pixel x 50 pixel blank, transparent .PNG)
Click on the Home tab, and select the “Picture Button” Control.

Right-click on the new button, go to Properties, select your transparent picture (in General Tab) and re-size it as needed. As all of the Green & Yellow dots in my Body Parts image are the same size, I decided to go with a uniform size on every button. Click OK.

Personally, the quickest way for me to build the button map was to build one button, set the Rule, then copy and paste it in to every cell that I needed one. Of course depending on your image, this is up to you.
Note: To align the buttons perfectly, each button may need to have specific margins set, as you can see above.
-
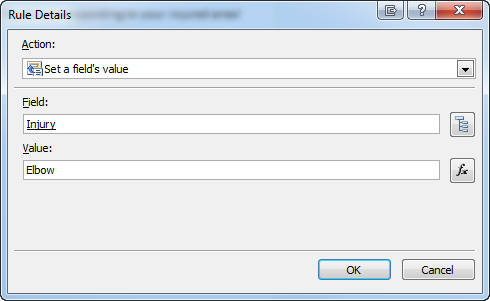
Set up the Button Rules. In the General tab, click Add Rule (while you have your button selected). If you do in fact copy & paste your buttons, just use the manage rule button and alter the following. Add a “Set a Field’s Value” rule, set the field you want to change (likely in your other view) and set your value.
Now add a second rule to change the view back. This means whn this transparent button is clicked, it will set the selected value and then change back to your default form view. Add a 'Switch Views' rule, and select the view you would like to switch back to.
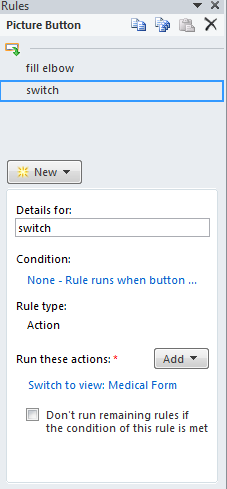
Repeat with all of your buttons, pretty up your page, and voila!
You’re done! Now just publish it to a SharePoint library to substantially improve efficiency at your clinic.
Good Luck!


