A key part of using forms is sending invitations to an audience and managing their responses through notifications.
Invite the audience to your form
When you share a form, you can select individuals or groups, from a people-picker, as the audience for your form.
-
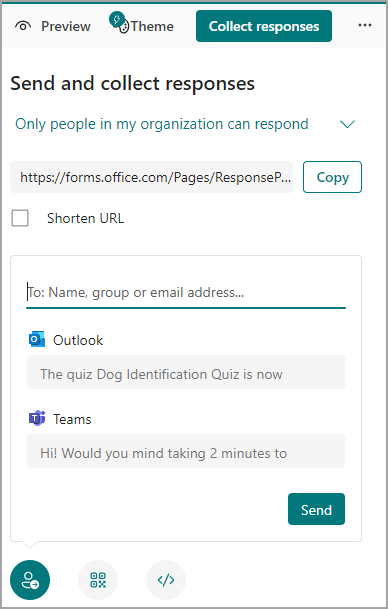
Select Collect responses.
-
Select the audience from these options: Anyone can respond, Only people in my organization can respond, Specific people in my organization can respond.
Note: When you select Specific people in my organization can respond, complete the Enter a name, group, or email address field.
-
Copy the URL. Select Copy and select the Shorten URL checkbox if you want a shorter URL than what's provided.
Note: The Shorten URL option is not available when signed in to Forms with a Microsoft personal account (Hotmail, Live, or Outlook.com) or if you're using the mobile site.
-
Select an invitation icon for your chosen delivery method. The options are:Contact Link
Notes:
-
Applies if you have Exchange online.
-
If you are sending a form or quiz out in Teams, you can send it to a person, a chat group in Teams, or a Teams channel when you select the invitees.
-
When you enter an Outlook address for an addressee, the Outlook checkbox if filled by default.
QR Code
Note: Insert the downloaded .png wherever your intended audience can scan it with a QR code scanner.
Embed
-
Note: Anyone who receives the form link through email will be able to forward your email to other people who can potentially see and complete your form. If your form, however, is set to Only people in my organization can respond or Specific people in my organization can respond, only individuals and groups you define - whether everyone in your organization or just specific individuals and groups - can view and respond to your form (even if the email has been forwarded to them).
Turn on notifications
You can turn on notification messages on the invitation confirmation window or the settings pane.
Confirmation window
To turn notifications on, select the Get notification messages toggle.
To turn notifications off, select the Get notification messages toggle again.
Settings pane
Select
Note: Avoid turning off notifications immediately, so that you can receive the first notification email after one day.
Send reminders
There are two ways to send reminders to your audience.
-
Through an email notification you receive the day after sending a form or quiz to an audience-Select Send reminder.
Notes: There are two versions of notification mail.
-
An actionable message which is only available in Outlook
-
An HTML version in other mail clients like Windows Mail
-
Through the responses tab of the form or quiz-Select Remind them.


