Note: This article has done its job, and will be retiring soon. To prevent "Page not found" woes, we're removing links we know about. If you've created links to this page, please remove them, and together we'll keep the web connected.
With Open Up Resources and Office 365 Education, you can create a OneNote Class Notebook that's pre-populated with standards-aligned ELA content. In one digital notebook, you can access enough material for an entire ELA course, from daily lesson plans to assessments—like a digital textbook, but better.
The structure of your Class Notebook can keep your class materials organized, back everything up to the cloud, and easily distribute content to students when you need to. Learn more about Office 365 Education and sign up now for free.
Create an Open Up Resources ELA notebook
To begin, you'll need your Open Up Resources welcome email and the Class Notebook Add-in for OneNote. Download the free Class Notebook add-in for OneNote if you don't have it yet.
-
Open the link provided in your welcome email and sign in with your school account.
-
Select Create Class Notebook. Give your class a name and select Next.
-
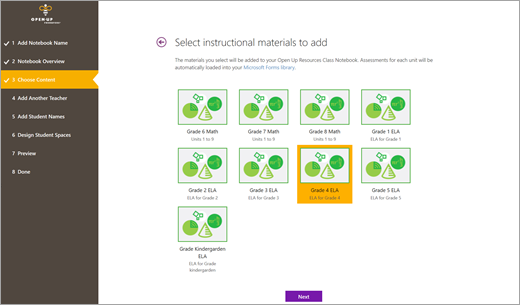
Choose the ELA instructional material you’ll be using in this class and select Next.

-
Optional: Add co-teachers and students to your Class Notebook. You can complete these actions later if you want.
-
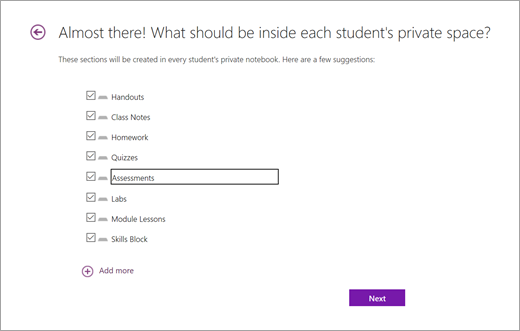
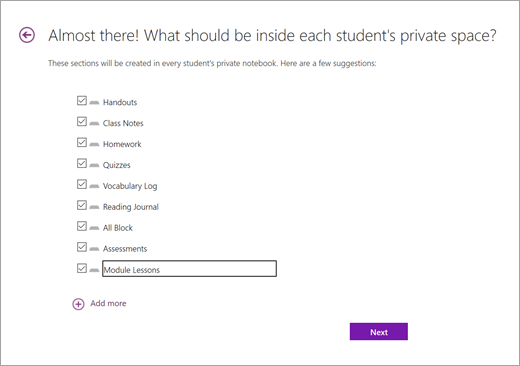
Select or edit the sections you’d like to include in every student's notebook. Handouts, Class Notes, Homework, and Quizzes will be added automatically as part of the Class Notebook structure.
Note: To match your notebook to the pre-populated Open Up Resources ELA content, add sections to student notebooks that will correspond to those Open Up content sections. You can edit these sections any time by navigating to Manage Notebooks under the Class Notebook tab of your notebook.
If you're creating a notebook with K-2 ELA materials, add the following sections: Assessments, Labs, Module Lessons, and Skills Block.

If you're creating ELA notebooks for grades 3-5, add: Vocabulary Log, Reading Journal, All Block, Assessments, and Module Lessons.

-
Preview your new notebook, then select Create.
Your Open Up Resources notebook, populated with ELA standards-aligned materials, is now ready to use.
Explore the structure of your Open Up Resources ELA notebook
Open your Open Up Resources ELA notebook in OneNote 2016 or OneNote for Windows 10 to see how your content is organized.
Each notebook includes:
-
A Content Library, where teachers can share course content for their students to reference. All materials in this space are read-only for students.
-
A Collaboration Space, where teachers and students can work together on course curriculum and projects.
-
A private notebook for each student, with designated sections for homework, assessments, notes, and other initiatives. Your Class Notebook is designed to allow you to distribute content to all of your students' notebooks at once.
-
An optional addition of a Teacher-Only section group, from where you can develop course materials privately and push assignments out to your students.
Learn more about how your Class Notebook is set up here.
Distribute content to your students
An Open Up Resources Class Notebook allows you to determine how—and when—you deliver content to your students. Choose an option that works best for you and your teaching preferences.
Tip: Release blank Student Resources content to your notebook’s Content Library and distribute it directly to your student’s private notebooks. That way, the Content Library will function like a textbook to be referenced later, including for new students.
Reminder: You can edit your students’ Class Notebook sections to match the content in the Student Resources section by navigating to Manage Notebooks.
Copy content from your Teacher-Only section group into the Content Library:
1. Right-click a page or section.
2. Select Move or Copy.
3. Select a destination in the notebook’s Content Library.
Distribute pages to students’ private Class Notebooks:
1. Navigate to the page you'd like to distribute to your students.
2. Select the Class Notebook tab, then Distribute Page.
3. Choose the section of your students’ notebook you’d like the page copied to.
4. Ask your students to sync their notebooks by right-clicking their notebook name and selecting Sync this Notebook Now.
Note: You can also distribute pages to individual students or student groups during this step.
Learn more:
Distribute pages and sections to all students in a Class Notebook


