
Summary
This article describes how to enable Transport Layer Security (TLS) protocol version 1.2 in a Microsoft System Center 2012 R2 environment.
More Information
To enable TLS protocol version 1.2 in your System Center environment, follow these steps:
-
Install updates from the release.
Notes-
Install the latest update rollup for all System Center components before you apply Update Rollup 14.
-
For Data Protection Manager and Virtual Machine Manager, install Update Rollup 13.
-
For Service Management Automation, install Update Rollup 7.
-
For System Center Orchestrator, install Update Rollup 8.
-
For Service Provider Foundation, install Update Rollup 12.
-
For Service Manager, install Update Rollup 9.
-
-
-
Make sure that the setup is as functional as it was before you applied the updates. For example, check whether you can start the console.
-
Change the configuration settings to enable TLS 1.2.
-
Make sure that all required SQL Server services are running.
Install updates
|
Update activity |
SCOM1 |
SCVMM2 |
SCDPM3 |
SCO4 |
SMA5 |
SPF6 |
SM7 |
|
Make sure that all current security updates are installed for Windows Server 2012 R2 |
Yes |
Yes |
Yes |
Yes |
Yes |
Yes |
Yes |
|
Make sure that the .NET Framework 4.6 is installed on all System Center components |
Yes |
Yes |
Yes |
Yes |
Yes |
Yes |
Yes |
|
Install the required SQL Server update that supports TLS 1.2 |
Yes |
Yes |
Yes |
Yes |
Yes |
Yes |
Yes |
|
Yes |
No |
Yes |
Yes |
No |
No |
Yes |
|
|
Make sure that that CA-signed certificates are either SHA1 or SHA2 |
Yes |
Yes |
Yes |
Yes |
Yes |
Yes |
Yes |
1 System Center Operations Manager (SCOM)
2 System Center Virtual Machine Manager (SCVMM)
3 System Center Data Protection Manager (SCDPM)
4 System Center Orchestrator (SCO)
5 Service Management Automation (SMA)
6 Service Provider Foundation (SPF)
7 Service Manager (SM)
Change configuration settings
|
Configuration update |
SCOM1 |
SCVMM2 |
SCDPM3 |
SCO4 |
SMA5 |
SPF6 |
SM7 |
|
Yes |
Yes |
Yes |
Yes |
Yes |
Yes |
Yes |
|
|
Yes |
Yes |
Yes |
Yes |
Yes |
Yes |
Yes |
|
|
Yes |
No |
Yes |
Yes |
No |
No |
No |
.NET Framework
Make sure that the .NET Framework 4.6 is installed on all System Center components. To do this, follow these instructions.
TLS 1.2 support
Install the required SQL Server update that supports TLS 1.2. To do this, see the following article in the Microsoft Knowledge Base:
3135244 TLS 1.2 support for Microsoft SQL Server
Required System Center 2012 R2 updates
SQL Server 2012 Native client 11.0 should be installed on all the following System Center components.
|
Component |
Role |
|
Operations Manager |
Management Server and Web Consoles |
|
Virtual Machine Manager |
(Not required) |
|
Orchestrator |
Management Server |
|
Data Protection Manager |
Management Server |
|
Service Manager |
Management Server |
To download and install Microsoft SQL Server 2012 Native Client 11.0, see this Microsoft Download Center webpage.
For System Center Operations Manager and Service Manager, you must have ODBC 11.0 or ODBC 13.0 installed on all management servers.
Install the required System Center 2012 R2 updates from the following Knowledge Base article:
4043306 Description of Update Rollup 14 for Microsoft System Center 2012 R2
|
Component |
2012 R2 |
|
Operations Manager |
Update Rollup 14 for System Center 2012 R2 Operations Manager |
|
Service Manager |
Update Rollup 14 for System Center 2012 R2 Service Manager |
|
Orchestrator |
Update Rollup 14 for System Center 2012 R2 Orchestrator |
|
Data Protection Manager |
Update Rollup 14 for System Center 2012 R2 Data Protection Manager |
Note Make sure that you expand the file contents and install the MSP file on the corresponding role, except Data Protection Manager. For Data Protection Manager, install the .exe file.
SHA1 and SHA2 certificates
System Center components now generate both SHA1 and SHA2 self-signed certificates. This is required to enable TLS 1.2. If CA-signed certificates are used, make sure that the certificates are either SHA1 or SHA2.
Set Windows to use only TLS 1.2
Use one of the following methods to configure Windows to use only the TLS 1.2 protocol.
Method 1: Manually modify the registry
Important: Follow the steps in this section carefully. Serious problems might occur if you modify the registry incorrectly. Before you modify it, back up the registry for restoration in case problems occur.
Use the following steps to enable/disable all SCHANNEL protocols system-wide. We recommend that you enable the TLS 1.2 protocol for incoming communications and enable the TLS 1.2, TLS 1.1, and TLS 1.0 protocols for all outgoing communications.
Note Making these registry changes does not affect the use of Kerberos or NTLM protocols.
-
Start Registry Editor. To do this, right-click Start, type regedit in the Run box, and then select OK.
-
Locate the following registry subkey:
HKEY_LOCAL_MACHINE\System\CurrentControlSet\Control\SecurityProviders\SCHANNEL\Protocols
-
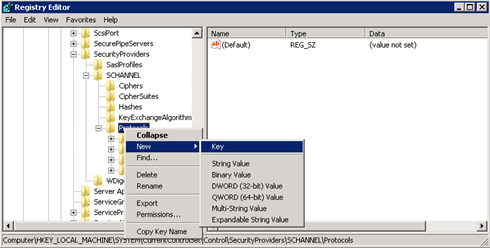
Right-click the Protocol key, point to New, and then click Key.
-
Type SSL 3, and then press Enter.
-
Repeat steps 3 and 4 to create keys for TLS 0, TLS 1.1, and TLS 1.2. These keys resemble directories.
-
Create a Client key and a Server key under each of the SSL 3, TLS 1.0, TLS 1.1, and TLS 1.2 keys.
-
To enable a protocol, create the DWORD value under each Client and Server key as follows:
DisabledByDefault [Value = 0]
Enabled [Value = 1]
To disable a protocol, change the DWORD value under each Client and Server key as follows:DisabledByDefault [Value = 1]
Enabled [Value = 0] -
On the File menu, select Exit.
Method 2: Automatically modify the registry
Run the following Windows PowerShell script in Administrator mode to automatically configure Windows to use only the TLS 1.2 Protocol:
$ProtocolList       = @("SSL 2.0","SSL 3.0","TLS 1.0", "TLS 1.1", "TLS 1.2")
$ProtocolSubKeyList = @("Client", "Server")
$DisabledByDefault = "DisabledByDefault"
$Enabled = "Enabled"
$registryPath = "HKLM:\\SYSTEM\CurrentControlSet\Control\SecurityProviders\SCHANNEL\Protocols\"

foreach($Protocol in $ProtocolList)
{
    Write-Host " In 1st For loop"
	foreach($key in $ProtocolSubKeyList)
	{
		$currentRegPath = $registryPath + $Protocol + "\" + $key
		Write-Host " Current Registry Path $currentRegPath"

		if(!(Test-Path $currentRegPath))
		{
		    Write-Host "creating the registry"
			New-Item -Path $currentRegPath -Force | out-Null
		}
		if($Protocol -eq "TLS 1.2")
		{
		    Write-Host "Working for TLS 1.2"
			New-ItemProperty -Path $currentRegPath -Name $DisabledByDefault -Value "0" -PropertyType DWORD -Force | Out-Null
			New-ItemProperty -Path $currentRegPath -Name $Enabled -Value "1" -PropertyType DWORD -Force | Out-Null

		}
		else
		{
		    Write-Host "Working for other protocol"
			New-ItemProperty -Path $currentRegPath -Name $DisabledByDefault -Value "1" -PropertyType DWORD -Force | Out-Null
			New-ItemProperty -Path $currentRegPath -Name $Enabled -Value "0" -PropertyType DWORD -Force | Out-Null
		}
	}
}

Exit 0
Set System Center to use only TLS 1.2
Set System Center to use only the TLS 1.2 protocol. To do this, first make sure that all prerequisites are met. Then, configure the following settings on System Center components and all other servers on which agents are installed.
Use one of the following methods.
Method 1: Manually modify the registry
Important: Follow the steps in this section carefully. Serious problems might occur if you modify the registry incorrectly. Before you modify it, back up the registry for restoration in case problems occur.
To enable the installation to support the TLS 1.2 protocol, follow these steps:
-
Start Registry Editor. To do this, right-click Start, type regedit in the Run box, and then select OK.
-
Locate the following registry subkey:
HKEY_LOCAL_MACHINE\SOFTWARE\Microsoft\.NETFramework\v4.0.30319
-
Create the following DWORD value under this key:
SchUseStrongCrypto [Value = 1]
-
Locate the following registry subkey:
HKEY_LOCAL_MACHINE\SOFTWARE\WOW6432Node\Microsoft\.NETFramework\v4.0.30319
-
Create the following DWORD value under this key:
SchUseStrongCrypto [Value = 1]
-
Restart the system.
Method 2: Automatically modify the registry
Run the following Windows PowerShell script in Administrator mode to automatically configure System Center to use only the TLS 1.2 Protocol:
# Tighten up the .NET Framework
$NetRegistryPath = "HKLM:\SOFTWARE\Microsoft\.NETFramework\v4.0.30319"
New-ItemProperty -Path $NetRegistryPath -Name "SchUseStrongCrypto" -Value "1" -PropertyType DWORD -Force | Out-Null

$NetRegistryPath = "HKLM:\SOFTWARE\WOW6432Node\Microsoft\.NETFramework\v4.0.30319"
New-ItemProperty -Path $NetRegistryPath -Name "SchUseStrongCrypto" -Value "1" -PropertyType DWORD -Force | Out-Null
Additional settings
Operations Manager
Management packs
Import the management packs for System Center 2012 R2 Operations Manager. These are located in the following directory after you install the server update:
\Program Files\Microsoft System Center 2012 R2\Operations Manager\Server\Management Packs for Update Rollups
ACS settings
For Audit Collection Services (ACS), you must make additional changes in the registry. ACS uses the DSN to make connections to the database. You must update DSN settings to make them functional for TLS 1.2.
-
Locate the following subkey for ODBC in the registry.
Note The default name of DSN is OpsMgrAC.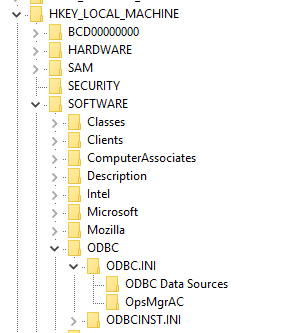
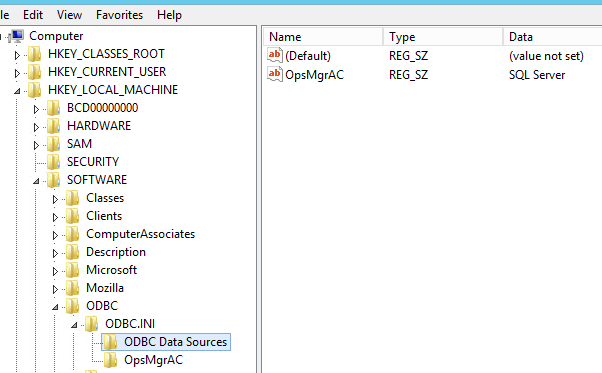
-
In ODBC Data Sources subkey, select the entry for the DSN name, OpsMgrAC. This contains the name of ODBC driver to be used for the database connection. If you have ODBC 11.0 installed, change this name to ODBC Driver 11 for SQL Server. Or, if you have ODBC 13.0 installed, change this name to ODBC Driver 13 for SQL Server.
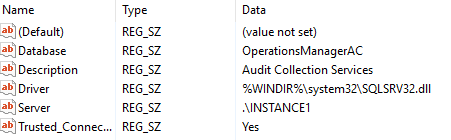
-
In the OpsMgrAC subkey, update the Driver entry for the ODBS version that is installed.
-
If ODBC 11.0 is installed, change the Driver entry to %WINDIR%\system32\msodbcsql11.dll.
-
If ODBC 13.0 is installed, change the Driver entry to %WINDIR%\system32\msodbcsql13.dll.
-
Alternatively, create and save the following .reg file in Notepad or another text editor. To run the saved .reg file, double-click the file.
For ODBC 11.0, create the following ODBC 11.0.reg file:
[HKEY_LOCAL_MACHINE\SOFTWARE\ODBC\ODBC.INI\ODBC Data Sources] "OpsMgrAC"="ODBC Driver 11 for SQL Server" [HKEY_LOCAL_MACHINE\SOFTWARE\ODBC\ODBC.INI\OpsMgrAC] [HKEY_LOCAL_MACHINE\SOFTWARE\ODBC\ODBC.INI\OpsMgrAC] "Driver"="%WINDIR%\\system32\\msodbcsql11.dll"
For ODBC 13.0, create the following ODBC 13.0.reg file: [HKEY_LOCAL_MACHINE\SOFTWARE\ODBC\ODBC.INI\ODBC Data Sources] "OpsMgrAC"="ODBC Driver 13 for SQL Server" [HKEY_LOCAL_MACHINE\SOFTWARE\ODBC\ODBC.INI\OpsMgrAC] [HKEY_LOCAL_MACHINE\SOFTWARE\ODBC\ODBC.INI\OpsMgrAC] "Driver"="%WINDIR%\\system32\\msodbcsql13.dll"
-
TLS hardening in Linux
Follow the instructions on the appropriate website to configure TLS 1.2 in your Red Hat or Apache environment.
Data Protection Manager
To enable Data Protection Manager to work together with TLS 1.2 to back up to the cloud, enable these steps on the Data Protection Manager server.
Orchestrator
After the Orchestrator updates are installed, reconfigure the Orchestrator database by using the existing database according to these guidelines.
Service Manager
Before the Service Manager updates are installed, install the required packages and reconfigure the registry key values, as described in the "Before the installation" instructions section of KB 4024037.
Also, if you are monitoring the System Center Service Manager by using System Center Operations Manager, update to the latest version (v 7.5.7487.89) of Monitoring Management Pack for TLS 1.2 support.
Service Management Automation (SMA)
If you are monitoring the Service Management Automation (SMA) by using System Center Operations Manager, update to the latest version of Monitoring Management Pack for TLS 1.2 support:
System Center Management Pack for System Center 2012 R2 Orchestrator - Service Management Automation
Third-party contact disclaimer
Microsoft provides third-party contact information to help you find additional information about this topic. This contact information may change without notice. Microsoft does not guarantee the accuracy of third-party contact information.


