
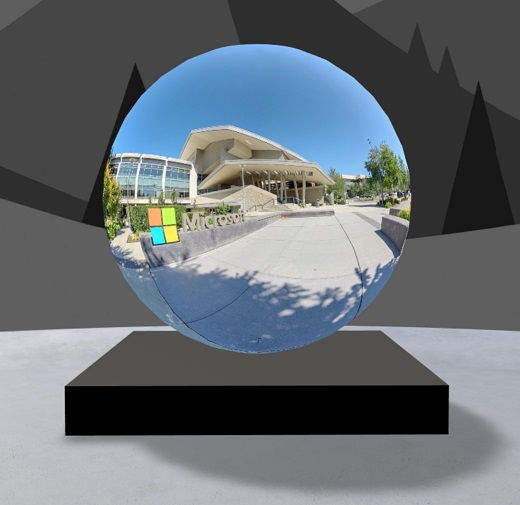
A 360° tour allows viewers to move through a sequence of 360° images. The tour is built by linking together the 360° images you want to use and then annotating each one to include text, images, video, audio, or files. To create a tour, use the 360° tour web part.
Add the 360° tour web part
-
Go to the space where you want to add a tour.
-
If you’re not already in edit mode, select Edit at the top right of your space.
-
In the space, select the circled plus sign (+) at the top left of the space, and then select 360° tour from the list of web parts.
-
Select anywhere on the structure (floor) to place the web part.
-
Find and select all of the 360° image files you’d like to use, and then select Open.
You can add more images or remove images later as you're building the tour.
Notes:
-
Even if you've selected multiple images, the web part will display only a single image, which is the image that the tour will start with. You can change the starting image later.
-
You can add more images or remove images later as you're building the tour.
-
-
Select the web part and then select Edit

-
If you'd like, enter alternative text for the web part in the Alternate text box under Details.
-
To set the distance between the image and the podium, use the Height from podium slider. (If you don't want to use a podium, slide the Show podium toggle to Off).
-
If you want, you can add actions to a 360° tour just like other web parts. This allows you to play audio, link to other spaces or external content, and control primary and secondary actions as described for the 360° image web part.
Use the tour builder to set the starting image and the format for all images
-
Select Open tour builder.
Note: All of the images you selected when you added the web part are shown in the image tray at the bottom of the space.
-
Select the 360° image you want to start the tour with by selecting an option under Start tour with this image. This will be the first image displayed when viewing the tour and the image displayed for the web part.
-
To change the image format for all 360 images in the tour, select one of the options under Select format for all 360° images in this tour.
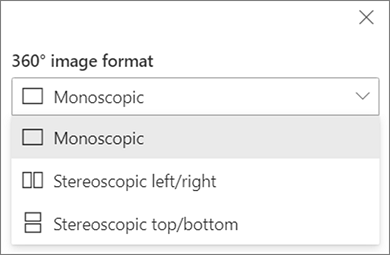
If the camera you used to capture the 360° image was a single lens camera which was placed on a rig or ring formation to make a circle, select Monoscopic. If the camera you used to capture the 360° image was two cameras for each field of view, select Stereoscopic.
-
Choose whether to use Nadir patching and set the size.Also choose whether to show a light or dark patch.
Move between the 360° images in your tour
-
While in the tour builder, hover over the image tray at the bottom of the screen to show all the images in your tour.
-
Select an image so you can go to it and set the starting view, link it to other images, and add annotations to the image.
Set the starting view for each image in your tour
-
While in the tour builder, press + hold left mouse button or track pad button, and drag the cursor left, right, up, or down to pan the image and adjust to the desired starting view.
-
Select Set as starting view of this image.

You can select the compass icon at any time to go to the existing starting view for the image.
-
Move to each image in your tour and repeat steps 1 and 2 to set all starting views.
Add links between 360° images in your tour
-
While in the tour builder, use the image tray at the bottom to move to the image where you want to add a link.
-
Press + hold left mouse button or track pad button, and drag the cursor left, right, up, or down to pan the image to the location you want to place your link.
-
While the + icon is showing, select the location in the image where you want to place your link.
-
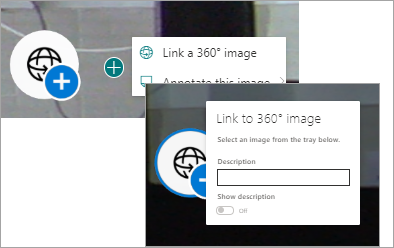
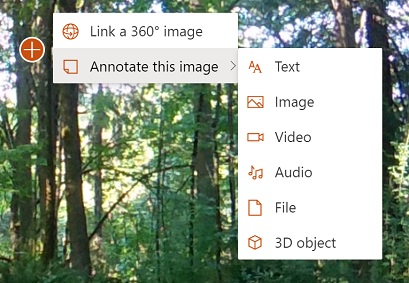
Select Link a 360° image to place a link at this location.
-
Select the image you want to link to from the image tray below.
-
If you'd like, enter a Description to describe the image you are linking to, then make sure the Show description toggle is set to On. If you don't want to show a description, slide the toggle to the Off position.
Tip: It may help your users to include in the description that they can select the link to go to the image.
-
Repeat steps 1-6 for any other links you want to add to your tour.
Add annotations to images in your tour
-
While in the tour builder, use the image tray at the bottom to go to the image where you want to add a link.
-
Press + hold left mouse button or track pad button, and drag the cursor left, right, up, or down to pan the image to the location you want to place your link.
-
While the + icon is showing, select the location in the image where you want to place your annotation. .
-
Expand the Annotate this image menu and select the annotation type from the menu.
-
Repeat steps 1-4 for additional annotations you want to add.
Add more images to your tour
-
While in the tour builder, select Add more 360° images in the image tray.
-
Select the 360° images you’d like to use, and then select Open.
Delete images from the tour
-
While in the tour builder, use the image tray to select the image(s) you want to delete.
-
Select Delete.
-
Confirm that you want to remove the image from your tour by selecting Yes in the confirmation dialog. This will remove the image and any links or annotations you have added to it from your tour but will not delete the image from its source location (such as a SharePoint document library or OneDrive).
Note: You can't delete the starting image from your tour. If you want to delete that image, first select a different image to be your starting image.
Tips
-
Put the 360° images for your entire tour into a single folder or document library for easy access.
-
Use meaningful file names for 360° images. Consider starting file names with a number in the order you want so they will appear in that order in the image tray.


