
A Microsoft 365 group is different from a contact group (formerly called a distribution list). A contact group is a set of email addresses that you can use to send an email message or meeting invitation to everyone at once. To create a contact group, see Create a contact group.
Watch a short video about creating a group to be used as a company email address.

-
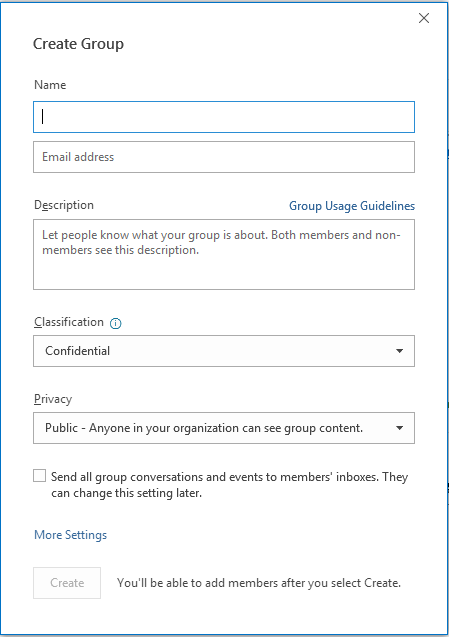
Open Outlook for Windows.
-
Select Home > New Group.


-
Fill out the group information.
-
Group name: Create a name that captures the spirit of the group.
Once you enter a name, a suggested email address is provided. "Not available" means the group name is already in use and you should try a different name. Note that once you choose a group name, it cannot be changed.
-
Description: Optionally, enter a description that will help others understand the group's purpose. This description will be included in the welcome email when others join the group.
-
Classification: Choose a classification. Options available depend on what your organization has set up.
-
Privacy: By default, Groups are created as Private. This means only approved members in your organization can see what's inside the group. Anyone else in your organization who is not approved cannot see what's in the group.
-
Select Public to create a group where anyone within your organization can view its content and become a member.
-
Select Private to create a group where membership requires approval and only members can view group content.
-
-
Send all group conversations and events to members' inboxes Optionally, check this box to enable members to see all group conversations and events in their inbox without having to visit separate group workspaces. Members can change this setting for their own mailboxes.
-
Select Create.
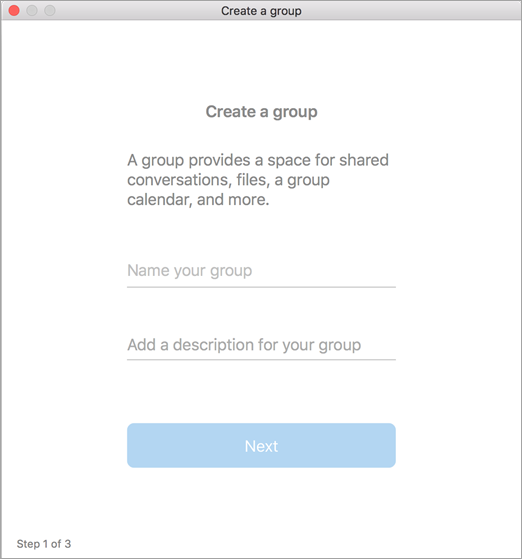
Note: This feature is only available in legacy Outlook for Mac.
-
Open Outlook for Mac.
-
Select File > New > Group.
-
Fill out the group information:
-
Group name: Create a name that captures the spirit of the group.
Once you enter a name, a suggested email address is provided. "Not available" means the group name is already in use and you should try a different name. Note that once you choose a group name, it cannot be changed.
-
Description: Optionally, enter a description that will help others understand the group's purpose. This description will be included in the welcome email when others join the group. Click Next.
-
Type member email addresses or select members from the contact list to add to the group. You can add guests who are people outside your school or your organization to the group.
-
Privacy: By default, Groups are created as Private. This means only approved members in your organization can see what's inside the group. Anyone else in your organization who is not approved cannot see what's in the group.
-
Select Public to create a group where anyone within your organization can view its content and become a member.
-
Select Private to create a group where membership requires approval and only members can view group content.
-
-
Classification: Choose a classification. Options available depend on what your organization has set up.
-
-
Click Create. You'll see a welcome mail in your newly created group inbox.
-
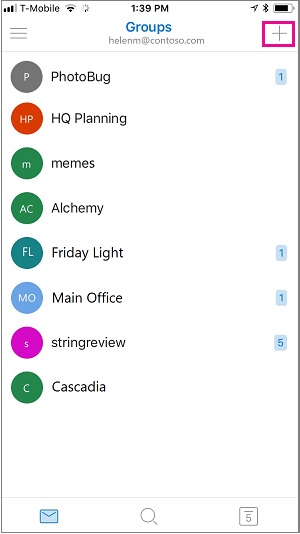
Open the Outlook mobile app.
-
Select Groups from the folder pane.
-
In the Groups header, tap +.
-
On the New Group page, type a name for the group > Next.
-
On the Settings page, enter the required information, including privacy level, (Public or Private), classification, and whether group members should follow group conversations and events in their personal inboxes.
-
Tap Create.
-
Type member email addresses or select members from the contact list to add to the group. You can add guests to the group.
-
Tap Add. You'll see a welcome mail in your newly created group inbox.
Create a PLC group in Outlook (Office 365 Education)
A Professional Learning Community (PLC) group is a type of Microsoft 365 Group that provides a shared space for educators to use for collaboration. PLCs are available in the Microsoft 365 Education plans.
A PLC is very similar to other Microsoft 365 groups. It comes with a shared mailbox and calendar, shared document library, and OneNote Notebook. The notebook is designed for educators and includes templates and lots of resources that provide ideas and assistance.
Notes:
-
Creation of PLC groups is not supported in the new Outlook on the web. Creating PLC groups is now only available on Teams
-
If you want to create a PLC group, you can still do it in Teams or by switching to the classic version of Outlook on the web while it's available.
-
Existing PLC groups are not affected, can be accessed from Outlook on the web as usual, and used as you have always done. This change only affects new PLC groups. To learn more on how to create PLC groups in Teams, see Create team for PLCs in Microsoft Teams
-
Open Outlook.
-
Right-click Groups and select Discover groups.
-
In the Search field, enter a keyword to find appropriate groups.
-
Press Enter.
-
For each group you want to add, select Request to join. For more group suggestions, select More suggestions.
Note: If you don't see Groups in the left pane, your organization may not have turned on Groups.
See Also
Create a group in Outlook.com or Outlook on the web
Add and remove group members in Outlook


