
There may be a few reasons why you want to export the mailbox of an account you have in the desktop version of Outlook. For example, you want a backup in case you lose your Outlook data. You want to move all the items from one email account to another account, you're moving from a personal account to a business account, you're moving to a new device and want to import your mailbox after setting up Outlook on your new device, etc. Check out the list of reasons to export a mailbox in the section below, When should I export a .pst file.
To learn how to import items after you've exported them, see Import email, contacts, and calendar from an Outlook .pst file.
Note: Exporting and importing a mailbox using a .pst file isn't supported in new Outlook at this time.
To export a mailbox, you need to use the desktop version of Outlook (also known as classic Outlook) following the steps below. Classic Outlook is included with Microsoft 365 subscriptions that include desktop apps such as Microsoft 365 Personal or Family or Microsoft 365 Business Standard, and one-time purchases of Office such as Office Home & Business.
If you're already using new Outlook, you'll need turn off the New Outlook toggle and switch back to classic Outlook. If you don't have classic Outlook installed, review the options in Step 1 of Export your Outlook.com mailbox to get classic Outlook.
Watch: Export or backup email, contacts and calendar items

Before you begin
Before you start your export, there's a few things you should do to make sure your export goes smoothly.
-
You may have multiple email accounts in Outlook. Make sure you select the correct email account before you start your export.
-
Do a mailbox cleanup: Manage my mailbox size. Save the content you want and leave the rest behind.
-
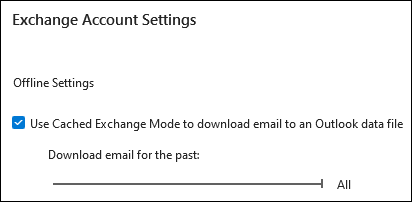
By default, Outlook is set to download email for the past 1 year. If you want to export all your emails, open Outlook, select Account settings > Account Name and Sync Settings and move the slider to All.
-
Make sure you don’t export your .pst file to a OneDrive location. If you have automatic sync, make sure it's not syncing to a OneDrive location. OneDrive will block automatic syncing for Outlook .pst files.
Begin exporting email, contacts, and calendar items from Outlook to a .pst file
If the account you want to export isn't already added to the desktop version of classic Outlook, add the email account you want to export. Once the account and all the contents are added to Outlook, you can begin the export process.
-
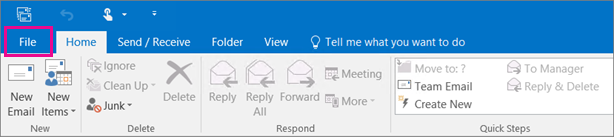
At the top of the ribbon in classic Outlook, choose File.
-
Choose Open & Export > Import/Export.
-
Choose Export to a file > Next.
-
Click Outlook Data File (.pst) > Next.
-
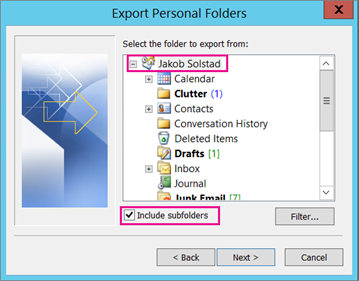
Select the name of the email account to export, as shown in the picture below. Only information for one account can be exported at a time.
Make sure that the Include subfolders check box is selected. This ensures that everything in the account will be exported: Inbox, Calendar, Contacts, and Tasks. Choose Next.
-
Click Browse to select where to save the Outlook Data File (.pst). Enter a file name, and choose OK to continue.
Note: If you’ve used export before, the previous folder location and file name appear. Type a different file name before choosing OK.
-
If you are exporting to an existing Outlook Data File (.pst), under Options, specify what to do when exporting items that already exist in the file.
-
Choose Finish.
-
Outlook begins the export immediately unless a new Outlook Data File (.pst) is created or a password-protected file is used.
-
If you’re creating an Outlook Data File (.pst), an optional password can help protect the file. When the Create Outlook Data File dialog box appears, enter the password in the Password and Verify Password boxes, and choose OK. In the Outlook Data File Password dialog box, enter the password, and choose OK.
-
If you’re exporting to an existing Outlook Data File (.pst) that is password protected, in the Outlook Data File Password dialog box, enter the password, then choose OK.
-
After your email data is exported to a .pst file, it's portable! You can import it to other email accounts. If you want to do this using Outlook, see Import email, contacts, and calendar from an Outlook .pst file.
What data is exported?
-
When Outlook exports email, contacts, and calendar info to a .pst, it makes a copy of the information. Nothing leaves Outlook. You'll still see and have access to your email, contacts, and calendar in Outlook.
-
When Outlook exports emails, it includes any attachments to the emails.
-
Outlook does not export meta-data such as folder properties (views, permissions, and AutoArchive settings), message rules, and blocked senders lists.
Important: If you're using Cached Exchange Mode, Outlook will only export the items in your current cache. By default, your cache contains items from the past 12 months. To export more than the past 12 months of data, turn off Cached Exchange Mode first. For more information, see Turn Cached Exchange Mode on or off.
When should I export (backup)/import a .pst file?
-
You want to move email from your Microsoft 365 personal or family account to a Microsoft 365 for business email account:
For example, let's say you have a Microsoft personal or family email account, alliebellew83@yahoo.com, and you want to move your email to a new Microsoft 365 for business email account, alliebellew@contoso.com.
Using Outlook on your desktop, add both accounts to Outlook. Wait for all of your email to appear (if you have a lot, this can be a long time). Then, use Outlook to export the email from alliebellew83@yahoo.com to a .pst file. Finally, import the .pst file to your Microsoft 365 for business account.
-
You want to move email from one email account to another email account:
For example, let's say you have an old Yahoo email account, jakobsol77@yahoo.com, and you want to move your email to a new Microsoft 365 email account, jakobsol78@contoso.com.
Using Outlook on your desktop, add both accounts to Outlook. Wait for all of your email to appear (if you have a lot, this can be a long time). Then, use Outlook to export the email from your Yahoo account to a .pst file. Finally, import the .pst file to your Office 365 account.
-
You're moving from PC to PC: You're moving your email from one computer with Outlook on it to another computer with Outlook on it. For example, let's say your old computer has Outlook 2016 and you just got a new computer with Outlook for Microsoft 365 or Outlook 2021 installed. Export your email data from Outlook 2016 and import it to the current version of Outlook.
-
You're moving from PC to Mac: Transfer email from Outlook on a PC by importing to Outlook on a Mac.
-
You want periodic backups: You can periodically backup all of your email, contacts, and calendar to a safe place. After you create the .pst file, copy it to a safe location: a USB flash drive, another hard drive, or cloud storage such as OneDrive or Dropbox.
There's no automated way to periodically backup everything (old and new). Auto-archive only backs up old items, and it moves them rather than making a copy.
-
If you only want to backup your contacts, see Export contacts from Outlook to copy your contacts to a .csv file.
See Also
Import email, contacts, and calendar from an Outlook .pst file
Import and export Outlook data from different apps and services


