
Note: This article has done its job, and will be retiring soon. To prevent "Page not found" woes, we're removing links we know about. If you've created links to this page, please remove them, and together we'll keep the web connected.
Welcome to Open Up Resources
Open Up Resources has partnered with Office 365 Education to provide a free and innovative solution for delivering standards-aligned content in the classroom. Open Up Resources acts like your own digital textbook, but better. Set up a OneNote Class Notebook that’s pre-populated with a complete course’s worth of material—everything from daily lesson plans to assessments. Your Class Notebook’s structure will help you stay organized, back everything up to the cloud, and easily distribute content to students when you need to.
Setting up an Open Up Class Notebook also automatically loads assessments for your class to Microsoft Forms. From there, assign and grade quizzes.
Learn more about Office 365 Education and sign up now for free.
Download the free Class Notebook Add-in for OneNote.
This guide is organized into four parts:
1. Get started with your Open Up Resources notebook
To begin, you'll need your Open Up Resources welcome email and the Class Notebook Add-in for OneNote. Download the free Class Notebook Add-in for OneNote if you don't have it yet. Be sure to save your welcome email so you can reference it in the future.
Follow the steps below for each class where you’ll be using the Open Up Resources digital textbook.
-
Open the link provided in your welcome email. If you’re prompted to, sign in with your school account credentials.
-
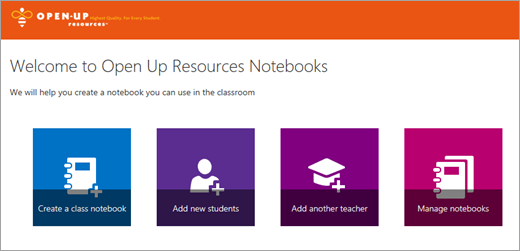
Select Create a class notebook.
-
Give your class a name and select Next.
-
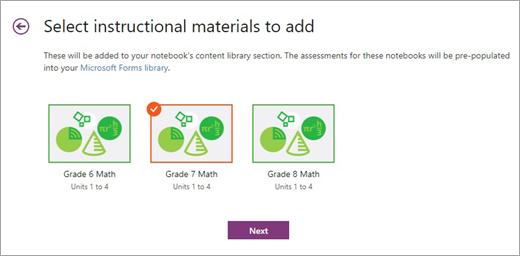
Choose the instructional material you’ll be using in this class and select Next. The materials you choose will be automatically loaded in your Class Notebook and in Microsoft Forms.
-
(Optional) Add co-teachers and students to your Class Notebook. You can return to this step later if you need to.
-
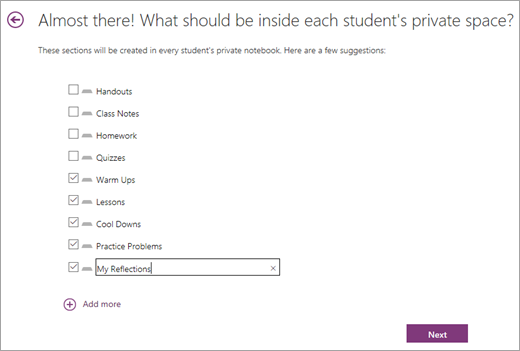
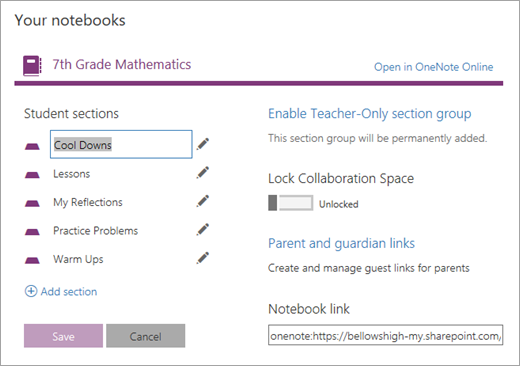
Select or edit the sections you’d like to include in every students’ notebook. Recommended: Add spaces that will correspond to the content sections of your Open Up Resources material: Warm Ups, Lessons, Cool Downs, Practice Problems, My Reflections. Don't worry--you can edit these sections anytime by visiting Manage notebooks.
-
Preview the look of your teacher and student notebooks and select Create.
Congratulations! Your Open Up Resources Class Notebook is ready to use.
Learn more about OneNote and how to make the most of your Open Up Resources notebook:
-
Search OneNote content (great for zeroing in on specific learning standards)
2. Explore the structure of your Open Up Resources notebook
Now that you’ve set up your first Open Up Resources notebook, let’s open it on your desktop, take a look in each section, and see how your content is structured. Each notebook includes a Content Library for teachers to share course content, a Collaboration Space where teachers and students can work together, and a private notebook for each student.
Tip: Pin your notebook pane so you can more easily navigate your Open Up notebook.
Terms:
Each OneNote Open Up Resources Class Notebook is structured with pages, sections, and section groups.
-
OneNote notebooks are made up of pages. Think of these as the handouts you give to students or the individual pages in a textbook. View the pages in each section at the right-hand side of your OneNote app.
-
A section acts like the tab in a notebook and organizes pages under one topic. For example, the Welcome section contains more than one page with guides and helpful links. Sections appear as tabs at the top of your app or in the notebook pane after you've pinned it open.

-
Section groups organize other sections. In this notebook, your Content Library, Collaboration Space, Teacher-only, Student Resources, and Units are all section groups. Expand a section group to see the content inside it. Section groups appear at the top of your app or in the notebook pane after you've pinned it open.

Sections and section groups:
-
Welcome section -- Find additional training here, like these Sways covering setting up your notebook, moving content to other notebooks, and distributing content to your students.
-
Content Library section group and User Guide
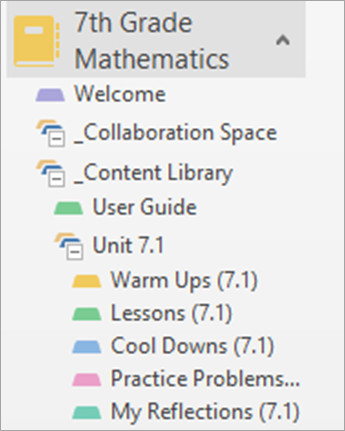
Expand the Content Library section by selecting the + symbol next to its name. The Content Library is where all the material you share with your students will be visible to both you and them. You’ll notice a User Guide section at the top. Your User Guide acts like a textbook’s Table of Contents—within it, the Index page gives you a preview of each unit of coursework with a hyperlink directly to that unit in the Content Library. The Glossary page provides a list of all the vocabulary you will be using and teaching during this course.
If you expand a unit, you’ll see that each one contains the following sections:
-
Warm Ups
-
Lessons
-
Cool Downs
-
Practice Problems
-
My Reflections
-
Right now, these sections are empty. You’ll be populating them with content depending on when you’d like your students to access each unit’s course content.
-
Teacher-Only section group
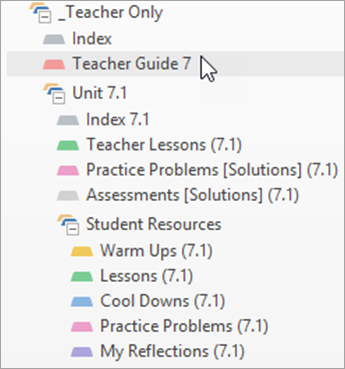
The Teacher-Only section group is automatically set up so that only you and your co-teachers can access its content. It acts like the teacher’s edition of a course textbook, containing lesson plans, answer keys, and more. As you explore the Teacher-Only section of your notebook, you’ll see that its content corresponds to the blank units in your Content Library—you’ll be filling those blank sections with the materials organized here. Plus, this section contains additional helpful resources for you and your class.
-
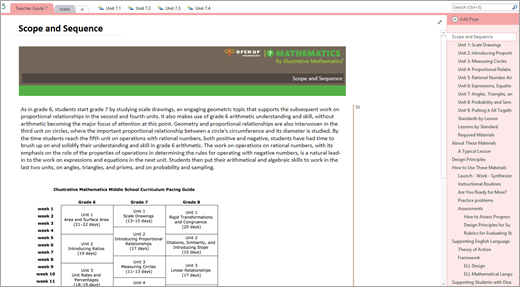
Teacher Guide: Here’s where you’ll find an overview of all your units, instructions for how to use these materials, learning goals, content standards, ideas for supporting a variety of learners, and much more. Take your time to explore each page. This section will be a valuable reference throughout the course.
-
Index: The Index contains hyperlinks to each unit in the notebook and a Glossary of terms you'll be using during the course. It's also where you'll find your Assessment Dashboard after it's been set up by an administrator. We'll cover the dashboard in Section 5 of this guide.
-
-
Anatomy of a unit
-
Index – This section contains everything you need for each unit in one place. Each Index section contains an Overview with an introduction to the unit and shortcut links to the content you’ll use for yourself and students. The Downloads section provides a quick reference page with all the PDFs you’ll need for each unit, broken into sections. Required materials is a helpful checklist that will help you pull together materials ahead of time.
-
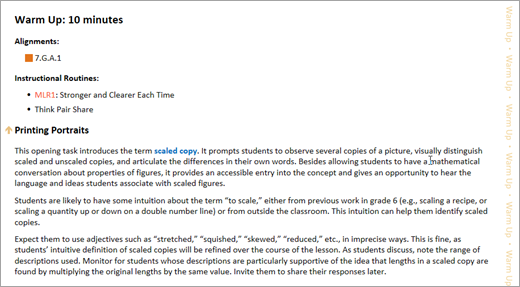
Teacher Lessons – Each Teacher Lessons section is broken down into the individual lessons that make up your unit. Each lesson “page” contains all the notes and planning materials you’ll need. Tip: Pay attention to the watermarks at the sides of your page. These show you the sequence of where you are in each lesson—from Warm Up to Cool Down.

-
Practice Problems – These pages contain the solutions to Practice Problems you’ll be distributing to your students.
-
Assessments – These pages contain the solutions to the Assessments you’ll be distributing to your students via Microsoft Forms. You'll use these solutions when it's time to review and grade assessments. Note: These pages are password protected. Enter the password you received in your welcome email to view them.
-
-
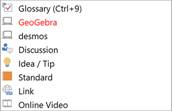
Key to tags and symbols
-
Tags -- The tags below help quickly identify the content on an Open Up Resources notebook page. You can also categorize content yourself by adding these tags. Use the keyboard shortcuts below or select the Home tab to choose a tag from the scrolling menu. Search for tags here by selecting Find Tags. Organize tags by content type, date, and more. Then, select a hyperlink to visit that page. (Learn more about searching tags in OneNote.)
-
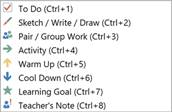
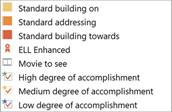
Watermarks – You'll find these along the sides of lesson pages—they help orient you to the type of content contained in each lesson. Warm Ups are in orange, numbered Activities are in blue and green, and Cool Downs are in dark blue.
-
OneNote Tips – Look for bold script on the top right of your Open Up notebook pages. These tips share OneNote shortcuts and other expert ideas to save you time and effort.
-
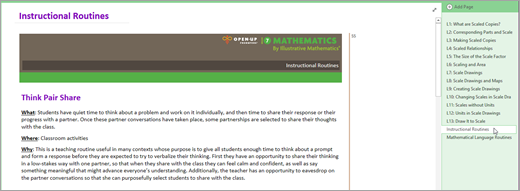
Instructional Routines – Each Teacher Lessons section contains the Instructional Routines used in the lessons for your reference. In this notebook, you'll find Mathematical Language Routines.
-
-
Student Resources section group
Each unit includes a Student Resources section group. This is where you’ll go to find all the blank handouts and material you’ll distribute to your students. Each section within Student Resources corresponds to the way your lessons are structured, the blank sections in the Content Library, and to the student notebook sections you created while setting up your notebook.
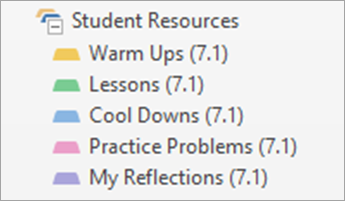
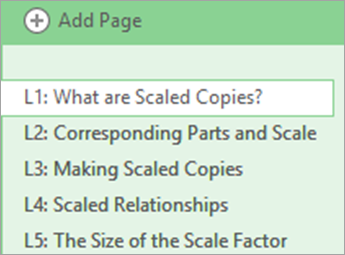
You’ll be matching your blank content to these sections. For example, on your first day of teaching Unit 7.1, you’ll go to the Student Resources section, select Warm Ups, and then select L1 to find the Warm Up for Lesson 1. You’ll distribute the L1 Warm Up to the blank Unit 7.1, Warm Up section in your Content Library.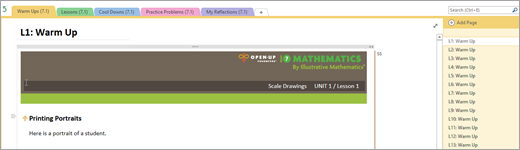
-
Tip: When inking, insert extra space, add sub-pages for each student answer completed in ink, or add grid lines so that inking stays in place as you or your students add more content to a page.
3. Distribute content to your students
The great thing about using an Open Up Resources Class Notebook is its versatility when it comes to how—and when—you deliver content to your students. Choose an option that works best for you and your teaching preferences.
-
Recommended best practice: Release blank Student Resources content to your notebook’s Content Library and distribute it directly to your student’s private notebooks. That way, the Content Library will function like a textbook to be referenced later, including for new students.
Reminder: You can edit your students’ Class Notebook sections to match the content in the Student Resources section by using the Manage notebooks tool.
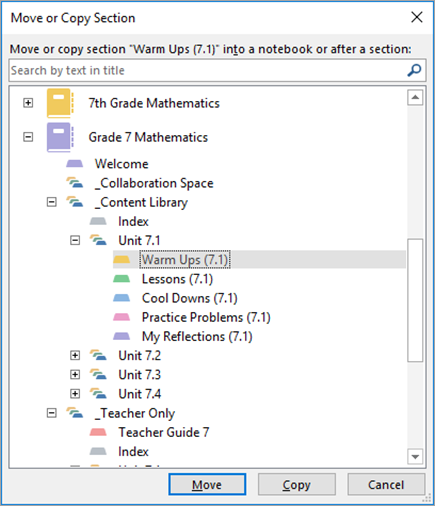
Copying to the Content Library:
Copy and/or move Open Up Resources content to a Class Notebook you’re already using. Don’t forget to distribute your User Guide sections during this step.
-
Right-click a page or section.
-
Select Move or Copy.

-
Select the destination notebook for that page or section.
-
Select either Move or Copy.
Copy content from your Teacher-Only section group into the Content Library of the same notebook:
-
Right-click a page or section.
-
Select Move or Copy.
-
Select a destination in the notebook’s Content Library.
-
Select either Move or Copy.
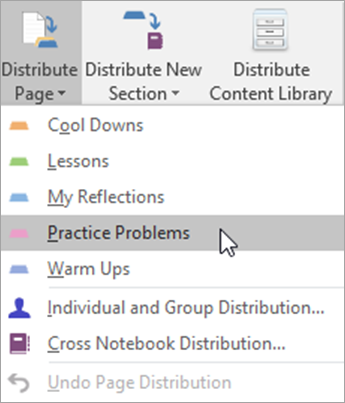
Distributing pages to students’ private Class Notebooks:
Push handouts out to students at your own pace. You can distribute several before class begins or distribute them “just in time” during class.
-
Navigate to the page you'd like to distribute to your students.
-
Select the Class Notebook tab, then Distribute Page.
-
Choose the section of your students’ notebook you’d like the page copied to.
-
Ask your students to sync their notebooks by right-clicking their notebook name and selecting Sync This Notebook Now.
-
Note: You can also distribute pages to individual students or student groups during this step.
Learn more:
Distribute pages and sections in Class Notebook
4. Administer and create assessments in Microsoft Forms
Microsoft Forms and Open Up Resources in the classroom give you access to standards-aligned assessments, each designed to be paired with the units you're teaching. These assessments can be easily distributed to students and kept in your Open Up notebook.
To get started, visit https://forms.office.com and log-in with your school credentials.
Access your assessments
-
In your Open Up Notebook: Each unit will come with pre-loaded assessment solutions. Select the unit, then select the Assessments tab. These solutions keys will help you grade your students' assignments.
-
Microsoft Forms: Select the My Forms option. Here, you'll distribute and then grade all assessments.
Distribute assessments
-
To your students:
-
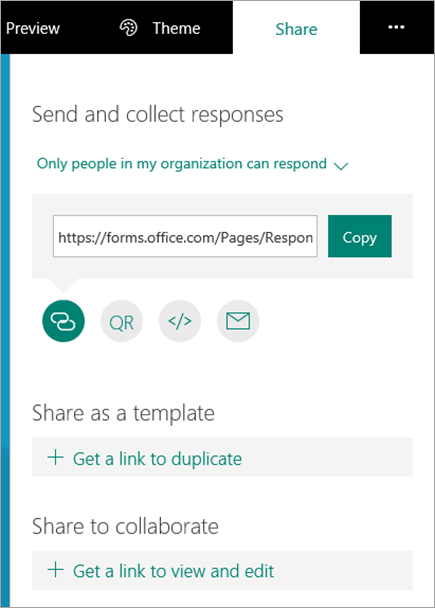
In Microsoft Forms, open the assessment you want to share.
-
Select Share.
-
Navigate to the box containing the assessment link. From there, you may choose to copy the link (to paste in your Class Notebook), download a QR code, copy the code to embed in a webpage, or distribute via email.
-
-
To other teachers:
-
In Microsoft Forms, open the assessment you want to share.
-
Select Share.
-
On the Share pane, you may choose to simply share the assessment template with others by selecting Share as a template. Or, opt to share, edit, and collaborate to create a different version of the assessment by selecting Get a link to view and edit.
-
Grade assessments
-
In Microsoft Forms, open the assessment you want to grade.
-
Once responses have been submitted, select the Responses tab.
-
Select Review Answers.
-
At the top of the assessment title at the top of the page, you'll see both People and Questions tabs.
-
On the People tab, you can see individual details for each student, such as time it took to complete the assessment, number of points earned, and the option(s) your student selected.
-
On the Questions tab, you can see responses from all students grouped by question and leave comments for each response.
Assessment record sheet handouts
You can provide students with printed record sheet handouts alongside Forms assessments so that they can show their work, further explain answers entered into Forms assessments, or provide any other supplements to their responses. Record sheets can be found with their corresponding units in the Open Up Class Notebook. All assessments will still be graded in Microsoft Forms.
Share and compile assessment responses
Microsoft Forms provides an automated tally that enables you to review responses by student or question. To view response data, open your assessment in Forms, select the Responses tab, then select View Results to break the responses down by student or question.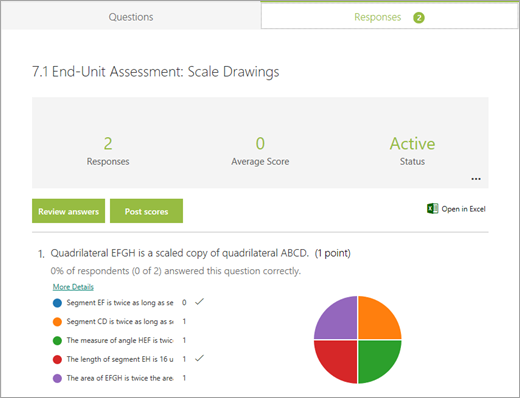
Export to Excel
View response data in Excel by selecting Open in Excel from the Responses tab in Forms.
In Excel, each question becomes a column and each response becomes a row. The first four columns display the start time and completion times for each response, and the name and email address for each student. The following columns display the students' answers.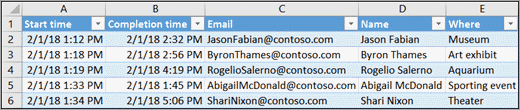
Learn more about Microsoft Forms:


