
Got a project you're tracking in Project desktop that you'd love to move online? You can move your .mpp file from Project 2016 and later to a new project in Project for the web and start collaborating more easily.
-
Go to project.microsoft.com and sign in to your Microsoft 365 account.
-
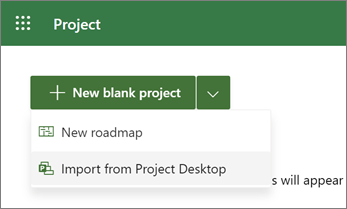
Select the arrow next to New blank project, and then select Import from Project desktop.
-
In the Import from Project desktop dialog box, select Choose .mpp file.
Notes:
-
Some features of Project desktop aren't supported in Project for the web. See a list of Features that don't migrate.
-
Your .mpp file won't be altered or affected by the import process. If the new Project for the web project doesn't work for you, you can delete it and either try again or go back to using your original Project desktop project.
-
The project you want to import must not exceed Project for the web limits and boundaries. If it does and you attempt to import anyway, you will get an error.
-
-
Browse to the .mpp file you want to import, and then select Open.
-
In the Import custom fields dialog box, choose up to 10 custom fields that you want to import into your Project for the web project, then select Done.
-
The Import complete message will list any features from your Project desktop file that aren't supported in Project for the web and what changes were made to allow import. Review these changes, and then select OK to start working on your project in Project for the web.
Need to learn about Project for the web? Start here:
Features that don't migrate
Project for the web is great for most projects, but it isn't a complete replacement for Project desktop. The following features aren't supported, and can't be migrated. Before you begin, you should evaluate your project and make sure it doesn't rely on these features.
Note: This list may not be exhaustive. If your new Project for the web project is missing elements or data, they may rely on an unsupported feature that is not listed.
-
Baseline
-
Constraints that aren't imported:
-
As late as possible
-
Start no later than
-
Finish no later than
-
Must finish on
-
Must start on
-
-
Cross-project dependencies
-
Deadlines
-
Formulas
-
Inactive tasks
-
Manual tasks
-
Null tasks
-
Project-level custom fields
-
Recurring tasks
-
Resources
-
Schedule from setting
-
Subprojects
To migrate using PowerShell instead, you download the PowerShell commands, find your Instance ID and your .mpp file path, and then run the commands. Following are the complete instructions.
Note: You can't use this tool to update an existing project. It only creates new projects in Project for the web.
-
Download the required PowerShell commands. You'll need some PowerShell files to perform the import. Download the .zip file and extract it to a new folder.
-
Find your Instance ID and the full file path to your .mpp file.
-
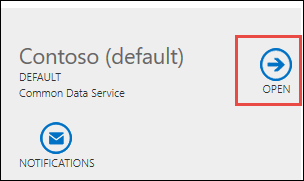
In the Dynamics 365 Administration Center, select the default instance, and then select Open.
-
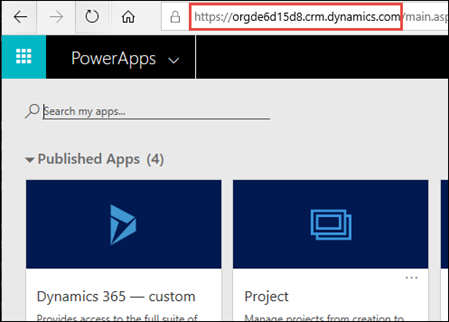
On the PowerApps setting page, the part of the URL that starts with https:// and ends with .com is your Instance ID. In the following image, the Instance ID value is https://orgde6d15d8.crm.dynamics.com.
-
-
Import a Project file (.mpp) into Project for the web Run the PowerShell commands to import a Project desktop file (.mpp) into Project for the web. These instructions use your credentials to create a new Project for the web project from the .mpp file. In some cases, you may need to unblock your .dll files.
-
Open PowerShell and navigate to the folder where you downloaded the required files.
-
Run the command Import-Module .\ProjectImport.psm1.
Important:
-
If this command produces an error, unblock the .dll files and run the command again.
-
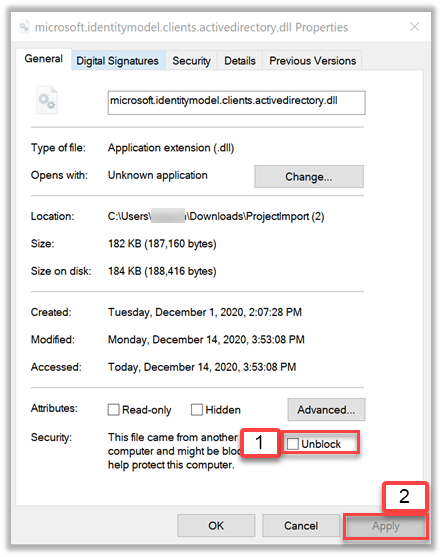
To unblock the two .dll files, do the following for each:
-
1. Select the file, and then select Home > Open > Properties.
-
2. Near the bottom, under Security, select Unblock and then select Apply.
-
-
-
-
Run the command ImportProject -InstanceId Your instance ID -FilePath Path to the .mpp, replacing Your instance ID with the ID you looked up and Path to the .mpp with the full file path for the .mpp file.
When you see a success message with a URL to your new project, you are done! Your imported project is ready to use in Project for the web.


