
Share a list or list item
This article discusses how to share a list or list item with people in your organization so others can view and edit it.
You can manage permissions on lists and list items at any time just like you can with files. For more information on sharing with people outside your organization, check out External or guest sharing in OneDrive, SharePoint, and Lists.

Notes:
-
In a SharePoint site, lists and lists items are usually available to everyone with permissions to the site. But in some cases, you may want to share the list or list items with people who don't otherwise have access to your list.
-
Does your screen look different than the examples here? The site might be set to use the classic experience by default, or you might be using an earlier version of SharePoint. If you're a list owner, site owner, or administrator, check out Switch the default experience for lists or document libraries from new or classic for the steps to set the default experience.
Share a list or list item with specific people
-
Go to the list or select the list item you want to share, and then select Share

-
For lists, you can find Share
-
For list items, you can find Share
-
-
Select People with existing access can use the link.
-
Select Specific people then Apply.
-
Enter the names of the people that you want to share the list or list item with.
-
Select the pencil icon to the right to set their level access.
-
If you're sharing a list, you have these permission options:
-
Can edit list allows people to edit the entire list, including editing, adding, or removing items, columns, or views.
-
Can edit items allows people to only edit, add or remove items.
-
Can view allows people to only view the list. They can't edit or share items or the list.
-
-
If you're sharing a list item, you have these permission options:
-
Can edit allows people to make any changes to an item. They cannot edit any other items, or the list.
-
Can view allows people to only view the item. They cannot view any other items, or the list.
-
-
-
Include a message, if you want.
-
Select Send.
Notes:
-
Sharing lists requires the “manage permissions” permission in SharePoint. By default, this means that only site or list owners can share lists.
-
If a site member or site visitor (or any non-owner) tries to share the list, SharePoint sends an approval request to the site owners if the site allows access requests.
-
If the site has access requests turned off, then non-owners receive a message letting them know they do not have permissions to share.
-
Your corporate admin may restrict sharing to users outside of your organization.
-
If site administrators have not restricted sharing to site owners, any person with Edit permissions can share that list or list item with others by selecting Share or Copy link. People who don't have edit permissions can use Copy link to get a link that is accessible to people who already have permissions to the list or list item.
Share a list or list item by using "Copy link"
-
Go to the list or hover over the list item you want to share, and then select Share
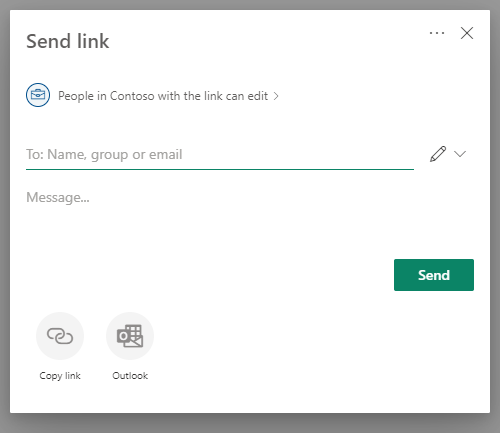
-
Use the default permissions or select People in <your organization> with the link can edit to change the link permissions.
-
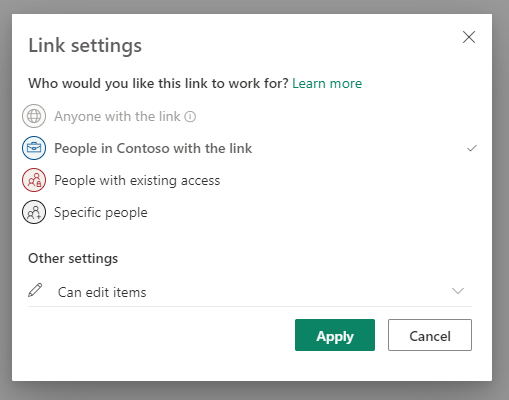
To change the link permissions, select an option for who you want to give access to with the link:
Note: If a sharing option has been greyed out, your organization's admins may have restricted them. For example, they may choose to disable the Anyone option to prevent usable links being forwarded to others outside your organization.
-
Anyone gives access to anyone who receives this link, whether they receive it directly from you or forwarded from someone else. This may include people outside of your organization.
Note: This option is not available in SharePoint Server 2019.
-
People in <your organization> gives anyone in your organization who has the link access, whether they receive it directly from you or forwarded from someone else.
-
People with existing access can be used by people who already have access. Use this if you just want to send a link to somebody who already has access.
-
Specific people gives access only to the people you specify, although other people may already have access. If people forward the sharing invitation, only people who already have access to the item will be able to use the link. To share with specific people, check out the previous section, Share a list or list item with specific people.
-
-
Under Other settings, select one of the following options.
-
If you're sharing a list, you have these permission options:
-
Can edit list allows people to edit the entire list, including editing, adding, or removing items, columns, or views.
-
Can edit items allows people to only edit, add or remove items.
-
Can view allows people to only view the list. They can't edit or share items or the list.
-
-
If you're sharing a list item, you have these permission options:
-
Can edit allows people to make any changes to an item. They cannot edit any other items, or the list.
-
Can view allows people to only view the item. They cannot view any other items, or the list.
-
-
-
When you're done, select Apply.
-
When you’re ready to send the link, select Copy and paste the link where ever you want to send it.
Notes:
-
Lists that are saved and stored on a SharePoint follow that SharePoint site's admin permissions for link sharing. Lists saved in My Lists follow the profile's OneDrive sharing permissions. You can configure both of these in the SharePoint admin center.
-
The permission granted by a shared link lasts only as long as the link exists. For example, when a link is disabled, access is revoked (though people may still have access to the list item via other means).
-
When Allow editing is selected (and after a person signs in) people in your organization can edit the column values of the list items. When Allow editing isn’t selected, people in your organization can view the item and its column values, but they cannot edit them.
-
Site administrators can restrict sharing so that only owners can share.
-
If site administrators have not restricted sharing to site owners, any person with Edit permissions to a list item can share that list item with others by selecting Share or Copy link. People who don't have edit permissions can use Copy link to get a link that is accessible to people who already have permissions to the list item.
-
Leave us a comment
Was this article helpful? If so, please let us know at the bottom of this page. If it wasn't helpful, let us know what was confusing or missing. We'll use your feedback to double-check the facts, add info, and update this article.
Share a list that's open in the app
-
Select More (...) at the bottom right of the app window.
-
Select Share list.
-
Tap To, then enter the names of the people that you want to share with.
-
Tap the pencil icon and select the level of access you want to give the recipient:

-
Include a message to the recipient, if you want.
-
Tap Send.
Share a list from the home page of the Lists app
-
Open the Lists app home page.
(If you're already in a list, you can tap the back arrow at the upper left corner of the app to go to Home.)
-
On the list you want to share, tap the vertical ellipsis:

-
Tap Share.
-
Tap To, then enter the names of the people that you want to share with.
-
Tap the pencil icon and select the level of access you want to give the recipient:
-
Include a message to the recipient, if you want.
Share a list that's open in the app
-
Select More (...) at the bottom right of the app window.
-
Select Share list.
-
Tap To, then enter the names of the people that you want to share with.
-
Tap the pencil icon and select the level of access you want to give the recipient:
-
Include a message to the recipient, if you want.
-
Tap Send.
Share a list from the home page of the Lists app
-
Open the Lists app home page.
(If you're already in a list, you can tap the back arrow at the upper left corner of the app to go to Home.)
-
On the list you want to share, tap the vertical ellipsis:
-
Tap Share.
-
Tap To, then enter the names of the people that you want to share with.
-
Tap the pencil icon and select the level of access you want to give the recipient:
-
Include a message to the recipient, if you want.


Need more help?
Want more options?
Explore subscription benefits, browse training courses, learn how to secure your device, and more.


Communities help you ask and answer questions, give feedback, and hear from experts with rich knowledge.


