
PowerPoint for Microsoft 365 lets you publish a presentation video to Microsoft Stream, as described here. Also, for a video that you want to embed in a presentation, you can publish it to Microsoft Stream by uploading the video directly.
Publishing to Microsoft Stream gives you the added benefit of having a closed-caption file automatically created for you. This makes your video more accessible.
Microsoft Stream is a video service for enterprises—people in your organization can upload, view, and share videos securely. For information on who can use Microsoft Stream, see Requirements below.
Tell Microsoft Stream to create closed captions
After the video is uploaded, PowerPoint gives you a link to the video playback page on the Microsoft Stream site for your organization.
-
Open the video playback page in your browser.
-
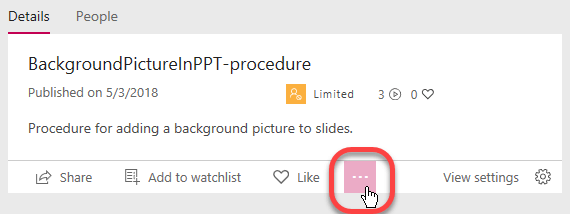
In the Details pane, select the ellipsis ("More") button, and then select Edit:
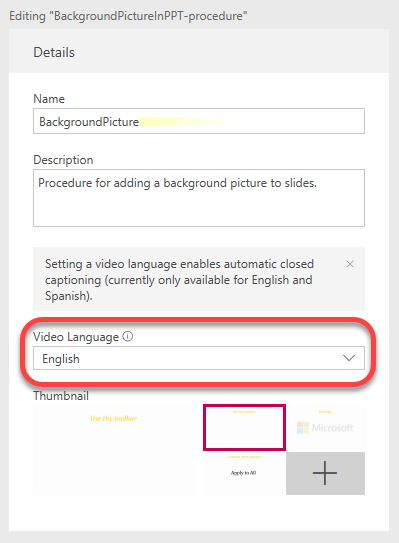
Now you are editing the properties of the video. There are three windows, left to right: Details, Permissions, and Options.
-
Under Details, specify the Video Language. Currently, auto-generated caption files can be created for English- and Spanish-language videos in MP4 and WMV formats.
-
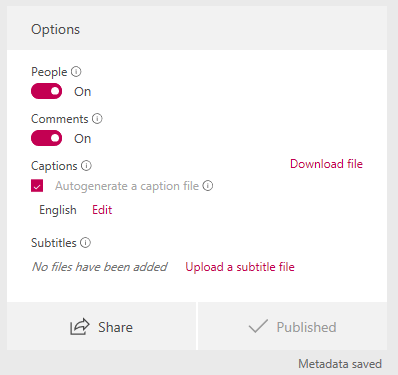
Next, in the Options window on the right, select Autogenerate a caption file:
-
Select Apply at the top of the page to save these settings.
Automatic captions generally take 1-2 times the video's duration to finish processing (that is, expect to wait roughly two hours for the creation of captions for a one-hour video.)
Edit the captions for accuracy
Your transcript likely will need corrections to punctuation and some of the words. The transcription tool is a new feature that uses artificial intelligence to write the words. It'll learn and become more accurate as time goes by.
-
Once the captions are created, select View settings on the Video playback page:

-
Select Show transcript.
Once closed captions have been generated by Microsoft Stream, the transcript of the video appears alongside it on the video playback page.
This transcript can be edited right on the page to improve its accuracy.
-
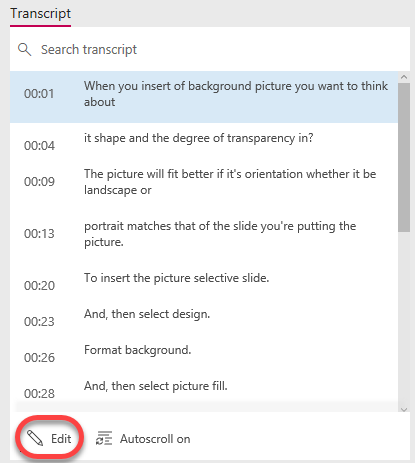
The Transcript window has an Edit button. You edit each time segment individually. Select a segment in the Transcript pane, then select the Edit button at the bottom of the pane:
When you select a time segment to edit, the video and audio play, starting from that segment.
Two buttons appear on the right of the Transcript window as you edit. The top one allows you to replay the currently selected segment of video.

-
When you've finished editing a segment, select the second button to save the changes. Click the next segment to edit it, and continue the process until you've edited the transcript to your satisfaction.
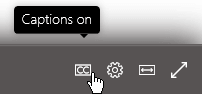
Play a video on Microsoft Stream with captions
If a video on Microsoft Stream has closed captions available, the toolbar at the bottom right of the video has a toggle button for turning them off or on:
Download the edited closed-caption file
The closed-caption file created by Microsoft Stream is a text-based file with a .vtt filename extension. ("WebVTT" is a standard format for displaying timed text in sync with audio or video tracks.)
If you want to add captions to your original PowerPoint presentation, follow this procedure and the next one, "Add the caption file to the video."
-
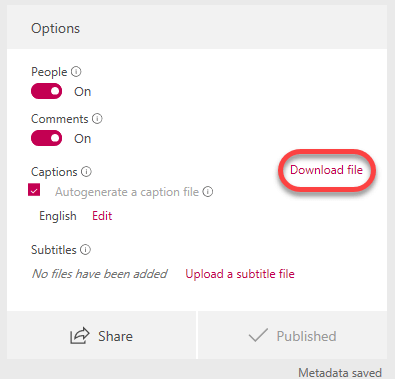
To download the caption file, return to the video's properties page.
-
In the Details pane, select the ellipsis ("More") button, and then select Edit:
In the Options window on the right, select the Download file link, shown circled in the picture below:
-
The file will be saved to the Downloads folder on your computer. Then you can move it wherever you want on your system.
We recommend that you rename the file in the following format:
MyClosedCaptions.en.vtt
A common practice is to include a two-letter language code, such as "en" (for English) or "es" (for Spanish). The file name extension must be ".vtt".
Add the caption file to the video
Once you have a completed closed caption file downloaded to your computer, you're ready to Add captions or subtitles in PowerPoint.
Requirements for Microsoft Stream
Publishing videos to Microsoft Stream is an Microsoft 365 subscriber feature.
Microsoft Stream is licensed on a per-user subscription basis. It's available as part of the Microsoft 365 subscription plans for organizations and businesses (except for the Business Premium and Business Essentials plans). It's also available as a standalone service.
For more information, see the Microsoft Stream Licensing Overview and the Pricing Overview.


