
To move all your content from SharePoint Server 2013 into Microsoft 365, the best place to start is the SharePoint Migration Tool.
To move files manually, read on in this article. You can also move SharePoint Server 2010 My Site library files to Office 365.
|
SharePoint 2013 OneDrive library |
SharePoint 2010 My Site libraries |
|---|---|
|
|
|

Why should I move files to OneDrive for work or school in Microsoft 365?
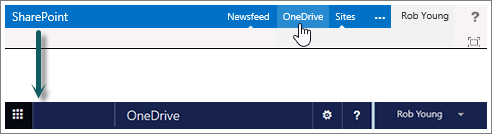
OneDrive for work or school gives you cloud access to your work documents. This means you can access your files using any computer or mobile device where you have Internet access. Additionally, your organization has changed your setup so that selecting OneDrive in the navigation bar takes you to OneDrive for work or school.
In this article
Moving to OneDrive for work or school involves a few one-time tasks. Some of these tasks depend on the files and activities you had in your original OneDrive in SharePoint 2013. The table below summarizes these tasks and the sections below provide details.
|
Action |
Description |
|
|---|---|---|
|
|
Your OneDrive library is set up and ready for you to use. But you probably have files in SharePoint that you’ll want to move to the Microsoft 365 library. |
|
|
|
You’ll need to use different steps to move your OneNote notebooks. |
|
|
|
You may have shared files in your old SharePoint OneDrive library in a number of ways. The files you’ve moved to the new Microsoft 365 library are new files. Therefore, you may want to set up sharing connections again to some of these files. |


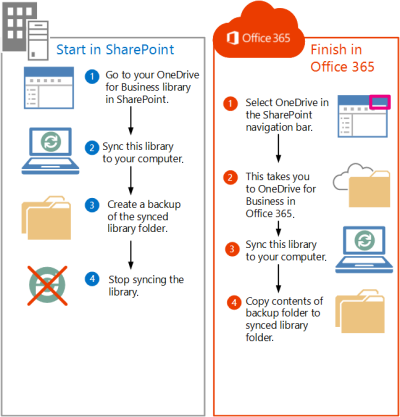
Move your files from SharePoint to Microsoft 365
To move your files, do the following tasks in sequence:
-
Sync your SharePoint Server 2013 OneDrive library to your computer
-
Create a backup copy of the synced library folder on your computer
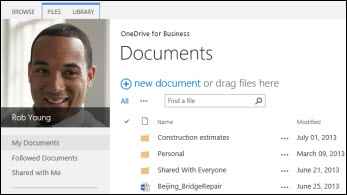
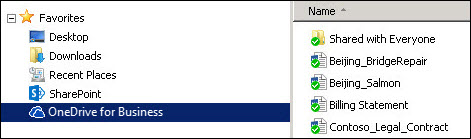
Go to your OneDrive on SharePoint Server 2013
Selecting OneDrive in the navigation bar in SharePoint Server 2013 now takes you to OneDrive for work or school. However, in order to move files to OneDrive for work or school, you’ll need to go to your original OneDrive on SharePoint 2013.
-
Sign in to SharePoint.
-
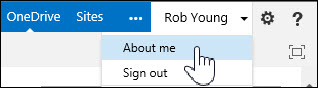
Select your name in the navigation bar, and then select About me.
-
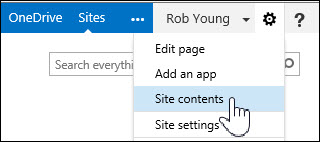
Select Settings, and then select Site Contents.
-
On the Site Contents page, select Documents.
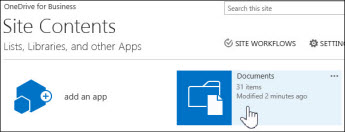
This takes you to your OneDrive library on SharePoint Server 2013.
Sync your SharePoint Server 2013 OneDrive library to your computer
The OneDrive sync app provides an efficient way to move your files because it allows you to work with files on your local computer, and avoid trying to move files over a network. Note the following important details about using the sync app for this task:
-
The sync app can sync libraries containing up to 20,000 items. If your OneDrive library on SharePoint Server 2013 has more than 20,000 items, you won’t be able to use the sync app to move your files. For more information and guidance, see My OneDrive library has more than 20,000 items.
-
We recommend using the most current version of the OneDrive sync app. If you’re not sure you have this, see Update the OneDrive sync app later in this article.
-
You can’t use the sync app to move OneNote notebooks. For information on moving OneNote notebooks, see Move OneNote notebooks to Office 365.
To sync OneDrive for work or school to your computer:
-
Go to your original OneDrive on SharePoint Server 2013.
-
Select Sync at the top of the page.
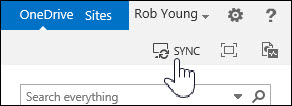
The OneDrive sync app opens.Note: If the app is named “SkyDrive Pro” instead of OneDrive, this means you’re not using the most current version of the sync app.
-
Select Sync Now.
If you need the latest version of OneDrive, click Get the OneDrive app that's right for me in the Sync dialog box.
-
Select Show My Files to go to the synced library folder. The folder appears under your Windows favorites and is named "OneDrive".
If you were already syncing this library before you started this task, you’ll immediately go to the synced library folder after you select Sync Now.
Create a backup copy of the synced library folder on your computer
Why create a copy of the synced library folder? It will provide a backup of your OneDrive library, and it will also be easier to find later in File Explorer.
-
Create a new folder in File Explorer for copying the synced library folder. For example:
-
Select the synced OneDrive in your Favorites.
-
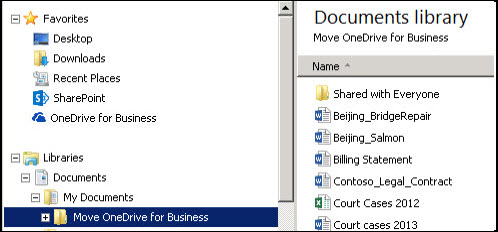
Select all files and folders and press Ctrl-C to copy them.
-
Select the new folder you created and press Ctrl-V to paste all files and folders.
Since files in this folder are not syncing with SharePoint, they should appear without any sync indicators (
Stop syncing your SharePoint OneDrive library
Now that you’ve created a backup folder that contains your library, you should stop syncing the SharePoint library.
-
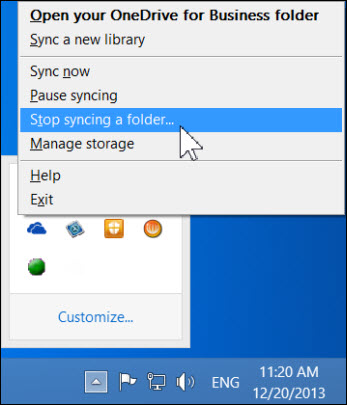
In your system tray, right-click the OneDrive sync app icon, and then select Stop syncing a folder…
-
Select OneDrive and then select Stop syncing.
-
Select Yes to confirm that you want to stop syncing this library.
Note: You'll get a message that this step permanently stops syncing but you can always just click Sync in OneDrive to start syncing again later.
Sync your Microsoft 365OneDrive library to your computer
-
Select OneDrive in the navigation bar.

This opens a new browser window with your Microsoft 365OneDrive library.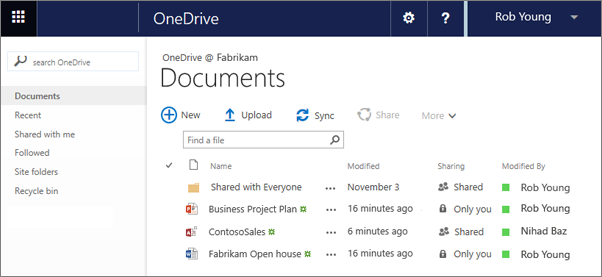
-
Select Sync.
The OneDrive sync app wizard opens.Note: If the app is named “SkyDrive Pro” instead of OneDrive, this means you’re not using the most current version of the sync app. For information on updating the app, see Update the OneDrive sync app later in this article.
-
Select Sync Now.
-
Select Show My Files to go to the synced library folder. The folder appears under your Windows favorites and is named “OneDrive @OrganizationName,” for example:
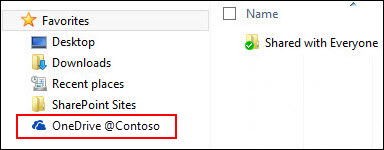
You won’t see any files in the synced library folder. So far you’ve only set up the sync connection between the folder and the Microsoft 365 library.
Upload files to your synced Microsoft 365 library folder
-
In File Explorer, open the folder where you copied files downloaded from the SharePoint library.
-
Move all the files in this folder to the synced Microsoft 365 library folder.
Tip: If you want, you can drag files to the synced Microsoft 365 library folder in your Favorites.
Important: If you’re moving a large number of files, for best results we strongly recommend that you move files in batches of no more than 100 files each.
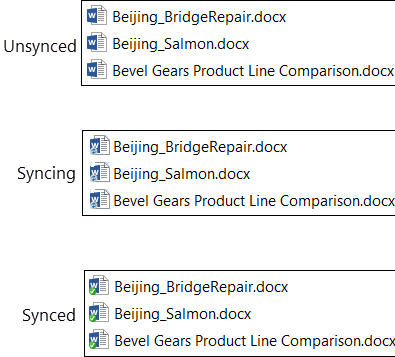
Once you’ve moved files to the synced library folder, they’re automatically uploaded to Microsoft 365. As the files upload, you can see their file icons change as shown below.
You should now be able to see them when you visit OneDrive on Microsoft 365 in a web browser.
Tip: You can quickly navigate to the library in a web browser. In the synced library folder, right-click any file, select OneDrive for work or school, and then select Go to browser.

My OneDrive library has more than 20,000 items
If your OneDrive library has more than 20,000 items, you can’t use the sync app as described in this article to move your files to Microsoft 365.
The item count in OneDrive is comprised of files and folders in the library, plus any files in your SharePoint recycle bin.
How many items do I have in OneDrive for work or school?
To see the number of items in OneDrive, you can create a view that counts items. You can also count the files and folders in OneDrive using the Open with Explorer option:
-
Go to your OneDrive library in SharePoint Server 2013.
-
On the Library tab, select Open with Explorer.
-
In File Explorer, right-click in the file list and select Properties.
The General tab in the Properties dialog box lists the number of files and folders.
Recommendations
If possible, reduce the number of items you’re storing in OneDrive so that you can use the sync app to move your files as described in this article.
If you really need to move more than 20,000 items, you can use the Open with Explorer option, though it may take a long time to do this. For details, see Upload files to a library. Alternatively, a programmer may be able to create a script to move your files more quickly.
Notes about moving files to Microsoft 365
Note the following details about moving files from SharePoint Server 2013 to Microsoft 365:
-
Files don’t retain their original metadata.
Files you move from SharePoint Server 2013 to Microsoft 365 are essentially recognized as new files. As a result, these files don’t retain metadata details such as Modified and Modified By. -
OOneDrive for work or school has a storage limit of 1 TB.
-
OneDrive for work or school restricts the following file types: ASHX, ASMX, JSON, SOAP, SVC, XAMLX.
Move OneNote notebooks to Microsoft 365
The OneDrive sync app doesn’t support OneNote notebooks. To move notebooks from SharePoint to Microsoft 365, we recommend that you create new notebooks in Microsoft 365 and then copy sections from the original notebooks to the new notebooks.
-
In OneDrive for work or school, create a new notebook.
Important: Name the notebook using the same name as the original notebook in SharePoint.
-
In SharePoint, sync the notebook you want to move, and then copy all sections.
-
In OneDrive for work or school, open the new notebook and paste the sections from the original workbook.
-
Delete the original notebook from the SharePoint library.
Update the OneDrive sync app
If you have a Click-to-Run installation of the OneDrive sync app (most common), you’re probably getting updates automatically. To check for updates, select File ->Office Account from any Office program such as Word or Excel. If you’re not running Microsoft Office, you receive all updates to the sync app automatically.
If you don’t see information about Office Updates on an Office program Account page, this means you have an msi installation of the OneDrive app. In this case, check for updates using Windows Update.


