You may need to respond to a private meeting invitation on the requester’s Bookings with me page. Or you might initiate a meeting through a link to their page.
Access the meeting page
-
Go to the Bookings page for the intended meeting. You can do this with the Organizer’s meeting invitation or their public page link. If you go directly to that page, you can select a meeting type to get started.
-
If you are signed in with your work or school account, the system will connect to your calendar availability. Otherwise, follow the prompts to sign in with your credentials or via the guest-user process, which will email you a verification code to submit for access.
Note: Sign-in enables full calendar access integration. Guest users will be able to proceed, but with some differences, which will be noted here.
Optional settings
Time zone
Guest user: The time zone is pulled from your browser. Logged in: Use the default time zone per your Outlook calendar or click the globe button and select a different time zone for booking this meeting.
Meeting availability filters
Guest users: You can only filter by Within meeting hours of 8am-9pm.
Logged-in users: Select one or both of the following:
-
Available shows available meeting times per your Outlook calendar availability.
-
Within meeting hours shows only times within your Outlook-specified standard meeting hours.
Find a preferred date and time
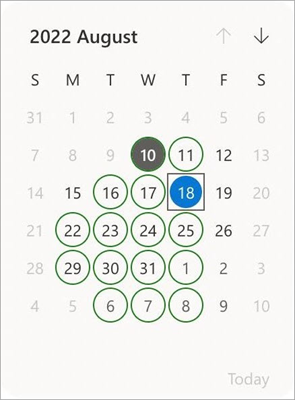
The displayed calendar shows available meeting dates.
|
Signed-in Smart Calendar |
Guest-user calendar |
 |
 |
|
Gray filled circle: Today. Light gray date: No availability. Dark-gray date: The Organizer has available times for this day. Green circle: Mutual availability. You both can meet on that day. Color-filled circle: Your currently selected date. |
Color-filled circle: Today. Light gray date: No availability. Dark-gray date: The Organizer has available times for this day. Color-filled square: Your currently selected date. Information here is limited per access to only the Booking page owner’s data. |
-
Select a preferred meeting date.
-
View the displayed available timeslots for the selected day. Signed-in users can hover over time slots for details about known time conflicts.
-
Click to choose one of the available timeslots.
-
Select Next to proceed with booking.
Confirm Booking
A message box displays your selected meeting date and time along with known attendee information.

-
Guest user: Add your Name and Email.
-
Optionally add information in the Notes area.
-
Guest user: Complete the validation steps.
-
Select Book to proceed.
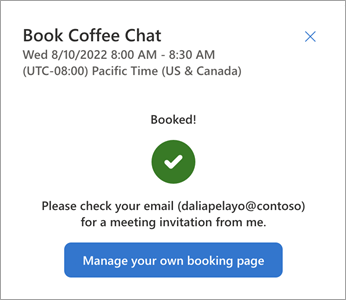
Confirmation Messaging
-
Allow a few minutes for the process to complete.
-
Watch for a confirmation email and calendar invite, similar to a note that is sent to the Booking page owner.
-
Optionally use the links in subsequent messages to manage the meeting or initiate follow-up actions.