Video: Save a presentation in a different format
Applies To

To make a PowerPoint presentation more accessible to people with disabilities, save it in an alternate format that can be read by a screen reader. Your audience can open it on a personal device or port it to a Braille reader.
Create a Word version of a presentation
-
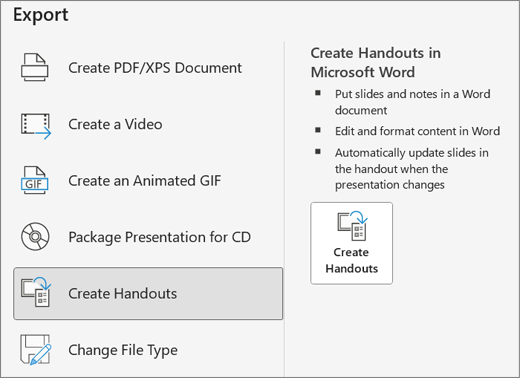
In your PowerPoint presentation, on the File tab select Export.
-
In the Export dialog, choose Create Handouts and then select Create Handouts.
-
Select Notes below slides to display the slides first, followed by the presentation notes.
-
Select Paste to include the slide images in the Word document, .
-
Select OK to create the Word document,
Make the Word version of the presentation more accessible
To make your presentation handouts more informative to the screen reader users, add the slide titles as headings and alternative text to each slide image.
Add slide headings
People who use screen readers use headings to navigate the document.
-
In the Word version, add a colon after each slide number, and then copy and paste the appropriate title from the PowerPoint presentation.
-
Select the slide title, and then on the Home tab, choose Heading 1 under Styles,
-
Once you’ve finished adding titles, check the outline of the presentation. Select View and choose Navigation Pane. Sometimes people who use screen readers or Braille review the navigation first to get an overview of the document.
Add alternative text to slide images
The slides are embedded as images to the Word version of your presentation. As the screen readers don’t read the text in the images, you need to add alternative text repeating the slide text and describing the slide content.
-
Right-click the slide image, choose Picture and select the Alt Text tab.
-
Type the alt text that describes the slide content, not only the possible image on the slide. Also, repeat the slide text in the description.
Check the document for accessibility
-
On the Review tab, select
-
Check and fix any issues shown in the right pane.
If you’ve followed the Rules for the Accessibility Checker in your Word document, the inspection results shouldn’t show any errors.
Want more?
Make your PowerPoint presentations accessible to people with disabilities
Improve accessibility with the Accessibility Checker
It can be difficult to catch everything that’s covered in a live or broadcast presentation. People with disabilities appreciate an alternative version of the presentation, such as a Word or PDF document.
A Word or PDF version of a presentation can be read by all of your audience members, as well as by anyone using a screen reader. It can also be opened on a personal device, like a smartphone, or ported to a Braille reader.
Here’s a presentation about Skype for Business that we presented at a conference, opened in PowerPoint.
To begin, I’ll select File > Export > Create Handouts.
And then select Create Handouts to create a Word document – I’ll be able to save the Word version as a PDF after I’ve made it accessible.
Now I’ll decide how I want to arrange the pages in Word.
I like to put Notes below the slides, which is easier to navigate with a keyboard or screen reader.
And I’ll select Paste for Add slides to Microsoft Word document.
After a few seconds, the Word version opens.
In Word, I make sure I’m in Read Mode, so I can quickly scan the document.
I can see each slide has its own page with the slide notes below the slide.
Each slide is labeled with the slide number. People who use screen readers appreciate headings, which help them navigate.
I’m going to add some headings.
First, I’ll switch to an edit mode.
I’ll add the slide title and select it.
Now I’ll format it with Heading 1 Style.
Next, I’ll add alt text to the slide images.
These are embedded versions of the slide itself.
Screen readers read the embedded versions of the slide as images, so they don’t read the text in the images. I need to add alternative text repeating the slide text and describing the slide.
I select the first slide picture in the Word document, then right-click.
I select Picture, then select Alt Text.
Now I’ll type the alternative text:
Title slide and the presentation title, names of the presenters, and a description of what the background image shows.
I’ll make both of these changes on each slide.
I can check my progress in the Navigation pane.
Sometimes people who use screen readers or Braille review the navigation first to get an overview of the document.
I’ve finished a few steps to make this document accessible, so I’ll have Word check the document accessibility for anything else.
And it looks like I have only minor issues.
Blank characters are a bit irritating, because screen readers say, “Blank”. So here, the screen reader would say, “Blank Blank Blank Blank” over and over.
To fix these, just select the first item (“6 Characters”), and Word will highlight the location in the document.
I’ll Show paragraph marks so I can see the blank characters.
Here are 6 from the first slide. I’ll go ahead and delete these.
Repeat this for the remaining repeated blank characters from the list.
When I’m finished, I’ll save the document with a meaningful name. I can save it in Word or as a PDF file.
I now have an additional, accessible version of the presentation to share with anyone who needs it.
To learn more about accessibility, go to aka.ms/OfficeAccessibility


