We all know that typing can be frustrating at times - dealing with typos, long words, and the inevitable autocorrect fails. We’ve put together this handy guide to help you get Microsoft SwiftKey set up and working seamlessly.
1 - Customizing Microsoft SwiftKey
One of our top tips to get Microsoft SwiftKey working for you is to really get to know your way around the Toolbar and Settings - i.e. the command centre.
Toolbar
Toolbar is designed to be the home for all of the content and features you use most often.
Toolbar is easily accessible from your SwiftKey Keyboard. Just tap the icon to the left of the prediction bar to open/expand Toolbar.
For more detailed information on Toolbar please see this article.
SwiftKey Settings
Many of the settings you'll use on a day-to-day basis can be found in Toolbar. But for complete control you'll want to open the Microsoft SwiftKey Settings proper.
From Toolbar:
-
Tap the three dots ... then the 'Settings' icon.
Or:
-
Open the Microsoft SwiftKey app directly from your device.
Within these settings, you’ll be able to really fine-tune Microsoft SwiftKey and also set up things such as your language packs/layouts, your sound/vibration options, and your text correction preferences.
2 - Languages
Microsoft SwiftKey supports in excess of 700 languages, so, even if you speak more than one, there’s a good chance we support yours! Also, you can type in up to five languages at once, so this means less frustrations switching and more time spent typing to the ones you love.
Downloading/Enabling languages
First things first, where to download and enable your languages?
-
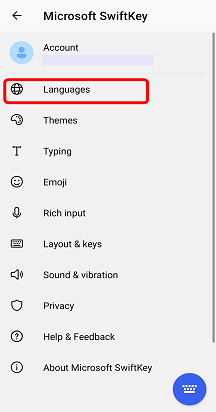
Open the Microsoft SwiftKey app: Tap 'Languages'
-
From Toolbar: Tap the three dots ... > select the 'Layouts' icon > tap the 'Globe' icon
You'll be presented with a long list of available languages. Tap on a language to download it.
Any downloaded languages will be enabled by default (up to a maximum of five at once). You'll also be given the option to change your keyboard layout should you so wish.
To learn more: What languages are currently supported for Microsoft SwiftKey on Android?
Setting Language Layout
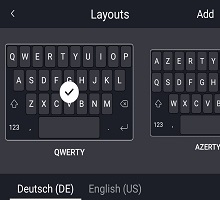
It may be that you wish to type in German, but with a QWERTY keyboard layout, or in English with a QWERTZ layout.
Once you download a language pack, tap the box underneath to see a list of available layouts and pick the one you want. Alternatively tap the 'Layout' icon found by expanding your Toolbar.
Read more: How do I change the keyboard layout (e.g. QWERTY to AZERTY)?
3 - Personalizing and backing up your words
Turbo charge your SwiftKey experience right from the beginning with a Microsoft SwiftKey Account.
Microsoft SwiftKey Account
Your Microsoft SwiftKey Account is a free opt-in service that enhances Microsoft SwiftKey Keyboard by leveraging the power of the cloud. As part of this, you can:
-
Instantly tailor your predictions to you, by letting Microsoft SwiftKey learn from the way you type on a range of social networks (including Facebook and Twitter).
-
Safely store your most used words and sync them across all your devices (never lose your learned words again).
All you need to perform this magic is to:
-
Create a Microsoft SwiftKey Account by opening the app from your device.
-
Ensure ‘Backup & Sync’ is enabled.
Privacy and Data Security
It’s important for you to know that we take privacy and data security extremely seriously. The Microsoft SwiftKey Account is an opt-in, secure, encrypted service and gives you full control over your data. Our robust Privacy Policy explains and protects your rights and privacy.
For further general reading about the Microsoft SwiftKey Account, Personalization and Backup & Sync, please continue here.
4 - Customizing your keyboard
Microsoft SwiftKey offers many options when it comes to customizing your typing experience.
Text Correction
Microsoft SwiftKey not only corrects your typos, but it also predicts your *next* word (i.e. reads your mind!). Your spacebar plays a big role here, you can set it so it does one of the following:
-
Always inserts the middle prediction (check 'Quick prediction insert')
-
Always completes the current word you’re typing (check 'Autocorrect')
-
Always inserts a space (uncheck 'Autocorrect')
Tip: in each case, you’ll still always be able to enter predictions directly from the prediction bar.
These settings can be found in the ‘Typing’ settings page when opening the app from your device.
Input Methods
If you would like to type by seamlessly gliding your finger across the keyboard, then Flow is something you’ll want to check out. If you want to give it a spin, you can do so from the Typing > Gesture input setting page (accessed by opening the app from your device).
Learn more about Flow here.
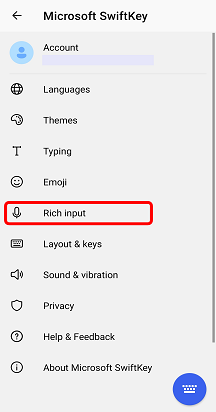
From the 'Rich input' settings you can also choose whether or not you’d like to enable the voice input key to make voice dictation possible.
Keyboard Features
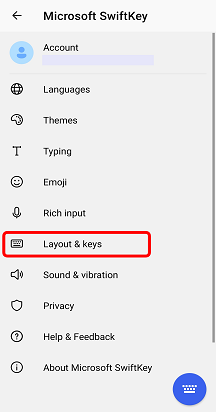
You'll also want to check out the ‘Layout & keys’ settings page - accessible by opening the app from your device and tapping Layout & keys. From here you can choose to add options to your keyboard such as:
-
Arrow keys
-
Number row
-
Additional accented characters
In addition you can choose the position of your number pad (top, left or right) and you can resize your keyboard.
For all of you who have a love for precision, you’ll be pleased to know that we also provide you with the option to select your long-keypress duration (i.e. the amount of time you need to press a key to access the secondary key options) - down to the millisecond.
Sound and Vibration
Whether you love or hate the idea of hearing a sound every time you tap a key, you can adjust your keypress sound and vibration settings under ‘Sound & vibration’ in the Microsoft SwiftKey Settings. This includes choosing the volume and duration of the sound/vibration, as well as disabling or enabling.
Want to learn more? Head to our 'Using the Keyboard' tutorial.
We all know that typing can be frustrating at times - dealing with typos, long words, and the inevitable autocorrect fails. This guide is designed for new users to Microsoft SwiftKey or those looking to gain a better understanding of features.
1 - How do I access my Microsoft SwiftKey Settings
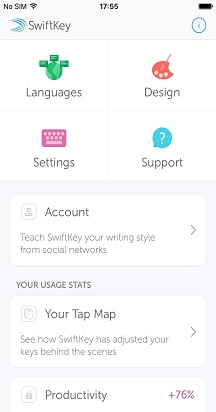
The Microsoft SwiftKey settings menu can be accessed by tapping the Microsoft SwiftKey icon from your home screen or apps list.
2 - Customizing Microsoft SwiftKey
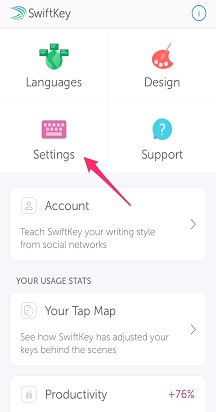
Tap on the Microsoft SwiftKey app icon to set up things like your languages/layouts, key click sounds, text correction preferences and more. You can even browse and download themes to beautify your keyboard.
3 - Languages
Your Microsoft SwiftKey Keyboard supports over 500 languages on iOS, so, even if you speak more than one, there’s a good chance we support yours! The iOS app also lets you type in up to two languages at once, this means less time spent switching and more time typing to the ones you love.
Downloading/Enabling languages
Open your Microsoft SwiftKey app and tap ‘Languages’. Here you'll see:
-
A list of available languages - just tap one to download.
-
Downloaded languages will be automatically enabled, and you can enable up to two languages at once.
Check out this article for a more detailed explanation.
Setting language layout
It may be that you wish to type in German, but with a QWERTY keyboard layout, or in English with a QWERTZ layout. So, how to change your language layout?
Once you have downloaded a language pack, simply press ‘Switch layout’ to see a list of available layouts and choose the one you want.
4 - Personalizing and backing up your words
Turbo charge your Microsoft SwiftKey experience right from the beginning with a MicrosoftSwiftKey Account.
Microsoft SwiftKey Account
The Microsoft SwiftKey Account is a free opt-in service that enhances your Microsoft SwiftKey Keyboard by leveraging the power of the cloud. As part of this, you can:
-
Instantly tailor your predictions to you by letting Microsoft SwiftKey learn from the way you type.
-
Safely store your learned language data and sync it across all your devices (never lose your learned language data again).
All you need to perform this magic is to:
-
Create a Microsoft SwiftKey Account (accessed by opening the app from your device and tapping ‘Account’).
-
Ensure ‘Backup & Sync’ is enabled.
Privacy and Data Security
It’s important for you to know that we take privacy and data security extremely seriously. The Microsoft SwiftKey Account is an opt-in, secure, encrypted service that gives you full control over your data. Our robust Privacy Policy explains and protects your rights and privacy.
For further information about the Microsoft SwiftKey Account, Personalization and Backup & Sync, please see here.
5 - Customizing your keyboard
Microsoft SwiftKey offers many options when it comes to customizing your typing experience.
Text correction
Your Microsoft SwiftKey Keyboard not only corrects your typos, but it also predicts your *next* word (i.e. reads your mind!).
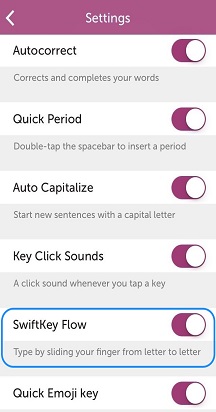
No matter what your typing style, Microsoft SwiftKey allows you to choose whether or not you want autocorrect turned on.
This option can be found in the 'Settings’ panel (accessed by tapping your Microsoft SwiftKey app icon).
Flow
If you would like to type by seamlessly gliding your finger across the keyboard, then Flow is something you’ll want to check out!
Give Flow a spin by turning if on from the ‘Settings’ panel. You can learn more about Flow here.
Key Click Sounds
Whether you love or hate the idea of hearing a sound every time you tap a key, you can enable or disable key clicks under ‘Settings’.
Please note that if keyboard clicks are turned off in Apple settings > Sounds, this will not affect the settings selected in Microsoft SwiftKey. However, muting ‘Ringer and Alerts’ in Apple settings > Sounds, will also mute Microsoft SwiftKey’s key click sounds.
For more detailed information, please see this article.
Haptic Feedback
We've added Haptic Feedback to Microsoft SwiftKey. Small vibrations can be felt when opening the emoji panel, long-pressing the emoji/globe key, and activating the 'emoji bomb'.
Support for Haptic Feedback is limited to iPhone 7 and above. It is enabled by default, so you don't need to do anything.
If you want to learn more move on to our ‘Using the Keyboard’ tutorial.
6 - Can I sign in to SwiftKey with my Facebook account?
You can no longer login to SwiftKey via Facebook as of late 2023. The available options for logging in are a Microsoft account, a Google account, or an Apple ID. If you have been using a Facebook account for logging into SwiftKey prior to 2024, you will need to switch to using any of the other mentioned options.
Contact Us For more help, Contact Support at Microsoft SwiftKey Support - Contact us

