When you add a border to a picture, text, or page, you can make those elements in your document stand out. You can do the same with the tables in your documents.
Note: This article describes procedures for Office for Mac applications. For Windows procedures, see Add, change, or delete borders from documents or pictures
Depending on the program you're using, you can add a border to a table by using the Border Styles gallery, you can apply a pre-designed table style, or you can design your own custom border.
Word
The quickest way to add borders in Word is from the Border Styles gallery.
-
Click in the table, and then click the Table Move Handle to select the table.
The Table Tools Design tab appears. (In Office for Mac, the Table Design and Layout tabs appear. Click the Table Design tab.)
-
Click Border Styles and choose a border style.
-
Click Borders and choose where you want to add the borders.
Tip: To change or add borders for part of your table, check that Border Painter is selected and then, in the table, click each border that you want to change or add. Word applies the border style you’ve already chosen, and you don’t need to select the table first.
Applying a pre-designed table style is another quick way to make your table stand out. Table styles add coordinating borders, shading, and text formatting.
-
Click inside a table, and then click the Table Tools Design tab (the Table Design tab in Office for Mac).
-
In the Table Styles gallery, click a table style. To see more gallery styles, click the More arrow. (This arrow appears below the gallery in Office for Mac.)
To design your own custom border, choose the color, width, line style, and where you want to apply the borders.
-
In Word or Outlook, click in the table, and then click the Table Move Handle to select the table.
In PowerPoint, click anywhere on the outside border of the table to select it. (The Table Move Handle does not appear in PowerPoint.)
-
Click the Table Tools Design tab (the Table Design tab in Office for Mac).
-
Design your border.
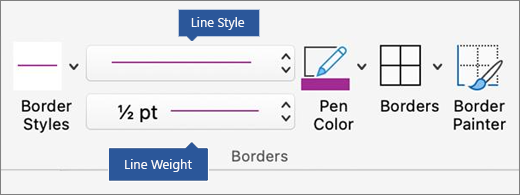
Click Line Style (Pen Style in PowerPoint) and choose a style.
Click Line Weight (Pen Weight in PowerPoint) and choose the border width you want.
Click Pen Color and choose a color.
-
Click Borders and choose the borders you want.
Tip: To change or add borders for part of your table, check that Border Painter is selected and then click each border in the table. Word adds a border in the style, width, and color you’ve already chosen, and you don’t need to select the table first.
PowerPoint
Applying a pre-designed table style is a quick way to make your table stand out. Table styles add coordinating borders, shading, and text formatting.
-
Click inside a table, and then click the Table Tools Design tab (the Table Design tab in Office for Mac).
-
In the Table Styles gallery, click a table style. To see more gallery styles, click the More arrow. (This arrow appears below the gallery in Office for Mac.)
To design your own custom border, choose the color, width, line style, and where you want to apply the borders.
-
In Word or Outlook, click in the table, and then click the Table Move Handle to select the table.
In PowerPoint, click anywhere on the outside border of the table to select it. (The Table Move Handle does not appear in PowerPoint.)
-
Click the Table Tools Design tab (the Table Design tab in Office for Mac).
-
Design your border.
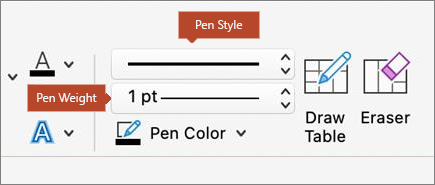
Click Line Style (Pen Style in PowerPoint) and choose a style.
Click Line Weight (Pen Weight in PowerPoint) and choose the border width you want.
Click Pen Color and choose a color.
-
Click Borders and choose the borders you want.
Tip: To change or add borders for part of your table, check that Border Painter is selected and then click each border in the table. Word adds a border in the style, width, and color you’ve already chosen, and you don’t need to select the table first.
Important:
Office for Mac 2011 is no longer supported. Upgrade to Microsoft 365 to work anywhere from any device and continue to receive support.
Upgrade now
Word
-
Click the table or select the cells to which you want to add borders.
-
On the Tables tab, under Draw Borders, click Borders, and then click the borders that you want.
-
Click the table or select the cells where you want to add or change borders.
-
On the Tables tab, under Draw Borders, on the Line Style pop-up menu, click the line style that you want.
-
On the Tables tab, under Draw Borders, click Borders, and then click the borders that you want.
-
Click the table or select the cells where you want to add or change borders.
-
On the Tables tab, under Draw Borders, on the Line Weight pop-up menu, click the line weight that you want.
-
On the Tables tab, under Draw Borders, click Borders, and then click the borders that you want.
-
Click the table or select the cells in which you want to remove borders.
-
On the Tables tab, under Draw Borders, click Borders, and then click None.
PowerPoint
-
Click the table or select the cells to which you want to add borders.
-
On the Tables tab, under Draw Borders, click the arrow next to Borders
, and then click the borders that you want.
-
Click the table or select the cells where you want to add or change borders.
-
On the Tables tab, under Draw Borders, on the Line Style pop-up menu, click the line style that you want.
-
On the Tables tab, under Draw Borders, click the arrow next to Borders
, and then click the borders that you want.
-
Click the table or select the cells where you want to add or change borders.
-
On the Tables tab, under Draw Borders, on the Line Weight pop-up menu, click the line weight that you want.
-
On the Tables tab, under Draw Borders, click the arrow next to Borders
, and then click the borders that you want.
-
Click the table or select the cells where you want to add or change borders.
-
On the Tables tab, under Draw Borders, click the arrow next to Line Color
, and then click the line color that you want.
-
On the Tables tab, under Draw Borders, click the arrow next to Borders
, and then click the borders that you want.
-
Click the table or select the cells in which you want to remove borders.
-
On the Tables tab, under Draw Borders, click the arrow next to Borders
, and then click No Border
.