Create attractive, organized layouts by adding sections with columns on SharePoint modern pages. To show content side-by-side, you can add up to three columns to each section. If you are working on a page that is part of a Communication site, you can create a column that spans the entire page (including its edges), by adding a full-width column. You can also stack multiple sections with varying numbers of columns. You can even add a vertical section to the right side which is great for showing things like quick links, contacts, the weather, countdown timers, and more.
The following example has three one-column sections on the left, and a vertical section on the right:

Note: Some functionality is introduced gradually to organizations that have opted in to the Targeted Release program. This means that you may not yet see this feature or it may look different than what is described in the help articles.
Add a section layout to a page
-
Go to the page where you want to add a section.
-
If you're note in edit mode already, select Edit at the top right of the page.
-
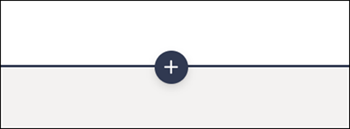
On the section borders, you'll see a line with a circled +, like this with a tooltip that says Add a new section. Hover over the button.
-
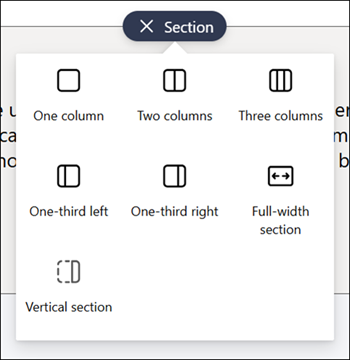
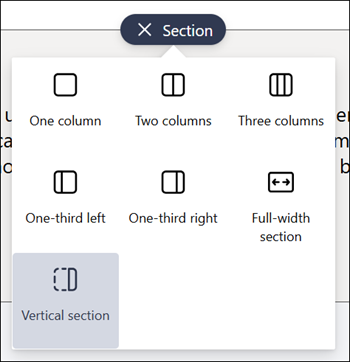
Select + Section.
-
Select the number of columns you want.
Note: Full-width sections are not available on pages that are part of Team sites. It is available only on pages that are part of Communication sites.
Add a section template
Note: Section templates are currently only available in SharePoint in Microsoft 365. This feature isn't available in SharePoint Server 2019 and SharePoint Server Subscription Edition.
-
Go to the page where you want to add a section template.
-
If you're not in edit mode already, select Edit at the top right of the page.
-
Navigate to the Toolbox

-
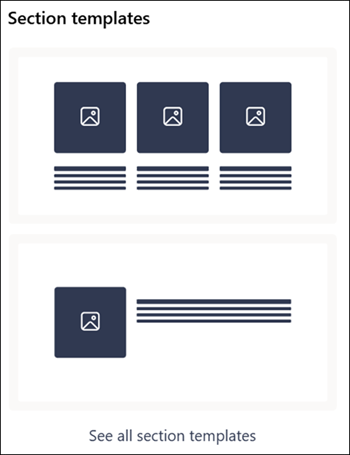
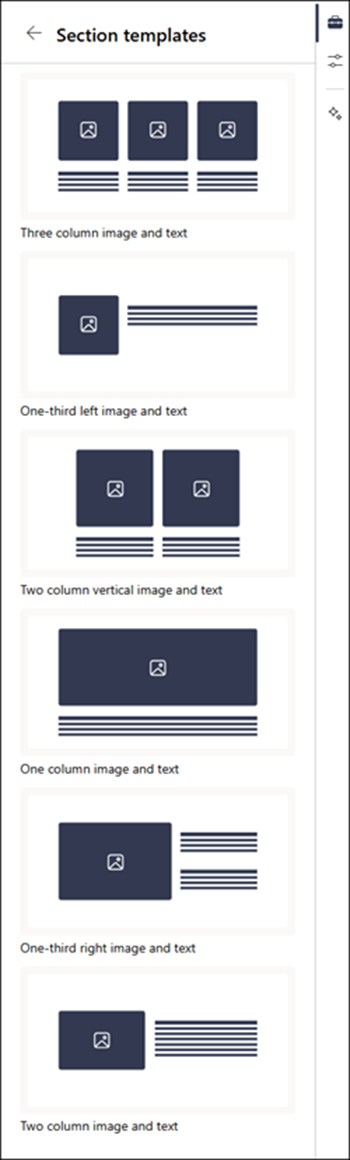
To see more section templates, select See all section templates, then select a template that best suits your needs from the list.
-
Once that template has been added to the page, insert the desired content into each field of the template.
Add a vertical section
Note: Vertical sections are currently only available in SharePoint in Microsoft 365. This feature isn't available in SharePoint Server 2019 and SharePoint Server Subscription Edition.
-
Go to the page where you want to add a vertical section.
-
If you're not in edit mode already, select Edit at the top right of your page.
-
On the section borders, you'll see a line with a circled +, like this with a tooltip that says Add a new section. Hover over the button.
-
Select + Section.
-
Select Vertical section.
-
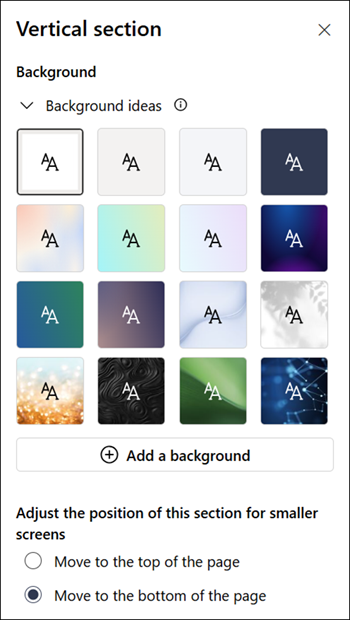
In a narrow browser window, a vertical section can be moved to the bottom or top of the page. Choose whether you want your vertical section to go to the top or bottom of your page when your browser window is condensed to a smaller size by selecting Edit properties in the section toolbar.
Notes:
-
Vertical sections are currently available only on the right side of the page.
-
Length of vertical sections is adjusted based on the content on the page, growing or shrinking with the length of content in non-vertical sections.
-
You can't have a full-width column and a vertical section on the same page.
-
In a narrow browser window, a vertical section is moved to the bottom of the page. The vertical section will return to the right side of the page when you make the window wider. This can also happen if your screen width is less than 1024 px. Try adjusting your display settings under Scale and layout. For example, in the dropdown under Change the size of text, apps, and other items, select a value of 125% or lower.
Change an existing section
Note: When you have content in two or more columns, and then reduce the number of columns, the content in the right most column will move to the next column on the left. If you reduce to one column, content in the second or third columns will move to the bottom of the first column.
-
Go to the page where you want to change a section.
-
If you're not in edit mode already, select Edit at the top right of the page.
-
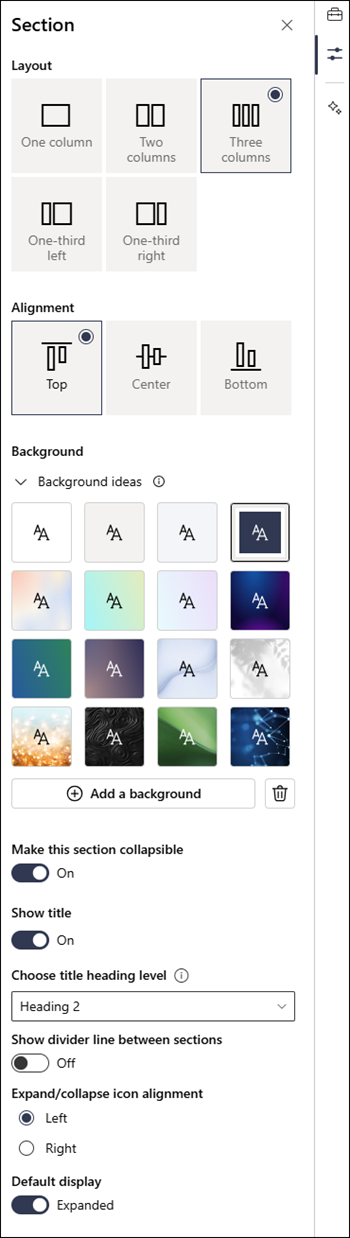
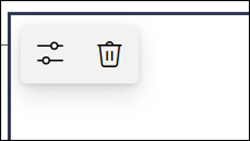
Select the section you want to edit, then select Edit properties in the toolbar at the top left of the section or select the Properties icon on the right side of the page.
-
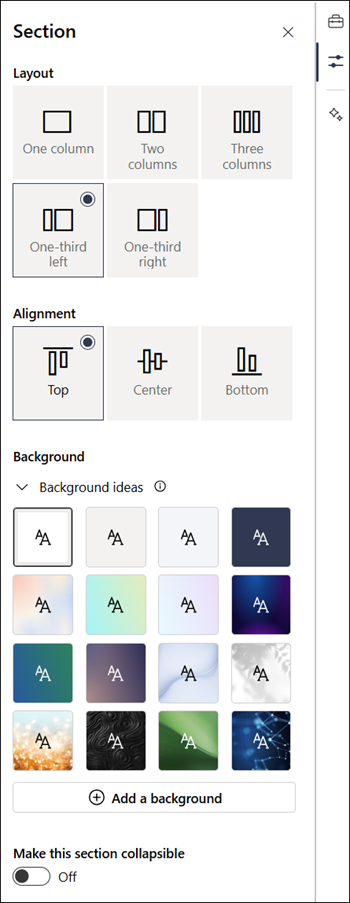
In the section properties, edit your section by choosing the number and type of columns you want. You can also align the content within the section and choose a section background. The top four background colors are based on your site theme.
Notes:
-
The section background color shows through most web parts, as in the text web part shown below (on the left). Other web parts maintain the background of the page rather than the section. For accessibility purposes, the List, Document library, and Quick chart web parts will always maintain the page background.
-
Web parts that will eventually allow section background to show through, but do not today, are: Site activity, Yammer conversations, Yammer highlights, List properties, Page properties, Group calendar, Bing news, and Microsoft Power Apps. For best results, we recommend not using a section background color for sections that contain these web parts.
Add content to a column
-
If you're not in edit mode already, select Edit at the top right of the page.
-
Select Toolbox
To learn more about how to find and use web parts, check out Using web parts.
Make sections collapsible
Note: Make sections collapsible is currently only available in SharePoint in Microsoft 365. This feature isn't available in SharePoint Server 2019 and SharePoint Server Subscription Edition.
-
If you're not in edit mode already, select Edit at the top right of the page.
-
Select the section you want to make collapsible, then select Edit Properties in the section toolbar or Properties on the right of the page.
-
In the Section properties, under Make this section collapsible, switch the toggle on.
-
Decide if you want to have a section title by switching the toggle to the desired option. If so, enter the name at the top of the section and adjust the title heading level.
-
Choose whether or not you want to enable the divider line between sections by switching the Show divider line between sections toggle on or off.
-
Choose the expand/collapse icon alignment by selecting Left or Right.
-
For each section, decide if the Default display will be expanded or collapsed by switching the toggle to the desired option.