
The To-Do bar is one of the panes you can add to Outlook for your PC or laptop. You can use the To-Do bar to display your upcoming calendar events, your task list, or your favorite contacts.
Note: The To-Do bar feature is not available in the New Outlook for Windows client. However, similar functionality is available by clicking My Day. For more information, please see Use My Day in Outlook.
Turn the To-Do Bar on or off
-
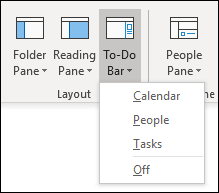
To display the To-Do Bar, select View > To-Do Bar.
-
Select Calendar, Tasks, or People. You can pick one type of item to display in the To-Do bar, two types of items, or all three.
-
To turn the To-Do Bar off, select View > To-Do Bar > Off.
Customize the To-Do Bar
Sections in the To-Do Bar appear in the order you added them. So if you added the Calendar section, then the Tasks section, then the People section, they will appear in that order. If you want to change the order, you'll need to close the different sections and re-add them in the order in which you want them to appear.
For example, if you added the Tasks view, then the People view, then the Calendar view and you want to display the Calendar on top of the To-Do Bar instead of the bottom, use the following steps.
-
Select View > To-Do Bar > Tasks to hide the Tasks view.
-
Select View > To-Do Bar > People to hide the People view.
-
You should now have only the Calendar view showing.
-
Select View > To-Do Bar > People to place the People view directly under the Calendar view.
or
select View > To-Do Bar > Tasks to place the Tasks view directly under the Calendar view.
Customize the sort order of Tasks in the To-Do Bar
If you want to customize the sort order of task items in the To-Do Bar, use the following steps.
-
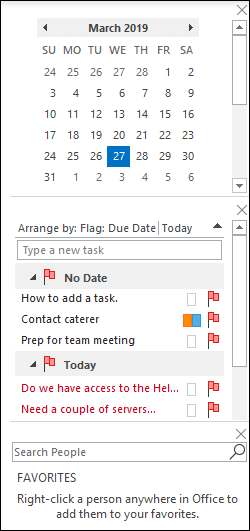
At the top of the To-Do Bar's tasks area, click Arrange by: Flag: Due Date, then select Arrange By to change how tasks are organized.

-
To sort tasks in the opposite order, select the up or down arrow on the right side of the To-Do bar to reverse the sort order.
Change which contacts appear in the People section of the To-Do Bar
All contacts you've added to Favorites appear in the People section of the To-Do Bar.
-
To add a contact to Favorites, right-click the person's name either from an email message or from your Contacts folder and select Add to Favorites. That person will now appear in the People section of the To-Do Bar if you've enabled that section.
-
To remove a contact from Favorites, right-click the person's name in the To-Do Bar and select Remove from Favorites. That person is still in your Contacts, but won't appear in the To-Do Bar.
Note: You cannot customize the calendar section of the To-Do Bar.


