Get started in Updates
Applies To

Welcome to Updates, an out-of-the-box app that allows you to create, submit, and review updates. People can easily see their employee updates, check-ins, and reports in one place to make sure the team is on track for success, whether those are recurring processes that happen on a regular basis or in-the-moment updates that might be needed at any time.
Whether on a desktop or mobile device, workers are alerted in the flow of work and can easily complete and submit updates, saving everyone time and energy.

Open the Updates app
You’ll find Updates on the left side of Teams with other apps. Select it to start sending and receiving updates. If you don’t see it there, select + Apps on the left side of Teams and search for Updates.
Request an update
From the app, you can request your teammates to update their work status by requesting an update:
-
Choose one of our recommended Templates that complement your everyday updates. If you choose a Template, preview the contents, or select Use template.
-
You can select Explore all templates for more templates and choose Start from blank for anything in-between.
-
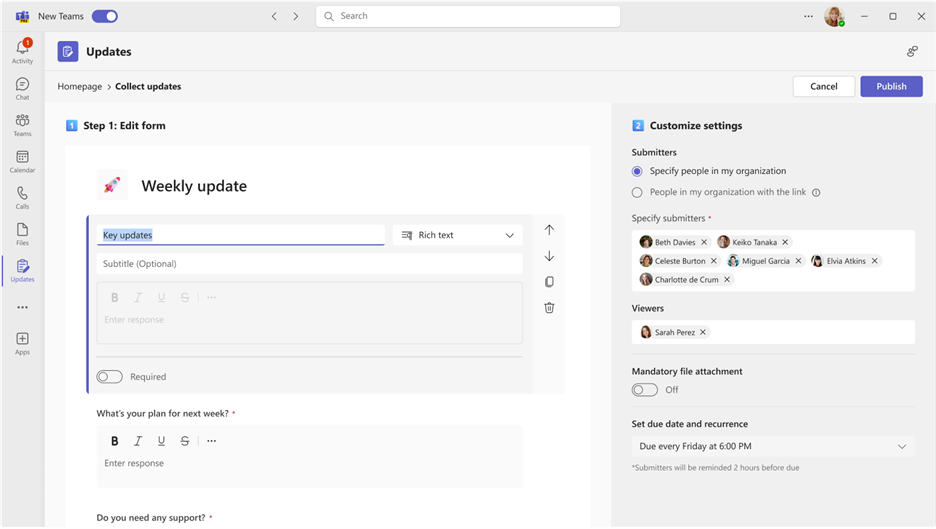
Configure the update request name, adjust and/or add any questions to the template in Edit form.
-
Assign users as Submitters if they need to complete and add content to the update. Assign users as Viewers if they can see and track update progress and the details of the submissions; Decide if Submitters are required to attach files and select Set due date and recurrence at specific times.
-
Select Publish.
For Submitters, the update request appears in the Needing your updates section on the homepage. If you make an update request, you can add a due date, a time, and the status of completion.
Manage update requests
Update requests can be edited and can be made available by Assigners if they’re needed and made unavailable if they’re not.
-
Select My requests on the homepage.
-
Under Actions, select More options (...).
-
Disable makes the request not available for use, Enable makes the request active and available for use, and Edit allows you to edit the request.
Submit an update
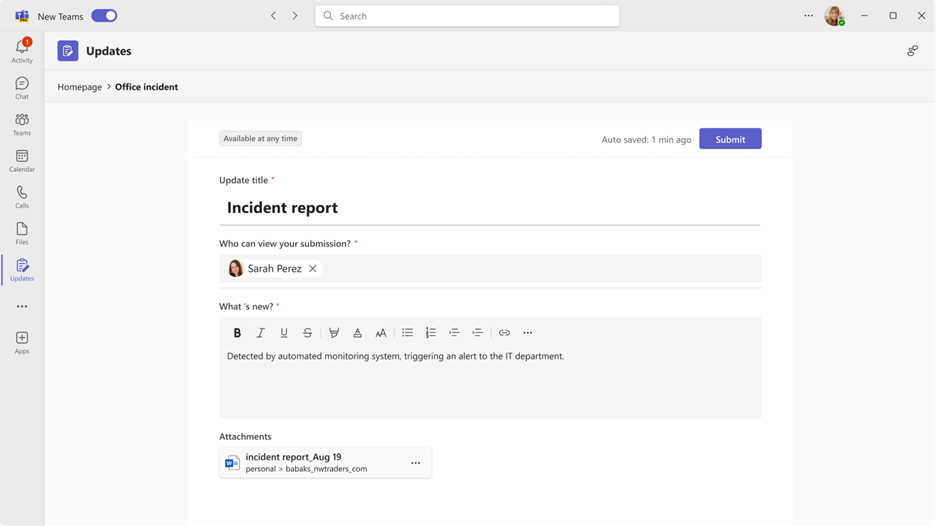
Submitters can complete and add content to the update requests that have been assigned to them.
-
Go to Updates app homepage and choose any one of the assigned requests under Needing your updates.
-
Once you’ve added all your information and attachments, select Submit.
You can also Submit a quick update to your teammates:
-
Select Quick update in the top right corner of the app.
-
Add your content and specify people you want to submit the update to as Viewers.
-
Select Submit.
View an update
Viewers can keep up to date with the progress of updates and view the details of submitted updates.
-
Go to Updates app homepage and navigate to Review updates. Review the submission status for each request briefly.
-
Choose a card to see all updates from that specific request.
Note: Choosing cards will display all the updates from that specific request, in order of submission, and in relation to each due date if it's a recurring request. Selecting a specific request shows the full details of the submission.
-
Select Customize to specify what type of update data to be highlighted.
-
Choose an update to see the details and attachments of that specific submission, or switch viewing modes to view submission content for a specific question.
Create, send, and receive updates in chat or channel
From your desktop, enter any chat or channel conversation and request an update from the Update app message extension. You can assign which members in current chat or channel as Submitters and Viewers.
-
Enter your desired team chat or channel.
-
Select More options (+) next to the send message button.
-
Choose one of the Templates that complements your everyday updates. If you choose a template, preview the Contents, or select Use template.
-
Configure the update request name, adjust and/or add any questions to the template in Edit form.
-
By default, everyone in the team chat or channel are assigned as Submitters and Viewers. You can choose to expand the list and make adjustment; Decide if Submitters are required to attach files and select Set due data and recurrence at specific times.
-
Select Publish.
The Update app message extension also allows people to submit updates.
-
Enter your desired team chat or channel conversation.
-
Select More options (+) next to the send message button.
-
Select Updates app.
-
Choose or review Any assigned request created from this team chat or channel.
Note: If there's already an update request card in the chat or channel and you have been assigned as a Submitter, select the card to submit a response. If you have been assigned a Viewer role, select the card to view the submissions.
The update request that is created or update submitted will appear in the group chat or channel as a card allowing Submitters to submit an update from it or Viewers to view the submission.

Open the Updates app
You’ll find Updates in Teams on the bottom of your mobile screen. Select … More, and it should appear in the app list. If it is not in the list, click + Add app at the end of the app list and search for Updates.
See your updates
In Updates, the Submit tab displays updates that need to be submitted, and the Review tab displays updates you can view. Each person has Scheduled and General updates to submit or view.
Scheduled updates have been assigned a due date. General updates have yet to include a due date but are available for in the moment events such as facility inspections, incident reports, and more.
People can request, submit, and view updates.
If it’s your first-time using Updates, don’t worry, we’ll show you the process of staying up to date with your team and give you some tips on how to use the app.
Request an update
Update requests can only be created from the desktop app. To start collecting updates from your team, click on the Desktop tab above and follow the steps there.
Manage update requests
Managing update requests can only be done on the desktop app. To begin editing, click on the Desktop tab above and follow the steps.
Submit an update
Submitters can complete and add content to update requests that have been assigned to them.
-
Select the Submit tab at the top of the app.
-
Choose an update request in Scheduled or General.
-
Once you’ve added all your information and attachments, select Submit.
All your submitted updates in Your Submissions, which is located below the Scheduled and General sections.
In the Submit tab, selecting See all will display your assigned updates that can’t fit in the Scheduled and General sections.
View an update
Viewers can keep up to date with the progress of updates and view the details of submitted updates.
-
Select the Review tab at the top of the app.
-
Select a card to see updates from that specific template.
Note: Selecting cards will display all updates from that specific template, in order of submission, and in relation to each due date if it’s a recurring update. Clicking on a specific update will display the full details of the submission.
-
Choose an update located beneath Received to see the details of that specific submission.
Updates listed under Scheduled will showcase each template’s Submission rate and total number that have been Submitted and are Unsubmitted. Updates under General will showcase the number of Submissions and New submissions.
In the Review tab, selecting See all will display all the Scheduled and General updates.
Send and receive updates in chat
From your mobile device, submit and receive updates from the message extension.
-
Enter your desired team chat or channel.
-
Click +in the bottom left corner of the compose bar.
-
Select Updates app.
-
Choose your desired update request. Add your information and add Viewers if necessary.
-
Select Submit.
The update appears in the group chat or channel as a card allowing Viewers to view the submission. If there's already an Update card in the Chat or Channel and you have been assigned as a Submitter, select the card to submit a response directly for that update. If you have been assigned as a Viewer, select the card to view the submissions.
Want more?
For IT admins
Manage the Updates app for your organization in Microsoft Teams


