In a Microsoft Office InfoPath form template, you can use a text box to collect information from users or to display data from a database or other external data source.
In this article
When to use a text box
Use a text box when you want to:
-
Enable users to type any amount of plain text into a form.
-
Display information, such as the result of a formula or the current date.
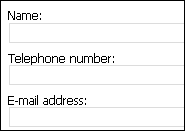
In the following illustration, text boxes are used to collect contact information from users.
By default, when you insert a text box on your form template, InfoPath adds a single-line text box. If you want the text box to display multiple lines of text instead, you can enable paragraph breaks or text wrapping for the text box after you insert it. Alternatively, you can use a rich text box.
Related controls
InfoPath includes controls that are similar to text boxes but that serve different purposes. To decide which of these controls works best on your form template, refer to the following list:
Rich text box Like a regular text box, a rich text box allows users to type, edit, or view text. Unlike a text box, a rich text box displays multiple lines of text by default. Users can also add formatting elements to a rich text box, such as bold or italic text, pictures, and tables. The formatted data in a rich text box is stored as XHTML, which may not be compatible with data sources that expect short sequences of plain text.
Expression box An expression box is generally used to display read-only text, to display the value of another control on the form, or to create formulas that are based on XPath expressions. Unlike a text box, an expression box does not store or save data. Therefore, you should use an expression box only if you don't want to save its value or reference it in another formula.
You can use text boxes by themselves or add them to repeating tables, sections, or other layout-related controls. For example, text boxes often appear inside the cells in a repeating table.
The user experience
Entering data into a text box is easy. Users place their cursor inside the text box and then type the required information. The data appears in the form as plain text.
Tip: If you want users to be able to apply character formatting to text in a text box, you can use a rich text box instead of a standard text box.
Text boxes include several familiar Microsoft Office system features. For example, if users misspell a word in a text box, they see the familiar wavy red underline, which signals a possible spelling error.
Along with the spelling checker, the AutoComplete feature is enabled for text boxes by default. AutoComplete saves previous entries that users have typed into a form. When a user types the first few characters into a text box, InfoPath lists possible matches from entries that the user has typed before. This makes it easier for users to enter repetitive or common data, such as their name or address, into the forms that they fill out.
Note: When you design a form template in InfoPath, you can choose to design a browser-compatible form template. When you design a browser-compatible form template, some features, such as the spelling checker, are unavailable for use in InfoPath because they do not work in a Web browser.
Insert a text box
The procedure for inserting a text box differs slightly depending on whether you are designing a new, blank form template or basing the design of your form template on a database or other external data source.
The following illustration shows how a text box looks when it is selected in design mode.
Controls can be bound or unbound. When a control is bound, it is connected to a field or group in the data source so that data entered into the control is saved in the underlying form (.xml) file. When a control is unbound, it is not connected to a field or group, and data entered into the control is not saved. When you select or move your pointer over a control, text and a binding icon appear in the upper-right corner of the control. The text indicates the group or field to which the control is bound in the data source. The icon indicates whether the control is correctly bound to that group or field. When the binding is correct, a green icon appears. If there's something wrong with the binding, you'll see a blue or red icon instead.
The data source for the form template consists of fields and groups that appear in a hierarchical view in the Data Source task pane. Text boxes are always bound to fields. In the following example, the Last Name text box on the form is bound to the LastName field in the Data Source task pane.
Insert a text box on a new, blank form template
When you design a new, blank form template, the Automatically create data source check box in the Controls task pane is selected by default. This enables InfoPath to automatically create fields and groups in the data source as you add controls to the form template. These fields and groups are represented by folder and file icons in the Data Source task pane.
-
On the form template, place the cursor where you want to insert the control.
-
If the Controls task pane is not visible, click More Controls on the Insert menu, or press ALT+I, C.
-
Under Insert controls, click Text Box.
-
To add a label to the control, type text above or to the left of the control, followed by a colon (:). For example, if the text box is meant to collect a user's last name, you can type Last Name:.
Insert a text box on a form template that is based on an existing data source
If you base the design of your form template on an existing Extensible Markup Language (XML) file, database, or Web service, InfoPath derives the fields and groups in the Data Source task pane from that existing data source. In this scenario, you can insert a text box by dragging a field from the Data Source task pane onto the form template or by inserting a text box from the Controls task pane instead, as described in the following procedure:
-
On the form template, place the cursor where you want to insert the control.
-
If the Controls task pane is not visible, click More Controls on the Insert menu, or press ALT+I, C.
-
Under Insert controls, click Text Box.
-
In the Text Box Binding dialog box, select the field in which you want to store text box data, and then click OK.
-
InfoPath uses the name of the field or group as the control's label. If necessary, change the label text.
Tip: You can also use the Data Source task pane to insert controls. In the Data Source task pane, right-click the field that you want to bind the text box to, and then click Text Box on the shortcut menu.
Layout tips
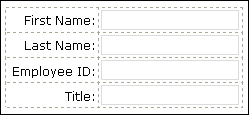
Before you insert text boxes onto your form template, think about how you want to arrange them. You can add text boxes by dragging them wherever you want on your form template, but that can result in a haphazard design. If you want more organization on your form template, you can add a layout table and then insert labels and controls inside the individual cells so that they align nicely. In the following illustration, a four-row, two-column layout table is used to arrange labels and controls.
In addition to using layout tables to organize text boxes, you can do one or more of the following:
-
To change the size of several text boxes at once, select the text boxes whose size you want to change, on the Format menu, click Properties, click the Size tab, and then make the necessary adjustments.
-
Resize the text boxes on your form template to accommodate the length of the text that you expect users to type into the boxes.
-
To change the border or color of several text boxes at once, select the text boxes that you want to change, on the Format menu, click Borders and Shading, click the Borders tab, and then make the necessary adjustments.
-
To customize the text that appears in a text box, use the Font and Font Size boxes on the Formatting toolbar. To change the font and font size for all of the text boxes on your form template at once, select the text box that contains the formatting that you want, and then click Apply Font to All Text Box Controls on the Format menu.
-
To see what your text boxes will look like with actual text in them, click Sample Data on the View menu. This helps you get a sense of what the form will look like when users fill it out.
-
Use margins to adjust the spacing around the outside of a text box. Use padding to adjust the spacing around the text inside the text box. Both settings are found on the Size tab in the Text Box Properties dialog box.
-
On occasion, the text inside a text box and the label to the left of the text box may appear to be slightly out of alignment. To quickly realign them, double-click the text box, click Align on the Size tab, and then click Apply. If the label and text box are in different cells in a layout table, right-click the cell that contains the label, click Table Properties on the shortcut menu, and then click Center under Vertical alignment on the Cell tab.


