You can use the Insert commands in the Layout tab to manage the rows and columns in tables.
Add a row or column
You can add a row above or below the cursor position.
-
Click where you want in your table to add a row or column and then click the Layout tab (this is the tab next to the Table Design tab on the ribbon).
-
To add rows, click Insert Above or Insert Below and to add columns, click Insert Left or Insert Right.
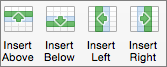
Tip: To add a row at the end of a table, click the last cell of the last row, and then press the TAB key.
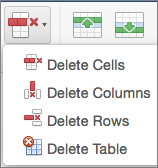
Delete a row, cell, or table
-
Click a row or cell in the table, and then click the Layout tab (this is the tab next to the Table Design tab on the ribbon).
-
Click Delete, and then click the option your need in the menu.
Note: The option to delete the table on the Delete menu is only in Word. If you want to delete a table in PowerPoint, select and delete it.