With your inbox filling up, you're probably looking for new ways to process all that email. Rules can help you sort through everything and get you to the most important mail first. Outlook for Mac can automatically run a rule on incoming or outgoing messages, based on the conditions you set.
A rule is an action performed automatically on incoming or outgoing messages, based on conditions that you specify. You can create rules to help keep you organized. For example, you can create rules to automatically file messages into folders or assign messages to categories.
Note: You can only create server rules in Outlook for Mac, client rules are no longer supported.
Create a new Rule
-
On the Outlook menu, select Settings.
-
Under Email, select Rules.
-
To create a new blank rule, select New Rule.
-
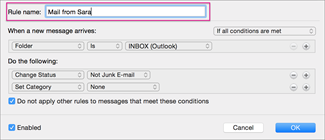
In the Rules window, Name your rule.
-
Select a Condition: Use this to select criteria for your rule. Use the down arrow to view and select the criteria you want to use. If the criteria have additional options, enter them in the window that appears.
-
Select an action: Use this to select the action you want taken when a message arrives that meets the criteria you selected.
-
More options for Rules:
-
Add additional conditions or actions to a rule by selecting Add another condition.
-
Add exceptions to a rule by selecting Add an exception.
-
By default, the option to Stop processing more rules is turned on. With this option on, when a message comes in that meets the criteria for more than one rule, only the first rule will be applied. Without this setting, all rules are applied that a message meets the criteria for. If you only want a specific rule to be applied, put that rule higher in the list than other rules, and then edit the first rule to add the option to stop processing more rules.
-
Edit an existing rule
-
On the Outlook menu, select Settings.
-
Under Email, select Rules.
-
In the Rules window, select the Edit rule

-
After making the edits you want, select Save.
Delete a rule
-
On the Outlook menu, select Settings.
-
Under Email, select Rules.
-
Select the Delete rule

Tip: If you just want to turn the rule off instead of deleting it, you can turn the toggle off next to the rule.
Additional information about rules
-
Rules are run from top to bottom in the order they appear in the Rules window. To change the order of rules, select the rule you want to move, and then select the up or down arrows to move the rule to the position you want in the list.
-
Rules can be turned on or off using the toggle next to the rule.
-
Rules can be run immediately by selecting the Run rule now play button.
Create a rule based on the sender's name or a contact group
You can create a rule that moves all messages from [name], to a folder called "Mail from [name]." If you are receiving mail from a contact group (also known as a distribution list), you can automatically move it to a specific folder as well.
-
To create a folder to hold the email messages sent by the rule, select the root mailbox, on the Organize tab, click New Folder, type the name of the folder, and press Enter.
Tip: If you've already created a folder, skip to step 2.
-
In the message list, click an email message with the sender or recipient you want to create a rule for.
-
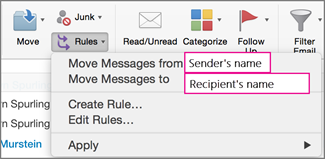
On the Home tab, click Rules, and then click Move Messages from (sender's name) or Move Messages to (recipient's name).
-
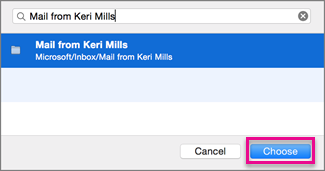
In the folder search box, start typing the name of the folder you want to move messages to.
-
When the folder you want appears, click the folder name, click Choose, and then click OK.
Notes:
-
If you have a Microsoft Exchange account managed by Microsoft Exchange Server 2010 or later, the rule is automatically saved on the server.
-
If you create multiple rules, Outlook runs the rules in the order in which they are listed in the Rules window.
-
Create a rule based on an existing message
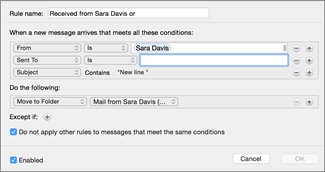
When you create a rule from an existing message, the sender, recipient, and subject are automatically pre-populated into the rules instructions.
-
To create a folder to hold the email messages sent by the rule, select the root mailbox, on the Organize tab, click New Folder, type the name of the folder, and press Enter.
Tip: If you've already created a folder, skip to step 2.
-
In the message list, click the message from which you want to create a rule.
-
On the Home tab, click Rules, and then click Create Rule.
-
Under When a new message arrives, edit the criteria to suit your needs.
To remove a condition, click


-
Under Do the following, choose what you want to happen when you send or receive email. For example, when you receive email from someone, choose Move to Folder, select the folder you want the email messages to be moved to, and then click Choose Folder. In the Search box, find the folder you created for this rule, click Choose, and then click OK.
Create a custom rule for an IMAP or POP account
Use this procedure to create a custom rule for an IMAP or POP account. Some IMAP and POP internet service providers include: Gmail, Yahoo!, AOL, and Hotmail/Outlook.com.
Note: If you don't know which type of account you have, see Find out what type of account you have.
-
On the Tools menu, click Rules.
-
In the left pane of the Rules box, under Client Rules, click the account type.
-
At the bottom of the Rules box, click Add

-
In the Rule name box, type a name for the rule.
-
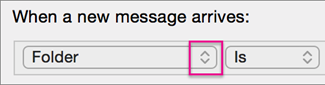
Under When a new message arrives, click the arrows on the first box to open the list, and then choose the type of information you want to identify.
-
Under When a new message arrives, continue to move from left to right, clicking the arrows and selecting conditions for your rule.
To remove a condition, click
-
Under Do the following, specify the actions you want the rule to perform.
-
Click OK.
Create a custom rule for an Exchange account
Use this procedure if your account runs on an Exchange server.
Note: If you don't know which type of account you have, see Find out what type of account you have.
-
On the Tools menu, click Rules.
-
In the left pane of the Rules box, under EXCHANGE SERVERS, click the account name. (This option is only available for accounts managed by Microsoft Exchange Server 2010 or later.)
-
Under When a new message arrives, click the arrows on the first box to open the list, and then choose the type of information you want to identify, such as From, Recipients, or Subject.
-
Under When a new message arrives, continue to move from left to right, clicking the arrows and selecting conditions for your rule.
-
Click Add search terms, and then in the search list, click Add
Find out what type of account you have
If you attempt to create a rule in Outlook for Mac, and you don't know what type of email account you have, here's how to find out:
-
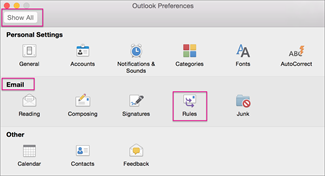
In the Rules box, click Show All.
-
In the Outlook Preferences box, under Personal Settings, click Accounts.
-
In the left pane of the Accounts box, click the account you want to create a rule for.
In the top right pane of the Accounts box, you'll see the type of account, such as IMAP Account, Exchange Account, or POP Account.
-
To go back to the Rules box, click Show All, and under E-mail, click Rules.