
Note: Windows Phone 7 has reached end of support, so services and functionality for this version of Windows will be discontinued over time.
We've collected some top-visited Windows Phone 7 help here to answer the most common questions you might have. If we haven't answered your question, visit the Microsoft Community forum to start or join a discussion.
-
Pin things to Start to get quick access to people, apps, and other items. On Start, flick left to the App list. Tap and hold the app you want to pin, then tap Pin to Start.
-
Press the Search button to find stuff on the web fast.
-
Press and hold the Back button to switch quickly between apps.
-
Press and hold the Camera button to take a picture fast—even if the phone is locked!
-
Tap a word and drag the arrows to copy and paste text on your phone.
Windows Phone 7.8 is an update for Windows Phone 7.5 phones. It includes some great features to make your phone easier and more fun to use. See how to get the update in the Phone Update FAQ section below.
Windows Phone 7.8 features
A fresh Start. Resize your Live Tiles—small, medium, or large—for a totally customizable Start screen. Large Tiles provide more info, like the text of new messages or details on appointments. Small ones make it easy to tap and go.
20 colors. There's now double the accent colors to jazz up your phone—at least 20, from red and yellow to indigo and steel. The color you choose will show up on Start and all around your phone.
Lock screen love. Get transported to exotic locales with a gorgeous new lock screen image from Bing—each and every day.
Notes:
-
The Windows Phone 7.8 update is not available in all markets or for all phones.
-
Some features may work differently or not at all if your phone has 256 MB of RAM. To find out how much memory your phone has, on Start, flick left, tap Settings, and then tap About. For more information, contact your mobile operator.
-
Some features might not be available in your country or region.
Here are answers to some common questions about phone updates.
Note: If your phone uses Windows Phone 7 software, it can't be updated to Windows Phone 8. See Which version of Windows Phone do I have? below if you're not sure what version is on your phone.
Which version of Windows Phone do I have?
To see which Windows Phone operating system (OS) version is currently installed on your phone, do the following:
-
On Start, flick left to the App list.
-
Tap Settings

How do I update my phone software?
Prepare for an update
-
Install the Zune software on your PC. You'll need this software to download the phone update.
-
If your battery level is low, give your phone a quick charge before starting the update.
-
Make some room on your phone for the update. If necessary, remove a few unwanted apps or other large items.
To see how much free space you have on your phone, on Start, flick left to the App list, tap Settings
-
Free up space on your computer.
We'll need some room to download the software update, to save a backup of your existing phone software and settings, and possibly to sync media files from your phone to your computer.
-
Make sure your computer has a reliable Internet connection.
In some cases, you might need to switch from a wireless (Wi-Fi) connection to a wired (Ethernet) connection. Or you might need to adjust your computer's firewall or proxy settings.
-
Verify that your phone is set to the correct date and time. That'll help us determine which updates you need. On Start, flick left to the App list, and then tap Settings
When you connect your phone to a PC for the first time
When you connect your phone to a PC for the first time, the Zune software will automatically create a primary sync relationship between your phone and that computer. Other computers you connect to after that will have a guest sync relationship with your phone. Your primary computer remembers your linked phone and all of its settings and history, so it's the only computer that will create a backup of your phone during the update process. That's why we recommend that you only use your primary computer to update your phone software. If you need to use a different computer, see How to sync your Zune player or Windows Phone 7.
Install an update
-
When an update is available, we'll notify you on your phone. After you see the notification, pick a convenient time to install the update on your phone. The process can take up to an hour.
If you miss the notification or don't have time to install the update, we'll remind you again in a few days.
-
Connect your phone to your primary computer—the first one you connected your phone to—using the USB cable that came with your phone.
If you're using a different computer than you normally use, please see some important information in the Notes below.
-
If the Zune software doesn't start automatically when you connect your phone, start it manually.
-
We might ask you to update the Zune software. If we do, just follow the on-screen instructions. Then restart the sync software.
-
In the Zune software, click Update Now.
Make sure you keep your phone connected to your computer until you see a notification that the update is complete.
Notes:
-
Windows 8 Pro supports the Zune software, but Windows RT does not.
-
To check if an update is available for your phone, on Start, flick left to the App list, tap Settings
-
By default, your phone uses your cellular data connection to check for updates and notifies you when an update is found. To change the type of connection for future updates, do this: on Start, flick left to the App list, tap Settings
-
Although we notify you "over the air" (via your phone's data connection) when an update is available to download, we don't deliver the actual software update over the air. You must connect your phone to your computer to download and install available updates.
-
When you install an update, all of your settings, apps, and media files are preserved.
Windows Live ID is now called your Microsoft account. A Microsoft account is the email address and password you use to sign in to any of the following:
-
Xbox LIVE
-
Groove Music
-
Outlook.com
-
MSN
-
Messenger
-
Find My Phone
-
OneDrive (formerly SkyDrive)
You can use any email address you want to create a Microsoft account. If you don't have one, we'll walk you through creating one when you sign in on your phone. Or you can create one at account.microsoft.com.
If you already have a Microsoft account, you may already have contacts, messages, a calendar, and photos stored on it, and they'll all be automatically synced to your phone when you sign in.
Notes:
-
To reset your password or get a reminder, go to the Microsoft account password reset page.
-
When you create a Microsoft account, it will generally be associated with the country or region where you create the account. This locale will be the one you use to buy things from Marketplace, and once a locale has been associated with your Marketplace account, it can't be changed.
-
Some of the features or services discussed in this article may not be available in your country or region.
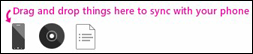
Sync music, videos, pictures, and podcasts with your phone
There are several ways to copy or sync files with your phone, depending on the type of file you're trying to sync, and where it's stored. Here's how to sync multimedia files (music, videos, pictures, and podcasts) between your phone and your PC.
-
Connect your phone to your PC using the USB cable that came with your phone.
If the Zune software is installed on your computer, the program will start automatically. If it isn't installed on your computer, see Install the Zune software section.
If this is the first time you've connected your phone to your PC, follow the instructions in the Zune software to name your phone and perform other setup tasks.
-
In the Zune software, click Collection.

-
Find the item you want to sync by doing one of the following:
-
Click a category (Music, Videos, Pictures, or Podcasts), and browse until you find the item you want to sync with your phone (such as a song, album, artist, playlist, genre, and so on).
-
In the Search box, enter what you're looking for (for example, a song title or artist name). In the search results, click the desired item.
-
-
Drag the item to the phone icon in the lower-left corner of the Zune software.
Tip: To see information about what you're currently syncing, click the phone icon in the lower-left corner of the Zune software. To see the specific media files that are on your phone, click one of the categories (Music, Videos, Pictures, or Podcasts) near the top of the Zune software.
Check free storage space on your phone
-
Connect your phone to your PC using the USB cable that came with your phone.
-
In the Zune software, click Phone > Summary.
-
At the bottom of the screen, look at the right-end of the storage indicator (for example, "FREE 3.24 GB" means that your phone has 3.24 gigabytes of free storage space).
Tip: If you've changed the Zune software sync options to sync all your music, videos, pictures, and podcasts to your phone, you might find that you don't have enough free storage space on your phone to do other things (such as take pictures, record videos, or download email and apps). To solve this problem, increase the amount of space on your phone reserved for doing these tasks. With your phone connected to your computer, in the Zune software, click Settings > Phone > Reserved Space and then drag the handle to the right.
Note: The Zune software won't work on Windows RT. But you can get music on your phone using a Groove Music Pass, and you can use OneDrive to sync your documents. You can also get the OneDrive app from the Windows Phone Store.
Zune software is a program for your PC that lets you sync music, videos, and pictures between your computer and your phone. It also lets you install the latest performance and feature updates for your phone.
In most cases, you'll be prompted to install the Zune software the first time you connect your phone to your computer. If you aren't prompted to install the Zune software, click here to download it.
Note: The Zune software won't work on Windows RT.
There are different ways to get your contacts onto your Windows Phone, depending on where they're currently stored.
Note: If you use Microsoft Outlook 2013, you don't need to install the Outlook Hotmail Connector to transfer your contacts to your Microsoft account.
My contacts are on my old phone
If you have contacts stored on an old phone, you can usually import them to your new phone. How you do it depends on the kind of phone you had. If your old phone uses a SIM card, you can move it to your new phone to import your contacts. Depending on your mobile operator, your phone might not have a SIM card.
To figure out if you use a SIM card, remove the battery cover from the back of your phone and look for a card that looks like this:
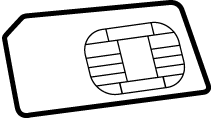
When you import contacts from a SIM card, they're automatically synced to your Windows Live account on your phone. They won't be deleted from the SIM card. If you haven't set up a Windows Live account, your contacts are saved to the phone's memory.
Import contacts from a SIM card
-
On Start, tap People.
-
Tap More and then tap Settings.
-
Tap Import SIM contacts and follow the instructions.
Notes:
-
If the Import SIM contacts button appears dimmed, it either means that the import is already in progress or you don't have any contacts stored on your SIM card.
-
Contacts are not always stored on a SIM card. If you don't think all your contacts were imported, you might be able to get them on your new phone in other ways, such as from an email account or your PC.
-
You can save contacts from a SIM card to a Windows Phone, but you can't save contacts from a Windows Phone to a SIM card.
Import contacts from a phone with no SIM card
If your old phone doesn't use a SIM card, don't worry—you'll still be able to get your contacts from your old phone to your new one. Different mobile operators have different ways of getting this done, so you'll need your mobile operator to help with the transfer. Check the company's website, call the support number, or visit a store for help.
My contacts are online
If your contacts are stored online as part of an Outlook.com or Microsoft Exchange account, just set up that account on your phone and your contacts will automatically be imported. When you set up a Facebook, Twitter, or LinkedIn account, the contacts will be imported, but you won't be able to edit or individually delete them on your phone.
Note: When you set up a Google email account on your phone, the contacts might not sync to your phone, depending on what version of the Windows Phone 7 software your phone has installed.
If your contacts are part of an online service that isn't fully compatible with Windows Phone, another option is to switch to Outlook.com. You can transfer your contacts, emails, even calendars to an Outlook.com account, then set up the account on your phone. Learn how.
You can use your own ringtones so you can match your jingle to your mood or match just the right tune to your contacts. Just make sure the audio file is:
-
In MP3 or WMA format.
-
Less than 40 seconds.
-
Less than 1 MB.
-
Not protected with digital rights management (DRM).
To make any file that fits these criteria into a ringtone, all you have to do is assign it the genre of ringtone. If you have a PC, you'll use the Zune software. If you don't have the Zune software on your computer, see the Install the Zune software section.
Add a ringtone to your phone
-
Connect your phone to your computer using a cable and then sync the file to your phone.
-
On Start, flick left to the App list, then tap Settings
-
Tap the Ringtone list, then find the new ringtone you just added.
Create a ringtone using the Zune software
-
Open the Zune software and find the file you want to turn into a ringtone.
-
Right-click the file and then click Edit.
-
In the Genre list, click or type ringtone, then click OK.
Notes:
-
You need to assign the genre "ringtone" in English, even if you're using a different language on your computer or your phone.
-
To see the length, size, and genre of a file in the Zune software, go to Collection > Music > Songs, then click Choose columns. Select the Genre, Length, and Size check boxes, then click OK.
I used to be able to download and update apps and games. Why do I get an error message now?
You may not have the latest version of the Windows Phone operating system (OS) on your phone. You'll need Windows Phone 7.5 to download and update apps.
If you're not sure which software version is currently installed on your phone or how to install the latest update, visit the Phone update FAQ section.
Install the Refresh Marketplace App to continue using Marketplace
Microsoft previously delivered a series of infrastructure upgrades to improve Windows Phone Marketplace. While most Windows Phone users' phones were automatically switched over to the improved Windows Phone Marketplace infrastructure, a small number of users need to install a simple Refresh Marketplace App to continue using Marketplace to download and/or update Windows Phone apps.
The app will make changes to the Marketplace configuration on a user's phone to ensure that it communicates with the updated online Marketplace infrastructure. Installation of this free app involves the same basic installation steps as any Windows Phone app. You can download it over a cellular data connection or Wi-Fi, and it takes only a few minutes to install and run.
If you are one of the small number of users who needs to install and run the Refresh Marketplace App to continue using Marketplace, you will receive a You must install the Refresh Marketplace App notice and will see this app as the only one featured within the Marketplace Hub on your phone. Follow the instructions below to download and install the Refresh Marketplace App:
-
Ensure your Windows Phone is connected to a cellular data connection or Wi-Fi.
-
Open Marketplace

-
Tap the Refresh Marketplace App icon or name to go to the app details page and then tap Install to download and install the app. The Refresh Marketplace App will be installed within the Games Hub on your phone, opening the Games Hub in the process.
-
Find and tap the Refresh Marketplace App in the Games Hub, then follow the on-screen instructions to complete reconfiguring your phone to access the updated online Marketplace infrastructure.
-
Re-open the Marketplace Hub. You should no longer see the You must install the Refresh Marketplace App notice, and you should be able to see various featured apps and games. You can now continue to use Marketplace on your Windows Phone—enjoy! If you choose, you can uninstall the Refresh Marketplace App at this time.
Troubleshooting
If, after following the previous steps, you continue to receive the You must install the Refresh Marketplace App notice or are unable to install apps from the Marketplace Hub on your phone, do the following:
Basic
-
Turn off your Windows Phone by holding down the power button and following the on-screen instruction to Slide down to power off.
-
After a few seconds, push the power button to restart your phone.
-
Ensure your Windows Phone is connected to a cellular data connection or Wi-Fi, then plug it in using the wall charger that came with your phone. Leave your phone plugged in for at least 10 minutes, then try again to access Marketplace.
-
Re-open the Marketplace Hub. You should no longer see the You must install the Refresh Marketplace App notice, and you should be able to see various featured apps and games. You can now continue to download apps from Marketplace—enjoy!
If you continue to have problems, see the following Advanced steps.
Advanced
-
From the Start screen on your Windows Phone, flick left to the App List. Go to the Games Hub and note whether the Games Hub icon says "Xbox LIVE" or not. If yes, continue with Step 2. If not, skip to Step 5.
-
Tap the Xbox LIVE Games icon to open the Games Hub.
-
Tap More, then tap Refresh. You should see Updating... on the top-left of the screen. When this goes away, continue to Step 4.
-
Re-open the Marketplace Hub. You should no longer see the You must install the Refresh Marketplace App notice, and you should be able to see various featured apps and games. You can now continue to use Marketplace—enjoy!
If you continue to have problems, do the following:
-
If your Games Hub icon doesn't say "Xbox LIVE" (or if Steps 1–4 don't restore the full Marketplace experience), plug in your Windows Phone using its wall charger, ensure your phone is connected to a cellular data connection or Wi-Fi, and charge your phone for at least 24 hours. During this time, your phone will automatically attempt to connect to the updated online Windows Phone Marketplace infrastructure, after which you should be able to continue using Marketplace.
If after following all of the steps above you continue to have problems, visit the Microsoft Community forum to start or join a discussion.
Why do I get an "Attention required. Tap here." message when I try to download an app or game?
Your phone might have temporarily lost its Internet connection, or you might be trying to download an app that's too big to download over your phone's cellular data connection. If you're trying to download an app larger than 50 megabytes (MB)—this applies to many games—you'll need to connect to a Wi-Fi network or connect the phone to your computer and use the Zune software.
-
Make sure you have a Wi-Fi or cellular data connection. On Start, tap Marketplace
-
At the bottom of the screen, you'll see the number of incomplete downloads. Tap it to see the downloads queue.
-
Tap and hold the stuck app or game and then tap Retry. If it doesn't work and you're not on Wi-Fi, connect to Wi-Fi and try again. You can also tap Retry, connect your phone to your computer, and start the Zune software. This will automatically download the app to your phone.
Tip: One common cause of a lost Wi-Fi connection is a screen time-out, which pauses your connection and can prevent apps from downloading. If you're downloading lots of games and other large apps on your phone via Wi-Fi, you might want to temporarily increase the screen time-out period or disable it in Settings
How do I update an app I own?
The people who create apps and games for Windows Phone are constantly making tweaks and improvements, fixing bugs or adding new features. When a newer version of an app you own is available for download in Marketplace, you'll know it.
On Start, you'll see a number on the Marketplace Tile that indicates how many of your apps have updates available.
When you open the Marketplace Hub, you'll also see a message at the bottom indicating you have updates available. Tap the message to see the list and start installing them.
How can I tell if an app has specific hardware or software requirements?
Many apps or games you buy from Marketplace are designed to take advantage of specific hardware and software features of your Windows Phone. For example, a photo app might need to use your phone's camera and a restaurant guide might need to know your location to provide nearby recommendations.
Some processor-intensive apps have memory requirements and won't work on phones with 256 MB of RAM. You can check how much memory you have on your phone in Settings
You can see what features an app requires by looking at the app's details screen in Marketplace. Apps are required to ask you for permission before using certain phone features.


