
Notes: If your issue prevents you from booting into Windows, you won't be able to follow the steps in this article. After the device tries to restart a few times, you should get Windows Recovery Options, which you can use to try to resolve the issue. Click a link below that corresponds to your version of Windows:
-
Windows 11, Windows 10: Recovery options in Windows
-
Windows 8.1: How to refresh, reset, or restore your PC
Summary
A "clean boot" starts Windows with a minimal set of drivers and startup programs, so that you can determine whether a background program is interfering with your game or program. This is similar to starting Windows in Safe Mode, but provides you more control over which services and programs run at startup to help you isolate the cause of a problem.
How to perform a clean boot
These steps might look complicated at first glance, but following them in order, step-by-step, will help you get you back on track.
-
Sign in to the computer as an administrator. If you are unsure if your account has administrator rights, see Create a local user or administrator account in Windows to find out how to see if your account has administrator rights, and grant them to your account, if necessary.
-
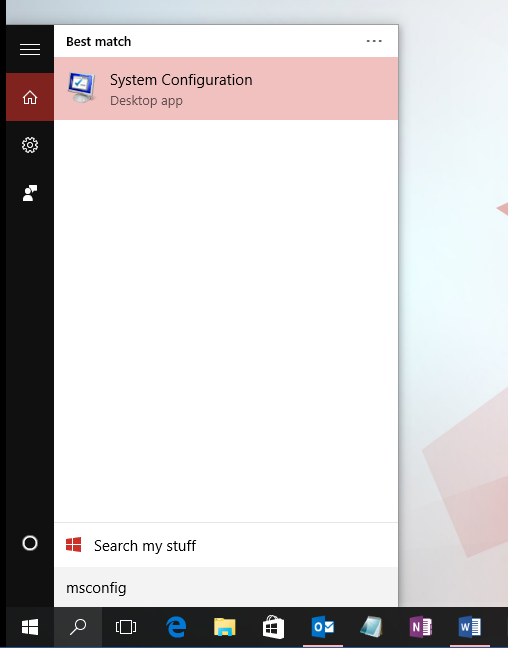
Select Search , type msconfig , and then select System Configuration from the list of results.
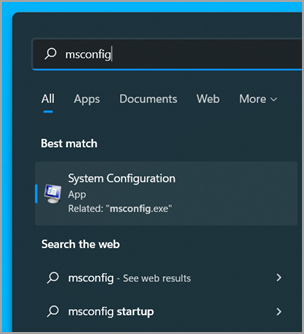
Important: If the computer is connected to a network, network policy settings might prevent you from following these steps. Only use the System Configuration utility to change the advanced boot options on the computer with guidance from a Microsoft support engineer. Using the System Configuration utility might make the computer unusable.
-
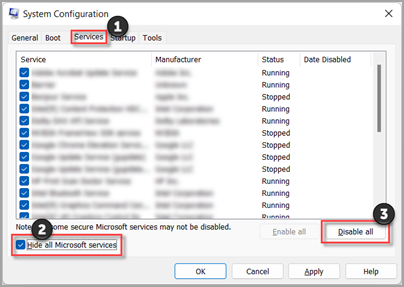
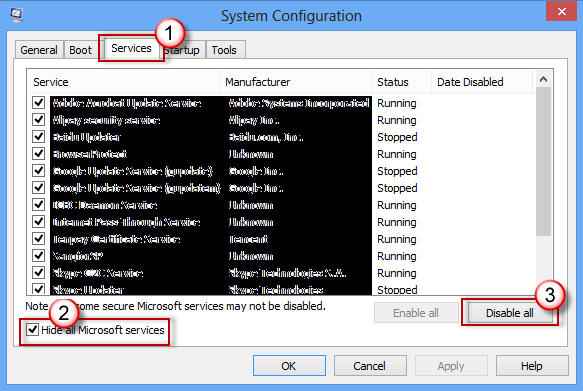
On the Services tab of System Configuration, select Hide all Microsoft services, and then select Disable all. Select Apply.
-
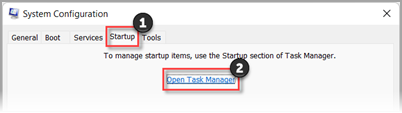
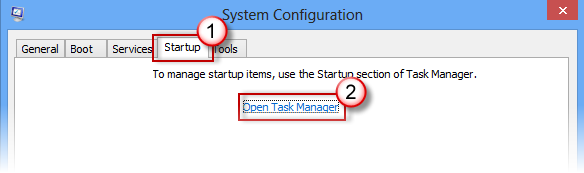
On the Startup tab of System Configuration, select Open Task Manager.
-
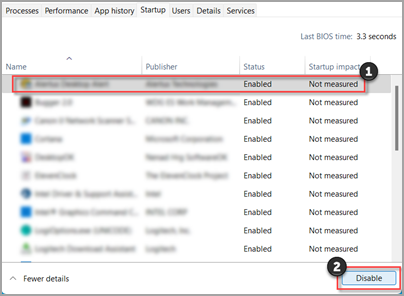
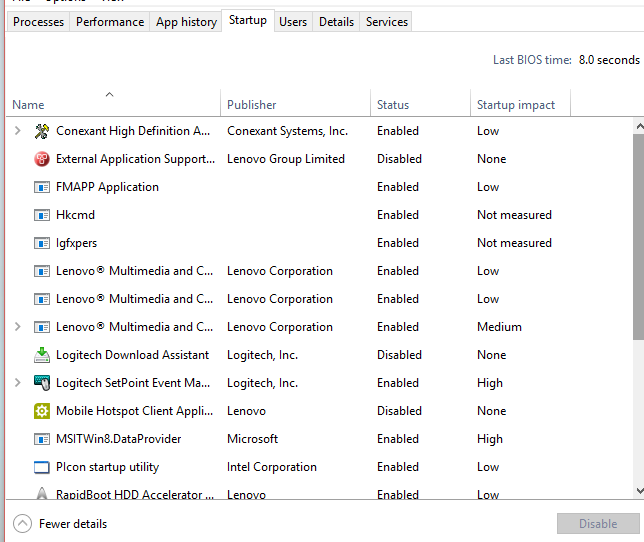
On the Startup tab in Task Manager, for each Enabled startup item, select the item and then select Disable. (Keep track of which items have been Disabled. You will need to know this later.)
-
Close Task Manager.
-
On the Startup tab of System Configuration, select OK. When you restart the computer, it will be in a clean boot environment. Follow troubleshooting steps to install, uninstall, or run your application. Your computer might temporarily lose some functionality while in a clean boot environment. Reset the computer to start normally after clean boot troubleshooting and resume functionality.
Install, uninstall, or run an application
After you restart the computer, you'll have a clean boot environment. Then, do one of the following, as appropriate for your situation:
Note: If you receive the "The Windows Installer service could not be accessed" error during the installation or uninstallation, you'll need more information. See How to start the Windows Installer service when system services are not loaded. Then install or uninstall the program or update again.
If the installation or uninstallation is successful, your issue is resolved and you can start as you usually do.
How to reset the computer to start as usual
If the installation or uninstallation still fails, that means this issue is not caused by application or service interference. You might need to contact the program manufacturer for more specific support.
If the program runs correctly, this issue is caused by application or service interference. You can find out which application or service is causing the issue.
How to determine what is causing the issue by performing a clean boot
If the program still doesn't run as expected, this issue is not caused by application or service interference. You might need to contact the program manufacturer for more specific support.
How to determine what is causing the problem after you do a clean boot
If your problem does not occur while the computer is in a clean boot environment, then you can determine which startup application or service is causing the problem by systematically turning them on or off and restarting the computer. While turning on a single service or startup item and rebooting each time will eventually find the problematic service or application, the most efficient way to do this is to test half of them at a time, thus eliminating half of the items as the potential cause with each reboot of the computer. You can then repeat this process until you've isolated the problem. Here's how:
-
Sign in to the computer as an administrator. If you are unsure if your account has administrator rights, see Create a local user or administrator account in Windows to find out how to see if your account has administrator rights, and grant them to your account, if necessary.
-
Select Search , then type msconfig. Select System Configuration from the list of results.
-
Select the Services tab, and then select Hide all Microsoft services.
-
Select each of the check boxes in the upper half of the Service list.
-
Select OK, then select Restart.
-
After the computer restarts, determine whether the problem still occurs.
-
If the problem still occurs, one of the checked items is the problematic service. Repeat steps 1 through 6, but in Step 4, clear the lower half of the boxes in the Service list that you selected in your last test.
-
If the problem doesn't occur, the checked items are not the cause of the problem. Repeat steps 1 through 6, but in Step 4, turn on the upper half of the boxes that you cleared in the Service list in the last test.
-
Repeat these steps until you've either isolated the problem to a single service, or until you've determined that none of the services are the cause of the problem. If you experience the problem when only one service is selected in the Service list, go to step 10. If none of the services cause the problem, go to step 7.
-
-
Select Startup, then select Open Task Manager. On the Startup tab on Task Manager, one at a time, select the upper half of the items you Disabled earlier, then select Enable.
-
Select OK, then select Restart.
-
If the problem occurs, repeat step 7, but this time Disable the lower half of the items you Enabled in your last test.
-
If the problem does not occur, repeat step 7, but Disable everything you Enabled in your last test and Enable the other half of the items you Disabled.
-
If you still experience the problem after only one Startup item is Enabled, then the Enabled item is the one causing the problem, and you should go to step 9. If no Startup item causes the problem, there might be a problem with a Microsoft service. See Recovery options in Windows.
-
-
After you determine the startup item or the service that causes the problem, contact the program manufacturer to determine whether the problem can be resolved, or run Windows with the service unchecked or the Startup item Disabled.
Reset the computer to start normally after clean boot troubleshooting
After you finish troubleshooting, follow these steps to reset the computer to start normally.
-
Select Search , then type msconfig. Select System Configuration from the list of results.
-
On the General tab, select Normal Startup.
-
Select the Services tab, clear the check box beside Hide all Microsoft services, select Enable all, then select Apply.
-
Select the Startup tab, then select Open Task Manager.
-
In Task Manager, Enable all of the startup programs you had Disabled before, and then select OK.
-
When you're prompted to restart the computer, select Restart.
How to start the Windows Installer service when system services are not loaded
If you run a Setup program without starting the Windows Installer service, you might receive the following error message:
The Windows Installer service could not be accessed. Contact your support personnel to verify that the Windows Installer service is properly registered.
The Windows Installer service doesn't start if you clear the Load system services check box in the System Configuration utility. To use the Windows Installer service when system services are not loaded, start the service manually. Here's how:
-
Select Search , then type computer management. Select Computer Management from the list of results.
-
In the console tree, select the arrow to expand Services and Applications, and then select Services.
-
In the details pane, right-click or swipe down on Windows Installer, and then select Start.
-
Sign in to the computer as an administrator. If you don't have an administrator account, you can create one.
Create a local user or administrator account in Windows -
In the Search box on the taskbar, type msconfig and select System Configuration from the list of results.
Important: If the computer is connected to a network, network policy settings might prevent you from following these steps. Only use the System Configuration utility to change the advanced boot options on the computer with guidance from a Microsoft support engineer. Using the System Configuration utility might make the computer unusable.
-
On the Services tab of System Configuration, select Hide all Microsoft services, and then select Disable all. Select Apply.
-
On the Startup tab of System Configuration, select Open Task Manager.
-
On the Startup tab in Task Manager, for each Enabled startup item, select the item and then select Disable. (Keep track of which items have been Disabled. You will need to know this later.)
-
Close Task Manager.
-
On the Startup tab of System Configuration, select OK. When you restart the computer, it's in a clean boot environment. Follow troubleshooting steps to install, uninstall, or run your application. Your computer might temporarily lose some functionality while in a clean boot environment. Reset the computer to start normally after clean boot troubleshooting and resume functionality.
Install, uninstall, or run an application
After you restart the computer, you'll have a clean boot environment. Then, do one of the following, as appropriate for your situation:
Note: If you receive the "The Windows Installer service could not be accessed" error during the installation or uninstallation, you'll need more information. See How to start the Windows Installer service when system services are not loaded. Then install or uninstall the program or update again.
If the installation or uninstallation is successful, your issue is resolved and you can start as you usually do.
How to reset the computer to start as usual
If the installation or uninstallation still fails, that means this issue is not caused by application or service interference. You might need to contact the program manufacturer for more specific support.
If the program runs correctly, this issue is caused by application or service interference. You can find out which application or service is causing the issue.
How to determine what is causing the issue by performing a clean boot
If the program still doesn't run as expected, this issue is not caused by application or service interference. You might need to contact the program manufacturer for more specific support.
How to determine what is causing the problem after you do a clean boot
If your problem does not occur while the computer is in a clean boot environment, then you can determine which startup application or service is causing the problem by systematically turning them on or off and restarting the computer. While turning on a single service or startup item and rebooting each time will eventually find the problematic service or application, the most efficient way to do this is to test half of them at a time, thus eliminating half of the items as the potential cause with each reboot of the computer. You can then repeat this process until you've isolated the problem. Here's how:
-
Sign in to the computer by using an account that has administrator rights. If you don't have an administrator account, you can create one.
Create a local user or administrator account in Windows -
In the Search box on the taskbar, type msconfig. Select System Configuration from the list of results.
-
Select the Services tab, and then select Hide all Microsoft services.
-
Select each of the check boxes in the upper half of the Service list.
-
Select OK, then select Restart.
-
After the computer restarts, determine whether the problem still occurs.
-
If the problem still occurs, one of the checked items is the problematic service. Repeat steps 1 through 6, but in Step 4, clear the lower half of the boxes in the Service list that you selected in your last test.
-
If the problem doesn't occur, the checked items are not the cause of the problem. Repeat steps 1 through 6, but in Step 4, turn on the upper half of the boxes that you cleared in the Service list in the last test.
-
Repeat these steps until you've either isolated the problem to a single service, or until you've determined that none of the services are the cause of the problem. If you experience the problem when only one service is selected in the Service list, go to step 9. If none of the services cause the problem, go to step 7.
-
-
Select Startup, then select Open Task Manager. On the Startup tab on Task Manager, one at a time, select the upper half of the items you Disabled earlier, then select Enable.
-
Select OK, then select Restart.
-
If the problem occurs, repeat step 7, but this time Disable the lower half of the items you Enabled in your last test.
-
If the problem does not occur, repeat step 7, but Disable everything you Enabled in your last test and Enable the other half of the items you Disabled.
-
If you still experience the problem after only one Startup item is Enabled, then the Enabled item is the one causing the problem, and you should go to step 9. If no Startup item causes the problem, there might be a problem with a Microsoft service. See Recovery options in Windows.
-
-
After you determine the startup item or the service that causes the problem, contact the program manufacturer to determine whether the problem can be resolved, or run Windows with the service unchecked or the Startup item Disabled.
Reset the computer to start normally after clean boot troubleshooting
After you finish troubleshooting, follow these steps to reset the computer to start normally.
-
In the Search box on the taskbar, type msconfig. Select System Configuration from the list of results.
-
On the General tab, select Normal Startup.
-
Select the Services tab, clear the check box beside Hide all Microsoft services, select Enable all, then select Apply.
-
Select the Startup tab, then select Open Task Manager.
-
In Task Manager, Enable all of the startup programs you had Disabled before, and then select OK.
-
When you're prompted to restart the computer, select Restart.
How to start the Windows Installer service when system services are not loaded
If you run a Setup program without starting the Windows Installer service, you might receive the following error message:
The Windows Installer service could not be accessed. Contact your support personnel to verify that the Windows Installer service is properly registered.
The Windows Installer service doesn't start if you clear the Load system services check box in the System Configuration utility. To use the Windows Installer service when system services are not loaded, start the service manually. Here's how:
-
In the Search box on the taskbar, type computer management. Select Computer Management from the list of results.
-
In the console tree, select the arrow to expand Services and Applications, and then select Services.
-
In the details pane, right-click or swipe down on Windows Installer, and then select Start.
-
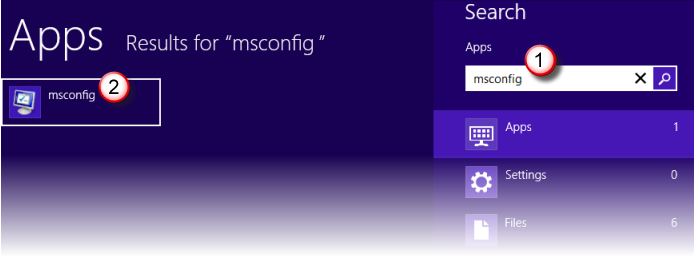
Swipe in from the right edge of the screen, and then select Search . Or, if you’re using a mouse, point to the lower-right corner of the screen, and then select Search .
-
Type msconfig in the search box, and then select System Configuration.
-
On the Services tab of System Configuration, select Hide all Microsoft services, and then select Disable all. Select Apply.
Important: If the computer is connected to a network, network policy settings might prevent you from following these steps. Only use the System Configuration utility to change the advanced boot options on the computer with guidance from a Microsoft support engineer. Using the System Configuration utility might make the computer unusable.
-
On the Startup tab of System Configuration, select Open Task Manager.
-
On the Startup tab in Task Manager, for each Enabled startup item, select the item and then select Disable. (Keep track of which items have been Disabled. You will need to know this later.)
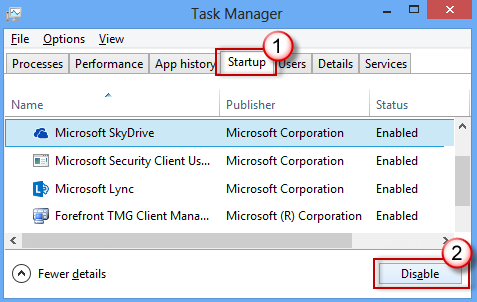
-
Close Task Manager.
-
On the Startup tab of System Configuration, select OK, and then restart the computer.
The computer restarts in a clean boot environment. Follow troubleshooting steps to install, uninstall, or run your application. Your computer might temporarily lose some functionality while in a clean boot environment, however that functionality will return. Finish troubleshooting and reset the computer to start normally.
Install, uninstall, or run an application
After you restart the computer, you'll have a clean boot environment. Then, do one of the following, as appropriate for your situation:
Note: If you receive the "The Windows Installer service could not be accessed" error during the installation or uninstallation, you'll need more information. See How to start the Windows Installer service when system services are not loaded. Then install or uninstall the program or update again.
If the installation or uninstallation is successful, your issue is resolved and you can start as you usually do.
How to reset the computer to start as usual
If the installation or uninstallation still fails, that means this issue is not caused by application or service interference. You might need to contact the program manufacturer for more specific support.
If the program runs correctly, this issue is caused by application or service interference. You can find out which application or service is causing the issue.
How to determine what is causing the issue by performing a clean boot
If the program still doesn't run as expected, this issue is not caused by application or service interference. You might need to contact the program manufacturer for more specific support.
How to determine what is causing the problem after you do a clean boot
If your problem does not occur while the computer is in a clean boot environment, then you can determine which startup application or service is causing the problem by systematically turning them on or off and restarting the computer. While turning on a single service or startup item and rebooting each time will eventually find the problematic service or application, the most efficient way to do this is to test half of them at a time, thus eliminating half of the items as the potential cause with each reboot of the computer. You can then repeat this process until you've isolated the problem. Here's how:
-
Sign in to the computer by using an account that has administrator rights. If you don't have an administrator account, you can create one.
Create a local user or administrator account in Windows -
Swipe in from the right edge of the screen, and then select Search . Or, if you’re using a mouse, point to the lower-right corner of the screen, and then select Search .
-
Type msconfig in the search box, and select System Configuration from the list of results.
-
Select the Services tab, and then select Hide all Microsoft services.
-
Select each of the check boxes in the upper half of the Service list.
-
Select OK, then select Restart.
-
After the computer restarts, determine whether the problem still occurs.
-
If the problem still occurs, one of the checked items is the problematic service. Repeat steps 1 through 7, but in Step 5, clear the lower half of the boxes in the Service list that you selected in your last test.
-
If the problem doesn't occur, the checked items are not the cause of the problem. Repeat steps 1 through 7, but in Step 5, turn on the upper half of the boxes that you cleared in the Service list in the last test.
-
Repeat these steps until you've either isolated the problem to a single service, or until you've determined that none of the services are the cause of the problem. If you experience the problem when only one service is selected in the Service list, go to step 10. If none of the services cause the problem, go to step 8.
-
-
Select Startup, then select Open Task Manager. On the Startup tab on Task Manager, one at a time, select the upper half of the items you Disabled earlier, then select Enable.
-
Select OK, then select Restart.
-
If the problem occurs, repeat step 8, but this time Disable the lower half of the items you Enabled in your last test.
-
If the problem does not occur, repeat step 8, but Disable everything you Enabled in your last test and Enable the other half of the items you Disabled.
-
If you still experience the problem after only one Startup item is Enabled, then the Enabled item is the one causing the problem, and you should go to step 10. If no Startup item causes the problem, there might be a problem with a Microsoft service. See How to refresh, reset, or restore your PC.
-
-
After you determine the startup item or the service that causes the problem, contact the program manufacturer to determine whether the problem can be resolved, or run Windows with the service unchecked or the Startup item Disabled.
Reset the computer to start normally after clean boot troubleshooting
After you finish troubleshooting, follow these steps to reset the computer to start normally.
-
Swipe in from the right edge of the screen, and then select Search . Or, if you’re using a mouse, point to the lower-right corner of the screen, and then select Search .
-
Type msconfig in the search box, and select System Configuration from the list of results.
-
On the General tab, select Normal Startup.
-
Select the Services tab, clear the check box beside Hide all Microsoft services, select Enable all, then select Apply.
-
Select the Startup tab, then select Open Task Manager.
-
In Task Manager, Enable all of the startup programs you had Disabled before, and then select OK.
-
When you're prompted to restart the computer, select Restart.
How to start the Windows Installer service when system services are not loaded
If you run a Setup program without starting the Windows Installer service, you might receive the following error message:
The Windows Installer service could not be accessed. Contact your support personnel to verify that the Windows Installer service is properly registered.
The Windows Installer service doesn't start if you clear the Load system services check box in the System Configuration utility. To use the Windows Installer service when system services are not loaded, start the service manually. Here's how:
-
Swipe in from the right edge of the screen, and then select Search . Or, if you’re using a mouse, point to the lower-right corner of the screen, and then select Search .
-
In the search box on the taskbar, type computer management. Select Computer Management from the list of results.
-
In the console tree, select the arrow to expand Services and Applications, and then select Services.
-
In the details pane, right-click or swipe down on Windows Installer, and then select Start.


