
INTRODUCTION
Losing data because of a computer problem or a hard disk crash is discouraging, to say the least. You might lose family photos, your music collection, or financial data. And, after you get the computer just the way that you want it, it can take a long time to reconfigure your personal settings on a new computer: desktop background, sounds, screensavers, and wireless network configurations to name just a few
However, a little prevention can go a long way to avoiding this ordeal. To help save you lots of time and aggravation, we recommend that you take the precaution of regularly backing up your data and settings.
This article describes how to manually back up your personal files and settings in Windows 7, Windows Vista, Windows XP, and Windows Server 2003. It also describes how to use the data tools in Windows to back up your files and settings.
More Information
Method 1: Manually back up your files and settings to removable media or to a network location
The simplest method is to manually back up your files and settings to removable media or a network location. You can specify the files and settings that you want to back up and how often you want to perform a backup.
Note Examples of removable media include external hard disks, DVDs, CDs, and USB memory cards. You can back up files to a different computer or a network device if your computer is connected to a network such as a wireless network.
To manually copy your files to a network location or to removable media on a computer that is running Windows 7, Windows Vista, Windows XP, or Windows Server 2003, follow these steps:
-
Click Start

-
Open the Users folder, and then open the user folder that contains the files that you want to back up.
-
Copy the necessary folders from the user folder to a network location or to removable media.
Notes
-
To back up data for all users, repeat steps 2–3.
-
To determine the size of all the files in the user folder, select all the folders, right-click those selected folders, and then click Properties.
-
The saved files can be copied to any computer. However, you must have corresponding applications installed on that computer to open those individual files.
-
Not all applications save their files to the user folder. You should make sure that you check other applications and the file system location where the applications save files by default, and then copy those files to the network location or to the removable media.
Method 2: Use the Easy Transfer feature to back up data to a different computer
The next easiest method is to use the Easy Transfer feature in Windows to transfer data to a different computer. This section discusses the following scenarios in which you can use the Easy Transfer feature to back up data to a different computer:
|
Your computer OS |
Target computer OS |
|---|---|
|
Windows 7 |
Windows 7 |
|
Windows 7 |
Windows Vista |
|
Windows Vista |
Windows Vista |
Back up a Windows 7-based computer
Transfer files and settings to another Windows 7-based computer
The Windows Easy Transfer feature lets you to back up user account files and settings. Then you can restore those files and settings to a new computer. To start Windows Easy Transfer, follow these steps:
-
Click Start, type windows easy transfer in the Start Search box, and then click Windows Easy Transfer in the Programs list.
-
Follow the instructions to transfer your files and settings.
Transfer files and settings to a Windows Vista-based computer
If you want to move your data from a Windows 7-based computer to a Windows Vista-based computer, use the Windows Vista version of Windows Easy Transfer. To do this, follow these steps:
-
On a Windows 7-based computer, insert the Windows Vista CD or DVD
-
Click to exit the Windows Vista Setup program.
-
Click Start, click Computer, right-click the CD or DVD drive, and then click Open.
-
Open the support folder, and then open the migwiz folder
-
Double-click the Migwiz.exe file.
-
Follow the instructions to begin the transfer from Windows 7.
Back up a Windows Vista-based computer
Transfer files and settings to another Windows Vista-based computer
The Windows Easy Transfer feature lets you to back up user account files and settings. Then you can restore those files and settings to the new computer. To start Windows Easy Transfer, follow these steps:
-
Click Start, type transfer in the Start Search box, and then click Windows Easy Transfer in the Programs list.
-
Click Next. If you are prompted to close programs, make sure that you have saved any open documents, and then click Close all.
-
Follow the steps to transfer files and settings.
Method 3: Use the Backup and Restore Center
As a precaution, you can use the Backup and Restore Center feature in Windows 7 and Windows Vista to back up your data.
Back up a Windows 7-based computer
Note Data that you back up by using the Windows 7 Backup and Restore Center can be restored only on a Windows 7-based operating system.
-
Click Start, type backup in the Start Search box, and then click Backup and Restore in the Programs list.
Note If you are prompted to close programs, make sure that you have saved any open documents and close those programs. Or, click Close Programs. -
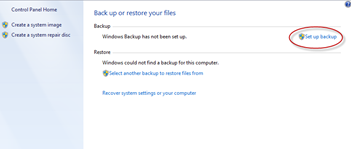
Under Back up or restore your files, click Set up backup.
-
Select where you want to save your backup, and then click Next.
Note Remember to save your backup files to removable media or a network location. -
Click Let Windows choose or Let me choose, and then click Next.
-
Make the appropriate selections, and then click Next or Save Settings and run backup.
-
The backup will be saved to the backup location.
Back up a Windows Vista-based computer
Note Data that you back up by using Windows Vista Backup and Restore Center can be restored only on a Windows Vista operating system.
-
Click Start, type backup in the Start Search box, and then click Backup and Restore in the Programs list.
-
Click Back up files under Back up files or your entire computer.
-
Select where you want to store the file backup, and then click Next.
-
Select the disk or disks that you want to back up, and then click Next
-
Select the file type or file types that you want to back up, and then click Next.
-
Click Save Settings, and then start the backup.
-
Your backup will be saved to the selected backup location.
Method 4: Transfer files from a Windows 2000, Windows XP, or Windows Server 2003-based computer
Use the Windows XP Files and Settings Transfer Wizard
You can use the Windows XP Files and Settings Transfer Wizard to transfer files in Windows XP, or Windows Server 2003, or Windows 2000 computer.
-
Click Start, click All Programs, click Accessories, click System Tools, and then click Files and Settings Transfer Wizard.
-
Click Next, click Old computer, and then click Next.
-
Select how you want to transfer your files. If you select Other, you can save to a network location or to removable media so that you can keep a backup for your records.
-
Select what you want to back up, and then click Next.
Additional resources
We recommend the following when you back up data:
-
Don’t back up your files to a recovery partition or to the same hard disk on which Windows is installed.
Note Manufacturers frequently configure a recovery partition on a computer. Typically, a recovery partition is displayed as a hard disk drive. -
Always store the media that you use for backups in a secure location to prevent unauthorized access to your files.
-
Try to use a fireproof location that's separate from your computer's location. Also, consider encrypting the backup data.


