Delay or schedule sending email messages in Outlook
Applies To
You can delay the delivery of an individual message by having it held in the Outbox for a specified time after you select Send.
Select a tab option below for the version of Outlook you're using. What version of Outlook do I have?
Note: If the steps under this New Outlook tab don't work, you may not be using new Outlook for Windows yet. Select the Classic Outlook tab and follow those steps instead.
Schedule a message for later in new Outlook
Note: This feature is not available for IMAP or POP accounts.
-
While composing a message, select the dropdown next to Send and select Schedule send.
-
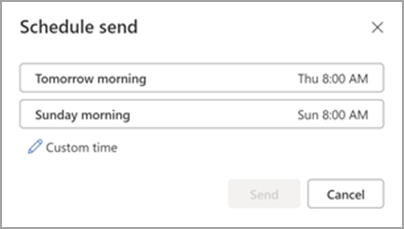
Select one of the default options, then select Send or choose a custom time and then select Send.
-
After you select Send, the message remains in the Draft folder until the delivery time.
Send the message immediately in new Outlook
If you decide later that you want to send the message immediately, do the following:
-
Switch to the Draft folder.
-
Open the scheduled message and select the Edit pencil icon.
-
Select Send Now.
Schedule a message for later in classic Outlook for Windows
-
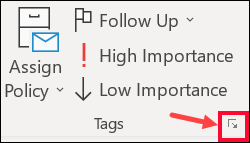
While composing a message, select the More options arrow from the Tags group in the Ribbon.
If you don't see these options, you probably have the simplified ribbon: On the ribbon, select the Options tab, then select More commands.
-
Under Delivery options, select the Do not deliver before check box, and then choose the delivery date and time you want.
-
Select Close.
-
When you're done composing your email message, select Send.
After you select Send, the message remains in the Outbox folder until the delivery time.
Send the message immediately in classic Outlook
If you decide later that you want to send the message immediately, do the following:
-
Switch to the Outbox folder.
-
Open the delayed message.
-
Select the More options arrow from the Tags group in the Ribbon.
If you don't see those options, you probably have the simplified ribbon: On the ribbon, select the Options tab, then select More commands.
-
Under Delivery options, clear the Do not deliver before check box.
-
Select Close, then select Send.
Note: Outlook must be online and connected for this feature to work.
Delay the delivery of all messages in classic Outlook
You can delay the delivery of all messages by up to two hours by creating a rule.
-
In Mail, on the ribbon, select the File tab.
-
Select
-
Select
-
In the Step 1: Select a template box, under Start from a Blank Rule, select Apply rule on messages I send, and then select Next.
-
In the Step 1: Select condition(s) list, select the check boxes for any options that you want, and then select Next.
If you do not select any check boxes, a confirmation dialog box appears. If you select Yes, the rule that you are creating is applied to all messages that you send.
-
In the Step 1: Select action(s) list, select the defer delivery by a number of minutes check box.
-
In the Step 2: Edit the rule description (click an underlined value) box, select the underlined phrase a number of and enter the number of minutes for which you want the messages to be held before it is sent.
Delivery can be delayed up to 120 minutes.
-
Select OK, and then select Next.
-
Select the check boxes for any exceptions that you want.
-
Select Next.
-
In the Step 1: Specify a name for this rule box, type a name for the rule.
-
Select the Turn on this rule check box.
-
Select Finish.
After you select Send, each message remains in the Outbox folder for the time that you specified.
Schedule a message for later in Outlook on the web or Outlook.com
-
While composing a message, select the dropdown next to Send and select Schedule send.
-
Select one of the default options, then select Send or choose a custom time and then select Send.
-
After you select Send, the message remains in the Draft folder until the delivery time.
Send the message immediately in Outlook on the web or Outlook.com
If you decide later that you want to send the message immediately, do the following:
-
Switch to the Draft folder.
-
Open the scheduled message and select the Edit pencil icon.
-
Select Send Now.


