
First things to know about bookable desks
Need to grab a desk quickly? If you’re working a hybrid schedule and need a place to land in your office for the day, you can reserve a bookable desk. With Teams desktop client, you can make a bookable desk your personal workstation by reserving it in advance or simply by plugging in when you arrive. Even if you haven’t booked a desk ahead of time, the desk will be reserved for you for the rest of the day upon connecting.
Notes:
-
Bookable desks are currently available on Teams Desktop for Windows and Mac.
-
Bookable desks must be set up in advance by your IT admin. If you’re not sure whether your organization has set up bookable desks, check with your admin.
Plug into a bookable desk
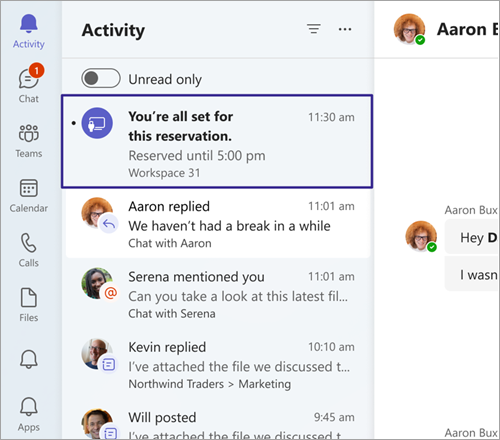
When you connect to a bookable desk, a meeting will automatically appear on your calendar reserving the desk for the rest of that day. You’ll also see a notification in your Activity feed.

Notes:
-
If you plug in to a bookable desk between 8AM and 5PM, the reservation is auto-created from the time you plug in until 5PM on the same day.
-
If you plug in outside 8AM to 5PM, the reservation will be auto-created for two hours, starting from the time you plugged in.
-
You can edit or cancel your reservation through the calendar invite in Teams or Outlook.
Reserve a bookable desk in advance
Bookable desks are set up in advance by your IT admin. A designated area of one or more desks is called a workspace, which is like a neighborhood in your office.
If you reserve a seat in the workspace in advance, you’re all set. Instead of reserving the seat when you plug in, you’ll see a confirmation message, letting you know that you are in the right spot and ready to start the day.
You can reserve a desk ahead of time using Teams or Outlook.
On Teams:
-
Go to your calendar on the left side of Teams and select New meeting.
-
Set the day and time you’d like to reserve a desk.
-
In the Add location field, type the name of the workspace you’d like to book. You may need to switch off the Online meeting toggle.
-
Select Save.
On Outlook:
-
From your calendar, select New Meeting.
-
Set the day and time you’d like to reserve a desk.
-
If you know the name of the workspace you’d like to book, type it in the location field. You can also use Room Finder to browse workspaces. If no workspaces appear, make sure that the type of space selected is workspace.
-
Select Send to add the reservation to your calendar.
To cancel a reservation, delete the meeting from your Teams or Outlook calendar.
Related topics
Use the scheduling assistant and room finder for meetings in Outlook


Need more help?
Want more options?
Explore subscription benefits, browse training courses, learn how to secure your device, and more.


Communities help you ask and answer questions, give feedback, and hear from experts with rich knowledge.


