

By sharing files and folders in Microsoft OneDrive, you can securely collaborate with friends, family, colleagues, or external partners. OneDrive files are private until you share them. You can add people, send a link, and choose what others can do with your files.
What you see differs depending on whether you're signed in with a personal account or a work or school account. Select a tab in the following section to learn more.
Sharing options
- Use Add people to give specific people or groups access. You can choose whether to send them an email notification.
- Use Copy link to send a link in an email or chat. Check who the link works for before you send it.
Share with specific people
Sign in to OneDrive with your work or school account.
Select the file or folder you want to share. In List view, select the circle to the left of the item. In Tiles view, select the circle in its top-right corner.
Note
You can share only one file or folder at a time in OneDrive for work or school.
Select Share
 at the top of the page.
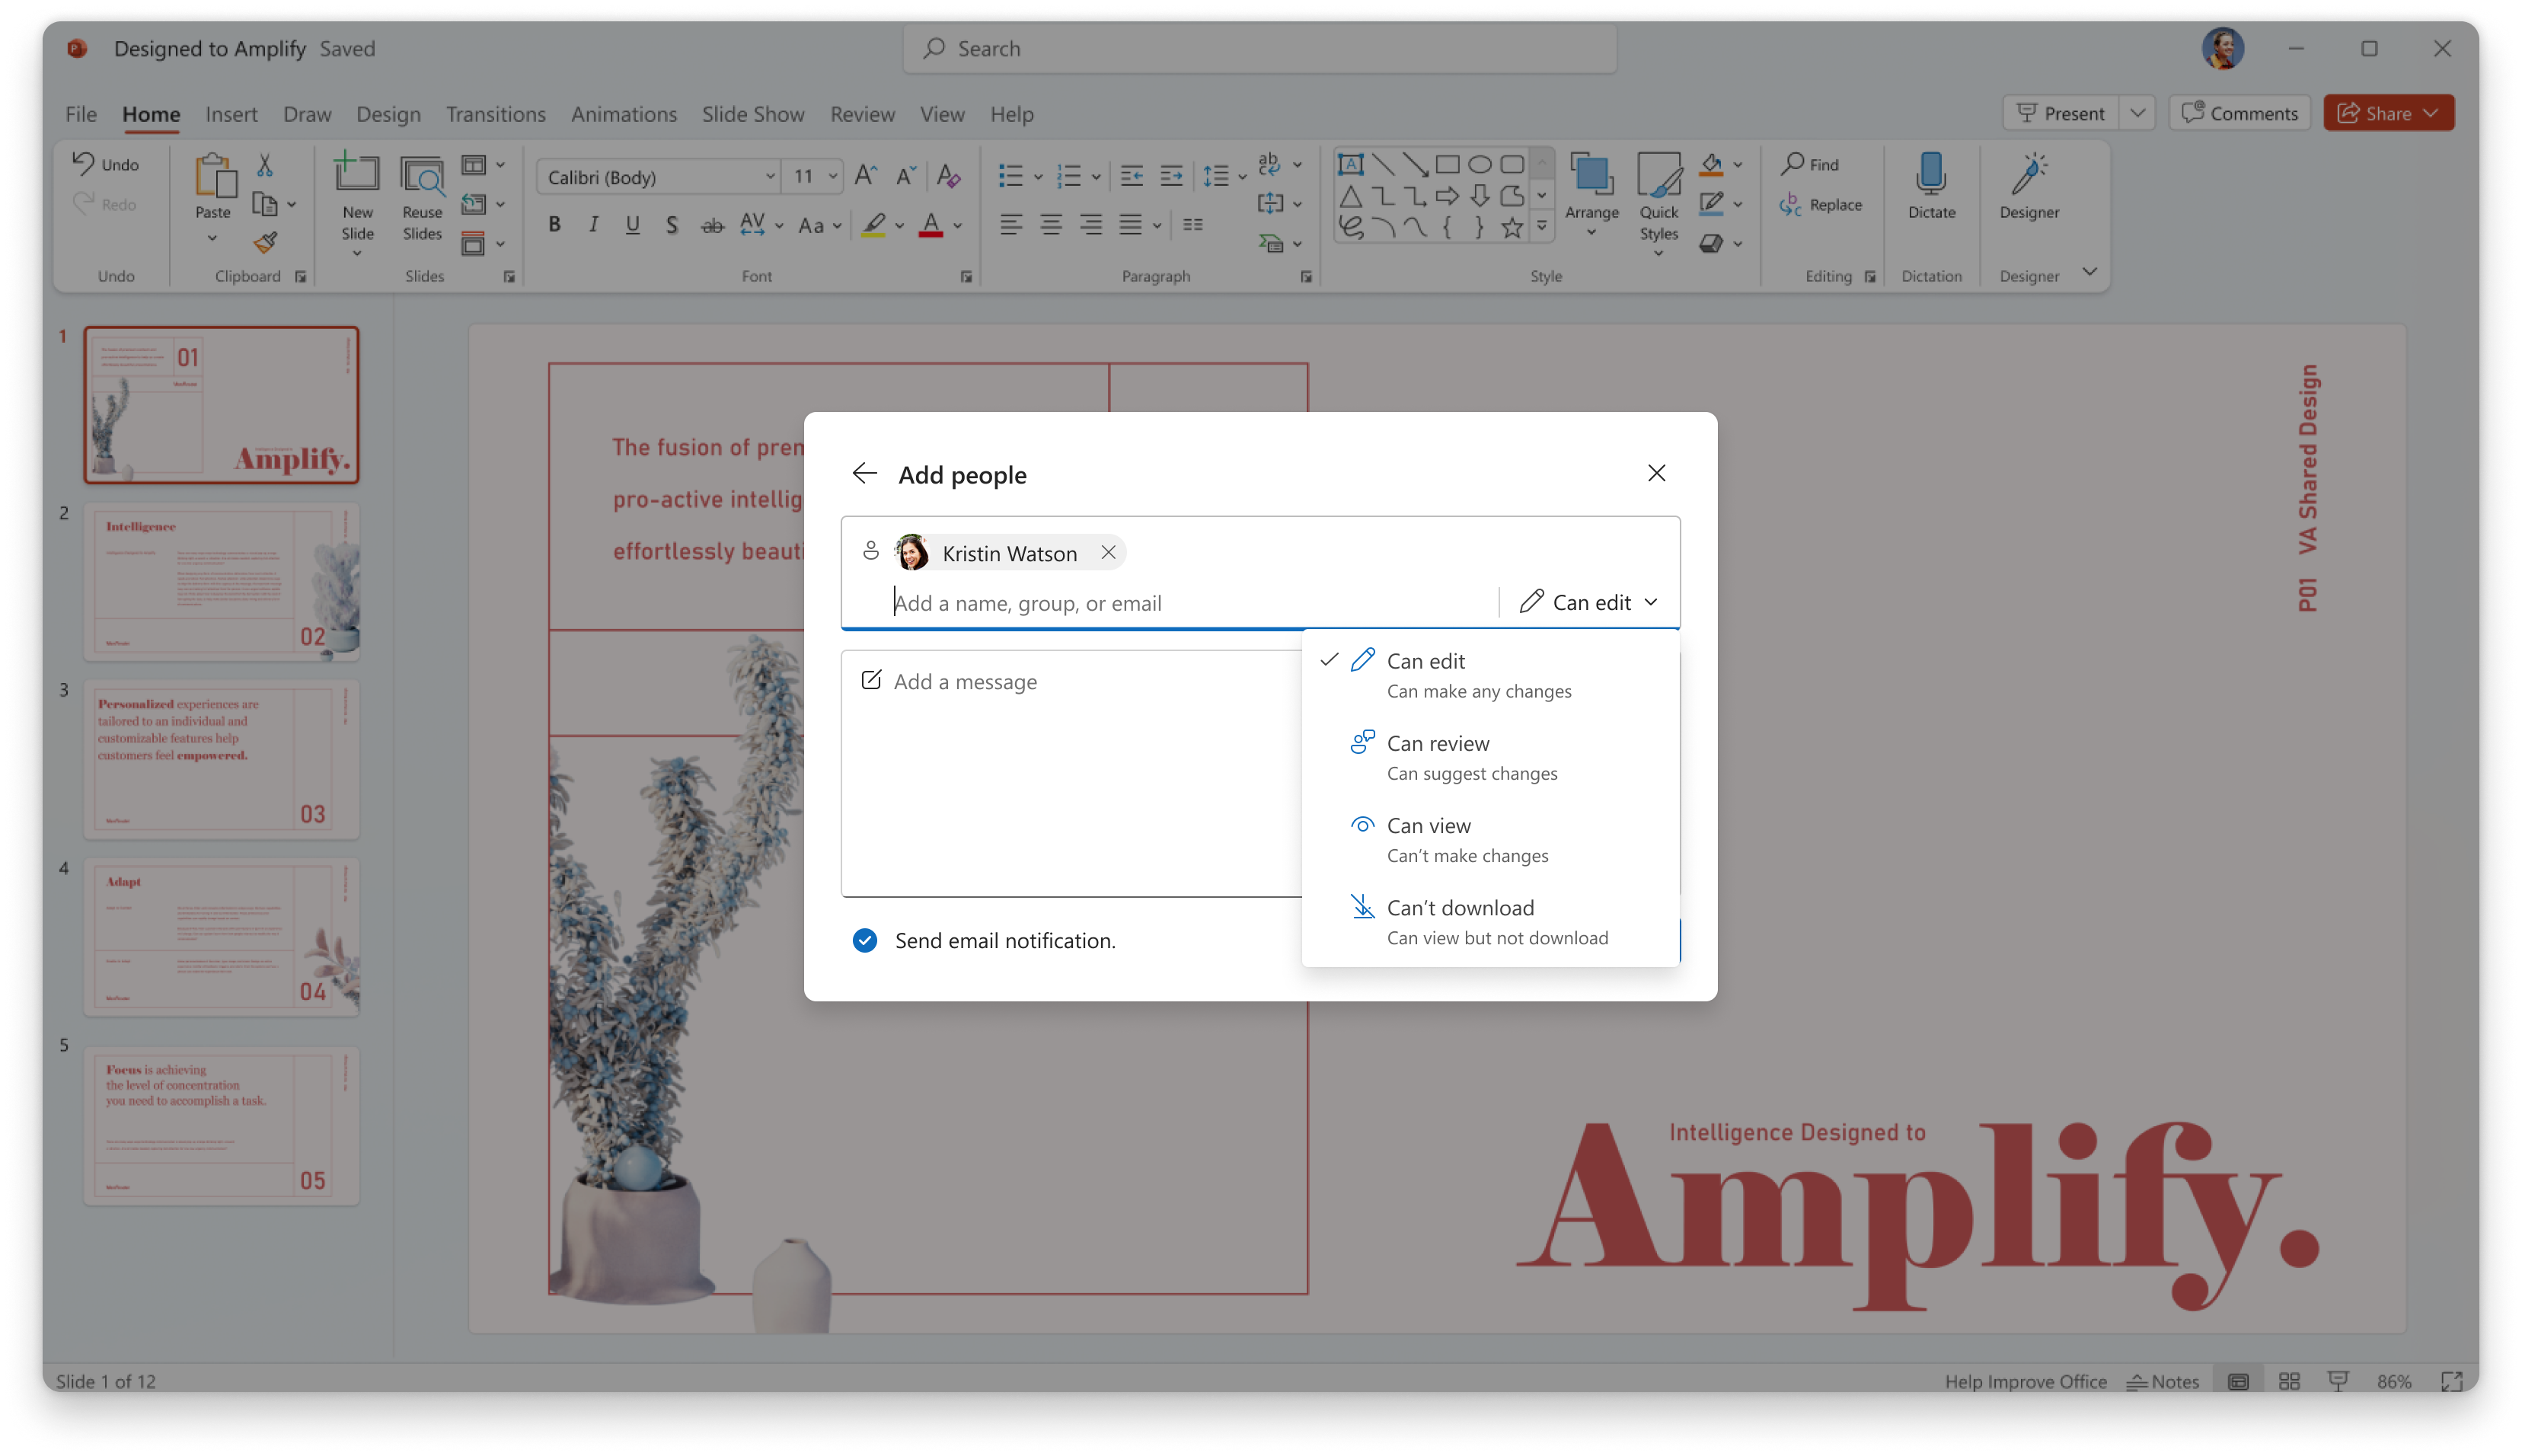
In Add people, enter names, groups, or email addresses. You can also choose recipients from the suggestions. If your organization allows external sharing, you can enter an email address for someone outside your organization.
Choose what the people you add can do:
- Can edit lets people view and change the file or folder. In a shared folder, they can also copy, move, rename, share, and delete items they have access to.
- Can review lets people suggest changes in supported file types, such as Word documents.
- Can view lets people view the file or folder without making changes.
- Can't download lets people view the file but not download it.
A person might also have access through a group, folder, site, or link. To reduce their permissions, review all sources of access.
Add a message if you want, and use Send email notification to choose whether to send an email. If Copilot is enabled for your account, you can select Add a file summary with Copilot to include a summary in the notification email.
Select Share.
The people you added now have access, whether or not you sent an email notification.
Share with "Copy link"
Every file or folder has one hero link, shown under File link settings in the sharing experience. Copy link copies that link. Links shared by email or copied from the browser address bar work the same way, although the URLs might look different.
Sign in to OneDrive with your work or school account.
Select the file or folder, and then select Share
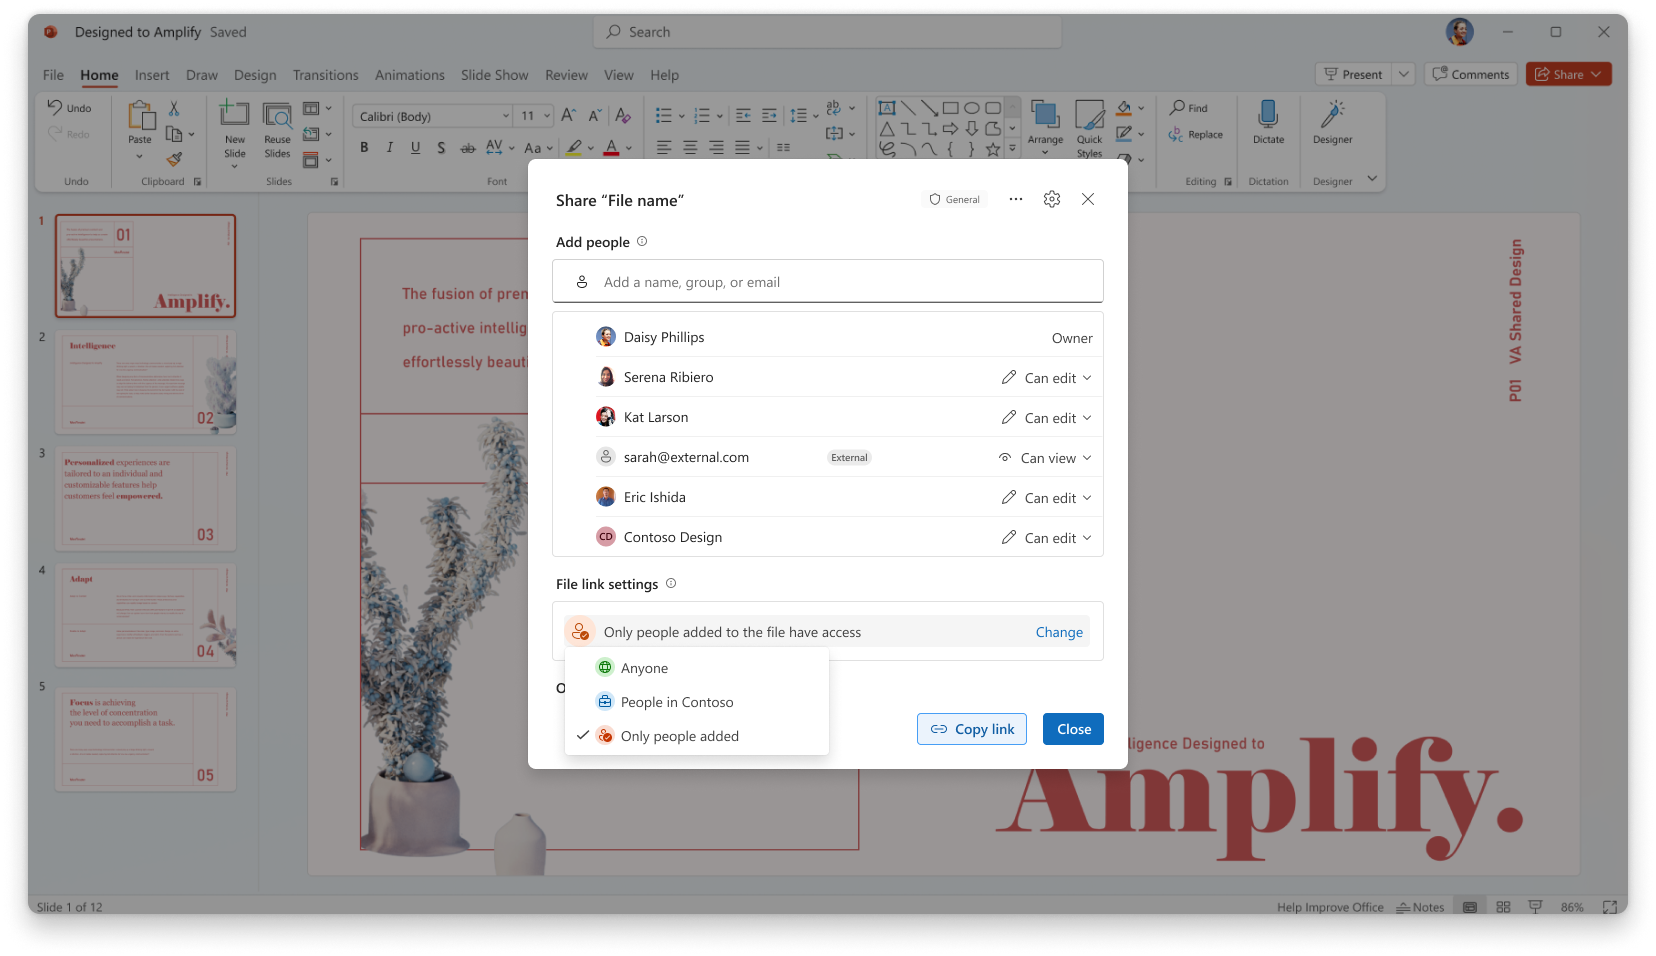
at the top of the page.Check File link settings. If the audience is Only people added, select Change. For an organization or anyone link, select the current audience text instead. Then choose an option:
- Only people added lets people use the link if they already have access, such as through a direct permission, a group, or the folder or site.
- People in <Your Organization> lets people in your organization open the item when they receive the link, including if someone forwards it.
- Anyone lets anyone who receives the link open the item without signing in. This access includes people outside your organization and anyone they forward it to.
Note
A new hero link usually starts at Only people added, but the default can depend on your organization and the parent folder. Your administrator might also restrict options, such as Anyone.
For an organization or anyone link, choose from the same permissions available when you add people: Can edit, Can view, Can't download, or Can review (for supported file types). Can view is selected by default when you first allow access through the link.
Select Copy link.
Paste the link into your email or chat, and send it to the recipients.
Changing the settings doesn't create a new link. If you limit who the link works for, that change also applies to people who already have it. To remove someone's access, see Manage sharing permissions in OneDrive.
Note
When you send an organization link to a security or Microsoft 365 group, recipients need to open the link to get access.
Send a link in Outlook
To compose an email in Outlook, open the ... menu in the sharing experience and select Send in Outlook. This option is separate from adding people through Add people. Before sending the email, check File link settings to ensure the recipients can use the link.
Use additional links
You can create extra links for a specific purpose, such as sharing with an expiration date or a password. These links appear under Other links, along with links inherited from a parent folder. Each extra link has its own settings, separate from the hero link.
Expiration dates and passwords apply to supported extra links, not to the hero link. Set expiration date makes a link stop working after the date you choose. Set password requires recipients to enter a password, which you must send them separately. Changing the hero link doesn't change or remove extra links.
Note
Links created before the hero link sharing experience continue to work and appear under Other links.
Manage sharing permissions in OneDrive
Select the file or folder, and then select Share to see who has access. You can review people, groups, links, and link usage, or search and filter the access list. People outside your organization have an External badge. If you're the owner, you can also change or remove permissions.
Change or remove access
If you're the owner, choose the action that matches what you want to change:
| To | Do this |
|---|---|
| Change a person's or group's permission | Use the permission menu next to their name. |
| Remove a person or group from the access list | Select X next to their name. |
| Remove an additional link | Under Other links, select X next to the link, and confirm Remove link. |
| Stop the hero link from granting access | Under File link settings, select the current audience text, then Only people added. |
Important
A person keeps the highest permission they have through any source: direct access, a group, the folder or site, the hero link, or another link. For example, changing someone's direct permission to Can view doesn't stop them from editing if a link still gives them Can edit. To reduce their access, change each source that grants the higher permission. If the hero link still grants more access, the sharing experience might ask you to confirm the change.
To make the file or folder private to owners, use Remove access instead. It removes direct, group-derived, and inherited access, removes additional sharing links, and returns the hero link to Only people added to the file have access without changing its URL. Follow the steps in Manage sharing and permissions in OneDrive and SharePoint, and review the confirmation before proceeding.
Advanced controls for owners
Owners can use advanced controls in the sharing experience to manage further sharing, inherited permissions, and the hero link itself.
Limit what editors can share
Owners can prevent editors from sharing a file or changing its access and link settings. Editors can still work on the file, but must ask an owner to give someone else access.
Control access from folder sharing
When someone shares a folder, the permissions they grant automatically apply to all files and subfolders inside it that they have access to. Owners can turn on a control for an item to block these automatic permission updates. With this control on, sharing a parent folder doesn't grant access to that item.
Stop people from using an old hero link
If the hero link was sent somewhere it shouldn't have been, an owner can invalidate it. Invalidation creates a new hero link with a new URL and stops the old link from working. People following the old link might see access denied or a request-access page.
Invalidation doesn't remove permissions people have through another source. If your goal is to stop someone from accessing the file, review their permissions rather than relying on a new URL. For more about invalidation and removing access, see Manage sharing and permissions in OneDrive and SharePoint.
 .
 in the upper-right corner to open the Details pane.
See also
- Share files in OneDrive for Android
- Share files in OneDrive for iOS
- Unable to share OneDrive files
- Can't share OneDrive files from Outlook.com
Need more help?
Account support. For help with your Microsoft account and subscriptions, visit Account & Billing Help.
Technical support. For technical support, select Contact Microsoft Support below, enter your problem and select Get Help.
Mobile users can contact Support by opening the OneDrive app and gently shaking your device.
Community support. Communities help you ask questions, give feedback, and hear from experts with rich knowledge. Ask the Microsoft Community. Do not disclose personal or sensitive information in public forums.