How to use Microsoft adaptive buttons
The Microsoft adaptive buttons are designed to work with your Microsoft Adaptive Hub and make it easier to work the way you want.
Microsoft adaptive buttons
There are three types of adaptive buttons available from Microsoft. Select an adaptive button to learn more:
-
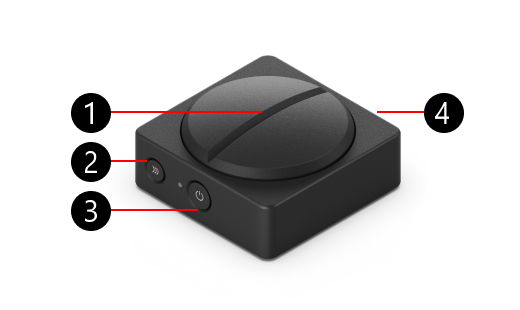
Button topper
-
Pairing button
-
Power button
-
USB-C charging port, on the side opposite of the power button (not shown)
-
Button topper
-
Pairing button
-
Power button
-
USB-C charging port, on the side opposite of the power button (not shown)
-
Joystick stem
-
Button topper
-
Pairing button
-
Power button
-
USB-C charging port, on the side opposite of the power button (not shown)
How to pair the adaptive button

Here’s how to pair your adaptive button:
-
Make sure your Adaptive Hub and adaptive button are turned on.
-
Press the pairing button on your adaptive button and wait for the light to flash.
-
On your Adaptive Hub, press and hold the pairing button until the light starts flashing.
-
The lights on both devices will continue flashing. When the lights stop flashing, your adaptive button has successfully paired to the Adaptive Hub.
How to change the button topper
Changing the button topper

Here’s how to remove the button topper for all the adaptive buttons:
-
Secure the base of your adaptive button and place a hand on the button topper.
-
Twist the button topper counterclockwise to loosen it from the base. You’ve loosened it once you can’t turn it anymore.
-
Remove the button topper from the button. One way to do this is to turn the button upside down.
-
Place the replacement button topper on the top of the adaptive button so the location markers match the base.
-
Twist the topper clockwise to secure it in place.
Changing the joystick stem

If you only want to change the joystick on the joystick button, here’s how:
-
Secure the base of your adaptive button and place a hand on the joystick.
-
Twist the joystick counterclockwise to loosen it from the base.
-
Continue twisting it until you can pull the joystick away from the base.
-
Once you’ve removed the original joystick button topper, put the replacement joystick on the adaptive button.
-
Twist it clockwise to secure it in place.


