
While you're editing a Microsoft 365 file that is stored on your device's hard disk or a network location, the Microsoft 365 app puts a temporary version of that file in the same folder where the real file is stored. When you close the real file, normally the temporary file is deleted by the system.
However, sometimes the temporary file isn't removed. Often this is caused by a sudden, unexpected closure of the app. Whatever the reason, if the temporary file lingers after the real file is closed, Microsoft 365 considers the real file "locked," and no one else may open it. This causes the "File in Use" error message that says the file is locked for editing by someone.
The following sections describe how to fix the situation. The person named in the error message should perform one of the following procedures—depending on whether the file is stored on someone's local device or a network.
Unlock a file stored on your local hard disk
First, ensure that the file isn't open on your device, hidden from view by another window. Then follow these steps:
-
Open the Windows File Explorer app.
-
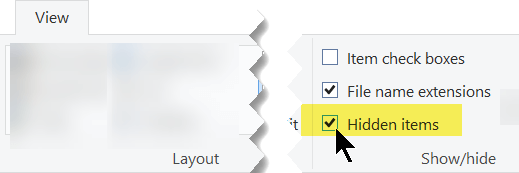
On the File Explorer ribbon, select the View tab.
-
In the Show/Hide group, ensure that Hidden items is selected:
-
Navigate to the folder where the problematic file is stored.
-
In the file list, locate the temporary file. (It has the same name as the real file, plus ~$ at the beginning of the name.)
-
Select the temporary file, then press Delete.
The real file should now be unlocked and available to edit.
Unlock a file stored on a network location
-
Open the Windows File Explorer app.
-
On the File Explorer ribbon, select the View tab.
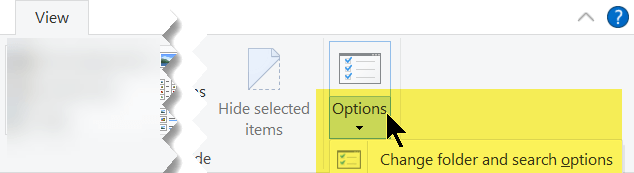
-
At the right end of the ribbon, select Options > Change folder and search options.
-
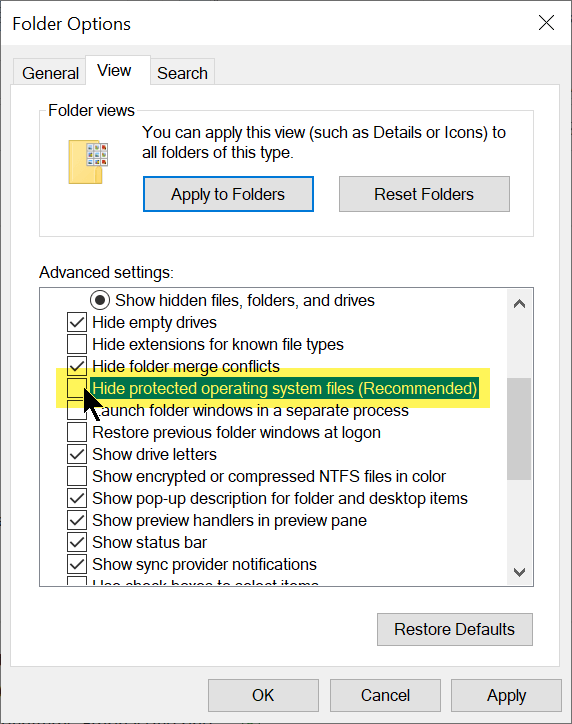
Select the View tab in the Folder Options dialog box.
-
Under Advanced settings, clear the option named Hide protected operating system files (Recommended). Click Yes in response to the warning, then click OK.
-
Navigate to the folder on the network where the problematic file is stored.
-
In the file list, locate the temporary file. (It has the same name as the real file, plus ~$ at the beginning of the name.)
-
Select the temporary file, then press Delete. The real file is now unlocked.
-
On the View tab of the ribbon, select Options > Change folder and search options.
-
Select the View tab in the Folder Options dialog box.
-
Under Advanced settings, select the option named Hide protected operating system files (Recommended). Click OK.
The real file should now be unlocked and available to edit.


