
In PowerPoint for Windows, macOS, and web, you can add closed captions or subtitles to videos and audio files in your presentations. Adding closed captions makes your presentation accessible to a larger audience, including people with hearing disabilities and those who speak languages other than the one in your video.
To read about best practices for accessibility, see Make your PowerPoint presentations accessible to people with disabilities.
Beginning with version 2016, PowerPoint has a new, simpler format for caption files, called WebVTT. The video player in the following versions of PowerPoint can show those captions when you play the video:
-
PowerPoint 2016
-
PowerPoint 2019
-
PowerPoint 2021
-
PowerPoint for Microsoft 365
The closed captions are stored in a text-based file with a .vtt filename extension. You can create a closed caption file on your own or use a caption-creation tool. To search online for available tools and detailed instructions, type "create vtt file" in your search engine.
For instructions on showing captions when watching a video in these versions of PowerPoint, see Accessibility features in video and audio playback on PowerPoint.
Requirements for this feature
In Office 2016, the availability of the closed-captioning feature depends on the way Microsoft 365 was installed. Closed-captioning is only available for Office 2016 Click-to-Run installations; MSI-based installations don't have closed-captioning features. Read the next section to see whether the feature is available to your installation of PowerPoint 2016.
-
Open an Office 2016 application.
-
On the File menu, select Account.
-
For Office 2016 Click-to-Run installations, you'll have an Update Options button.
MSI-based installations don't have an Update Options button. You'll only see the About <application name> button.
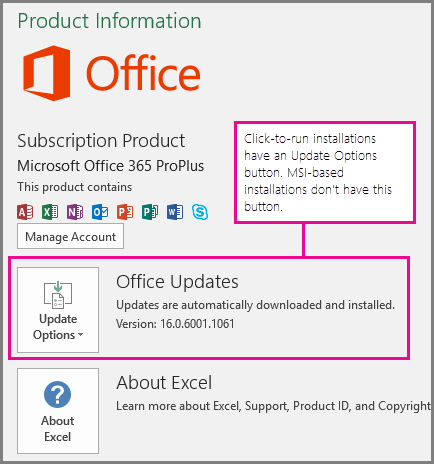
If you have an MSI-based installation of Office 2016, refer to the Office 2010-2013 tab of this article to see what captioning features are available to you.
Create closed captions
Prepare a text-based caption file with a .vtt filename extension before adding captions. For instructions on how to create the caption file, see Create closed captions for a video.
Add closed captions to a video
You can add captions to presentations that you've recorded with video narration, screen recordings, and any other video (except online videos) that you insert into PowerPoint.
-
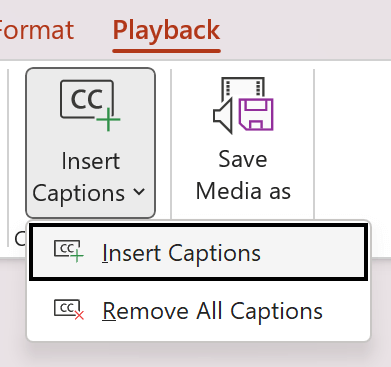
In PowerPoint, in the Normal view, open the slide that has the video that you want to add captions to.
-
Select the video on the slide.
-
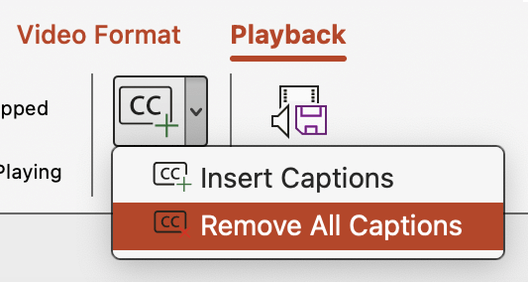
On the Playback tab, select Insert Captions, and then select Insert Captions.
-
In the Insert Captions dialog box, select the file or files and then click Insert.
-
If you need to add more caption files, just repeat the process.
-
Play the video and check that the captions appear correctly.
Remove closed captions from a video
If you need to edit a closed caption file that is inserted in a video in PowerPoint, you can first remove the file, modify it, and then add it back to the video. Before removing the file from the PowerPoint video, make sure you have the original copy of the closed caption file stored on your PC.
If you have added more than one caption file to a video, the following process removes all caption files assigned to the video.
-
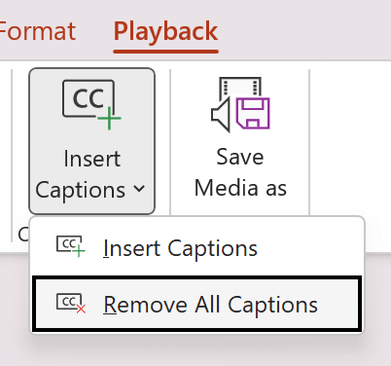
In PowerPoint, in the Normal view, open the slide that has the video containing the captions.
-
Select the video on the slide.
-
On the Playback tab, select Insert Captions, and then select Remove All Captions.
Additional ways to add closed captions
Beginning with version 2111, you can also insert closed captions from the Accessibility ribbon using the Insert Captions button.
Beginning with version 2208, you can also insert closed captions from the context menu that appears when you right-click on a video.
Tip: If you're using Microsoft 365, you can also show live subtitles, including live translation to another language if you like, of your speech as you present. For more information, refer to Present with real-time, automatic captions or subtitles in PowerPoint.
Add captions to an audio file
Beginning with version 2303, you can insert closed captions for audio in the same way as for video.
Tip: The closed captions will only be displayed on the slide that the audio file is inserted in even if the audio continues playing on other slides because the Play Across Slides setting is on.
Related topics
Make your PowerPoint presentations accessible to people with disabilities
Beginning with version 16.63, PowerPoint for Mac supports closed captions in the WebVTT format.
The closed captions are stored in a text-based file with a .vtt filename extension. You can create a closed caption file on your own or use a caption creation tool. To search online for available tools and detailed instructions, type "create vtt file" in your search engine.
For instructions on showing captions when watching a video in the supported versions of PowerPoint, refer to the section "Turn on closed captions or subtitles by using the keyboard" in the article Accessibility features in video and audio playback on PowerPoint.
Create closed captions
Prepare a text-based caption file with a .vtt filename extension before adding captions. For instructions on how to create the caption file, refer to Create closed captions for a video.
Add closed captions to a video
You can add captions to presentations that you've recorded with video narration, screen recordings, and any other video (except online videos) that you insert into PowerPoint.
-
In PowerPoint, in the Normal view, open the slide that has the video that you want to add captions to.
-
Select the video on the slide.
-
On the Playback tab, select Insert Captions, and then select Insert Captions.
-
In the Insert Captions dialog box, browse to your caption file. Select the file or files and then select Insert.
-
If you need to add more caption files, just repeat the process.
-
Play the video and check that the captions appear correctly.
Remove closed captions from a video
If you need to edit a closed caption file that is inserted in a video in PowerPoint, you have to first remove the file, modify it, and then add it back to the video. Before removing the file from the PowerPoint video, make sure you have the original copy of the closed caption file stored on your computer.
If you have added more than one caption file to a video, the following process removes all caption files assigned to the video.
-
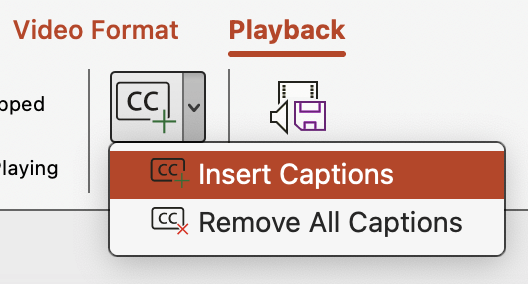
In PowerPoint, in the Normal view, open the slide that has the video containing the captions.
-
Select the video on the slide.
-
On the Playback tab, select Insert Captions, and then select Remove All Captions.
Additional ways to add closed captions
You can also insert closed captions from the Accessibility ribbon using the Insert Captions button.
Beginning with version 16.64, you can also insert closed captions from the context menu that appears when you Control-click on a video.
Tip: If you're using Microsoft 365, you can also show live subtitles, including live translation to another language if you like, of your speech as you present. For more information, refer to Present with real-time, automatic captions or subtitles in PowerPoint.
Add captions to an audio file
Beginning with version 16.71, you can insert closed captions for audio in the same way as for video.
Tip: The closed captions will only be displayed on the slide that the audio file is inserted in even if the audio continues playing on other slides because the Play Across Slides setting is on.
Related topics
Make your PowerPoint presentations accessible to people with disabilities
Beginning with build 16.0.17820.40500, you can generate closed captions for embedded videos in PowerPoint for the web using speech recognition. Additionally, you can translate captions to multiple languages and edit them for accuracy. If you have already created captions using another app or service in WebVTT format, you can insert those captions files in PowerPoint for the web.
For instructions on showing captions when watching a video in these versions of PowerPoint, see Accessibility features in video and audio playback on PowerPoint.
Generate closed captions
-
In PowerPoint, go to the Normal view and open the slide with the video you want to add captions to.
-
Select the video on the slide.
-
On the Video tab, select Edit Captions.

-
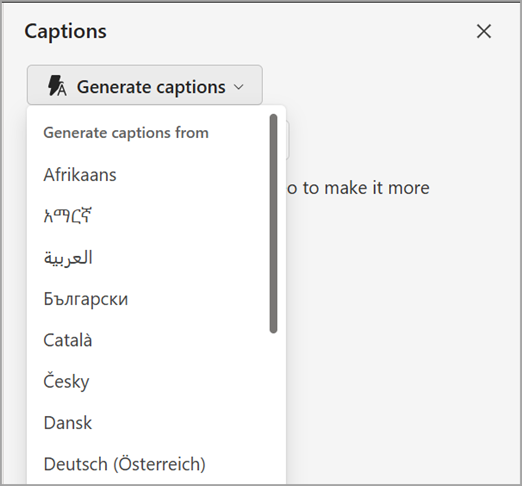
In the Captions pane, select Generate captions and choose the language of speech in the video.
-
Wait for the caption to be generated.
Note: For short videos, captions will be generated in several seconds. For a two-hour video, it can take up to three minutes.
-
When the captions have been generated, they will be displayed in the Captions pane for you to review and edit.
Edit closed captions
-
Go to the Normal view and open the slide with the video you want to add captions to.
-
Select the video on the slide.
-
On the Video tab, select Edit Captions.
-
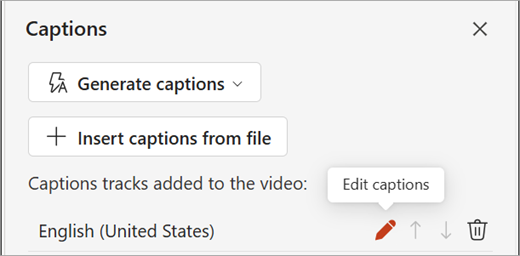
The Captions pane displays a list of caption tracks for the video. Select the Edit captions button next to the captions track you want to edit.
-
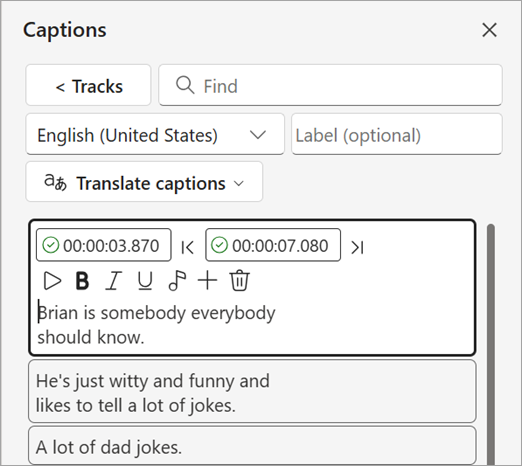
The list of text cues for the captions track is displayed in the Captions pane. Review the text cues to make sure they match what is being said in the video. When you place the cursor in a text cue, a toolbar will appear and the segment of the video for the text cue will play.
-
Edit the text cues as needed. Add descriptions of important sounds and the names of speakers.
-
Use the toolbar to apply text formatting, insert music characters, insert text cues, remove text cues, and adjust the start and end times. You can also find text in text cues using the Find box in the top-right corner.
-
Set the language of the track and optionally, add a label for the track.
-
-
When you are done editing the caption tracks, select the < Tracks button to return to the list of caption tracks.
Translate closed captions
-
Go to the Normal view and open the slide with the video you want to add captions to.
-
Select the video on the slide.
-
On the Video tab, select Edit Captions.
-
In the Captions pane, the list of caption tracks for the video is displayed. Select the Edit captions button next to the caption track you want to translate.
-
The list of text cues for the caption track is displayed in the Captions pane. Review the text cues and make any edits that are needed. Select Translate captions and choose the language that you want to translate to.
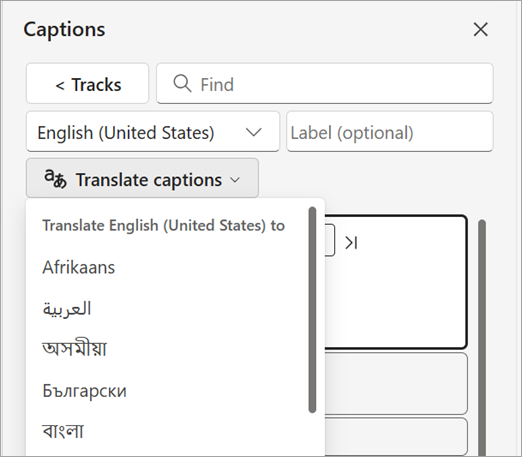
-
A new captions track with the translated text is added and displayed in the Captions pane. Review and make any edits that are needed.
Insert closed captions from the file
-
Go to the Normal view and open the slide with the video you want to add captions to.
-
Select the video on the slide.
-
On the Video tab, select Edit Captions.
-
In the Captions pane, select Insert captions and choose the WebVTT file you want to insert. The captions will be displayed in the Captions pane, where you can review and make any necessary edits.
-
The language of the track is set automatically based on the language code specified in the file name or the language of the caption text. If needed, use the Language combo box to set a different language for the captions track.
Removed closed captions
-
Go to the Normal view and open the slide with the video you want to add captions to.
-
Select the video on the slide.
-
On the Video tab, select Edit Captions.
-
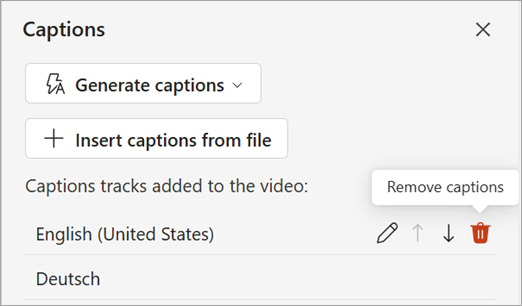
In the Captions pane, select the Remove caption button next to the captions tracks that you want to remove.
Reorder closed caption tracks
-
Go to the Normal view and open the slide with the video to which you want to add captions.
-
Select the video on the slide.
-
On the Video tab, select Edit Captions.
-
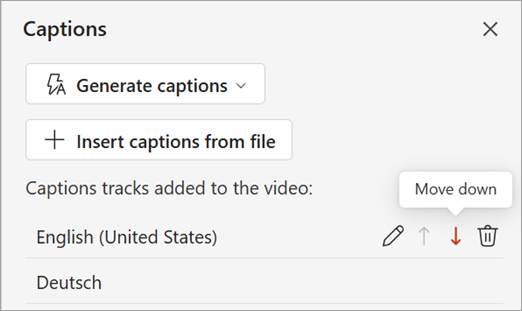
In the Captions pane, select the Move Up or Move Down button next to the captions track in which you want to change the order.
Additional ways to add or edit closed captions
You can edit closed captions from the Accessibility ribbon using the Edit Captions button. You can also edit closed captions from the context menu when you right-click a video.
Tip: If you're using Microsoft 365, you can also show live subtitles, including live translation to another language if you like, of your speech as you present. For more information, go to Present with real-time, automatic captions or subtitles in PowerPoint.


