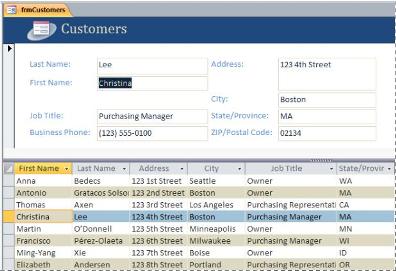
Forms in Access are like display cases in stores that make it easier to view or get the items that you want. Since forms are objects through which you or other users can add, edit, or display the data stored in your Access desktop database, the design of your form is an important aspect. If your Access desktop database is going to be used by multiple users, well-designed forms is essential for efficiency and data entry accuracy.
There are several ways of creating a form in an Access desktop database and this article points you to some of the common ways.
What do you want to do?
Create a form from an existing table or query in Access
To create a form from a table or query in your database, in the Navigation Pane, click the table or query that contains the data for your form, and on the Create tab, click Form.
Access creates a form and displays it in Layout view. You can make design changes like adjusting the size of the text boxes to fit the data, if necessary. For more information, see the article on using the form tool.
Create a blank form in Access
-
To create a form with no controls or preformatted elements: On the Create tab, click Blank Form. Access opens a blank form in Layout view, and displays the Field List pane.
-
In the Field List pane, click the plus sign (+) next to the table or tables that contain the fields that you want to see on the form.
-
To add a field to the form, double-click it or drag it onto the form. To add several fields at once, hold down CTRL and click several fields, and then drag them onto the form at the same time.
Note: The order of the tables in the Field List pane can change, depending on which part of the form is currently selected. If you are not able to add a field to the form, try selecting a different part of the form and then try adding the field again.
-
Use the tools in the Header/Footer group on the Form Layout Design tab to add a logo, title, or the date and time to the form.
-
If you want to add a wider variety of controls to the form, click Form Layout Design and use the tools in the Controls group.
Create a split form in Access
A split form gives you two views of the data at the same time — a Form view and a Datasheet view. Working with split forms gives you the benefits of both types of forms in a single form. For example, you can use the datasheet portion of the form to quickly locate a record, and then use the form portion to view or edit the record. The two views are connected to the same data source and are synchronized with each other at all times.
To create a new split form by using the Split Form tool, in the Navigation Pane, click the table or query that contains the data, and then on the Create tab, click More Forms, and then click Split Form.
Access creates the form and you can make design changes to the form. For example, you can adjust the size of the text boxes to fit the data, if necessary. For more information on working with a split form, see the article on creating a split form.
Create a form that displays multiple records in Access
A multiple item form, also known as a continuous form, and is useful if you want a form that displays multiple records but is more customizable than a datasheet, you can use the Multiple Items tool.
-
In the Navigation Pane, click the table or query that contains the data you want to see on your form.
-
On the Create tab and click More Forms > Multiple Items.
Access creates the form and displays it in Layout view. In Layout view, you can make design changes to the form while it is displaying data. For example, you can adjust the size of the text boxes to fit the data. For more details, see Create a form by using the Multiple Items tool.
Create a form that contains a subform in Access
When you are working with related data that is stored in separate tables, you often need to view data from multiple tables or queries on the same form and subforms are a convenient way to do this. Since there are several ways of adding a subform depending on your needs, for more information, see the article Create a form that contains a subform (a one-to-many form).
Additional information
There are several options that you can use to customize your forms, see if some the following fit your needs:
|
Options |
See this resource |
|---|---|
|
If you want to be able to select which fields appear on the form, use the Form Wizard to create your form. |
|
|
Adding tabs to a form can make the form appear more organized and easier to use, especially if the form contains many controls. |
|
|
A Web Browser Control lets you to display Web pages on a form. You can link the control to fields or controls in your database to dynamically determine which page is displayed. For example, you can use address information in a database to create custom maps on an Internet mapping site, or you can use product information in a database to search for items on a supplier's Web site. |
|
|
Access places controls in guides called layouts to help you align controls on a form. Find out how to move and size controls independently. |


