
Create additional calendars
In addition to the default Microsoft Outlook Calendar, you can create other Outlook calendars. For example, you can create a calendar for your personal appointments, separate from your work calendar.
Select a tab option below for the version of Outlook you're using. What version of Outlook do I have?
Note: If the steps under this New Outlook tab don't work, you may not be using new Outlook for Windows yet. Select Classic Outlook and follow those steps instead.
-
In the calendar, select the Home tab.
-
Below the calendar grid, select

-
Select Create blank calendar.
-
Enter a name for your new calendar. Then, under Add to, select which category to add the calendar to. (Categories appear under the calendar month view.)
-
Select Save.
Tips:
-
To share a calendar, see Share an Outlook calendar with other people.
-
To open a shared calendar, go to Home > Add calendar > Add from directory.
-
To delete a calendar, right-click the calendar name in the Navigation pane, and then select Remove.
When you create an additional calendar, often referred to as a secondary calendar, you might add events to that calendar and expect those events to also impact your availability. However, when others view your availability using the Scheduling Assistant, the secondary calendar events aren’t shown. This behavior is by design. Only events on your primary calendar impact your availability.
Important: If you create a new calendar under your Exchange calendar, the new calendar will also sync with the Exchange server. However, if you create a meeting on the new Exchange calendar, responses to this meeting won't be tallied.
-
In Calendar, select the Folder tab.
-
In the New group, select New Calendar.
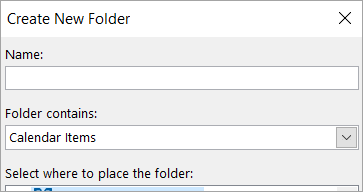
Tip: You can also create a new calendar if you are in Mail or People. From the Folder tab, select New Folder, then in the Folder contains list, select Calendar Items.
-
In the Name box, type a name for the new calendar.
-
In the Select where to place the folder list, select Calendar, and then select OK.
The new calendar appears in the Calendar Navigation Pane.
To view a calendar, select the check box for the calendar.
When multiple check boxes are selected, the calendars appear in side-by-side view and can be switched to the calendar overlay view. For more information, see View multiple calendars at the same time.
Tip: To delete a calendar, right-click the calendar name in the Navigation Pane, and then select Delete calendar name.


Need more help?
Want more options?
Explore subscription benefits, browse training courses, learn how to secure your device, and more.


Communities help you ask and answer questions, give feedback, and hear from experts with rich knowledge.


