Create Content Organizer rules to route documents
To determine how to route a document, Content Organizer uses rules that you create. Rules are based on a combination of content types and metadata.
This article describes how to create rules for organizing and routing documents or records. Any SharePoint enterprise site can be enabled for document routing.
Important: You must first enable the Content Organizer feature and configure the organizer to route records. For more info about how to configure Content Organizers, see Configure the Content Organizer to route documents.
In this article
Before you create rules: First steps
Before you create rules for routing documents, you must follow several important steps.
-
Activate the Content Organizer feature.
-
Create libraries and folders that you want documents to be routed to. You might want to create folders for each type of document that you are routing. For example, create a library just for e-mail records or Excel spreadsheets. To learn about how to create libraries, see Create a document library in SharePoint.
-
Content types must be associated with documents that are to be routed. In them, the content type can be part of the criteria that determines the final location where a document is stored.
Understand how documents are routed
You can route documents to a library or folder in a Records Center site or any other kind of SharePoint site. The Drop Off library, which is automatically created when you activate the Content Organizer feature, serves as the default location. The document routing process is made up of several elements:
-
Target libraries and folders Content stewards or records managers manually create libraries and folders where documents should be routed, and designate these libraries as target libraries.
-
Site content types Every document must have a content type, and users can add appropriate site content types manually to target libraries.
-
Drop Off library Documents that don’t match a rule, or that are missing required metadata are sent to the Drop Off library so that users can enter required metadata. Or, you can configure the Content Organizer so that all uploaded documents are temporarily routed to the Drop Off library.
Note: The Drop Off library is intended as a "catch-all" for those items not matching any rule. It is designed as a temporary location, and not as a permanent collaboration site.
-
Document rules list This is a collection of all the routing rules. Content stewards or records managers visit this list to create, manage, and view routing rules.
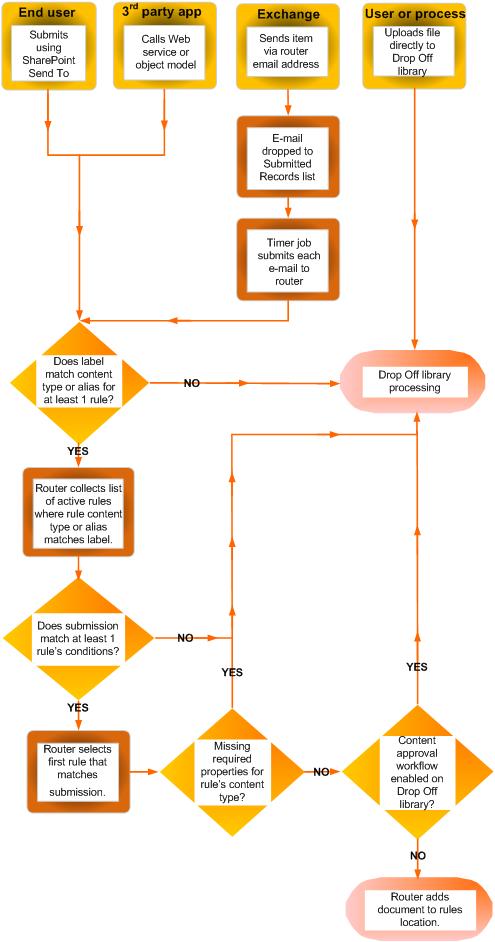
The following diagram shows how documents and email messages are routed based on meeting specific criteria, and how documents that are missing information are returned to the Drop Off library.

Create rules to route documents
For each record type that you add to the Record Routing list, you specify a record title and description. You also specify the location in the site where the record is stored. To make sure that all relevant records are routed to the appropriate location, you can specify alternate names for the record type.
Note: You must have at least Site Owner permissions to create rules to route documents.
-
Navigate to the site for which you want to create Content Organizer rules.
-
On the Quick Launch panel, to see the Site Contents options, select More.
-
From the Apps menu line, select Settings.
-
On the Site Settings page, under the Site Administration section, select Content Organizer Rules.
-
On the Content Organizer Rules page, in Click to add a new item, select add.
-
In the Rule Name section, enter a name that describes the rule’s conditions and actions.
-
In the Rule Status and Priority section, to apply the rule to incoming content, select Active. Then, select a priority to determine how content is routed should it match more than one Content Organizer rule.
If you do not want this rule to apply to incoming content, select Inactive. -
In the Submission’s Content Type section, associate the rule with a content type. By doing this, submissions to the Content Organizer are labeled with the selected content type, and properties used in the conditions of the rule are identified.
-
Select the appropriate content group. The group that you select determines the content types that you can choose from in the next step.
-
Select the appropriate content type.
-
If the content type that you selected has a different name on another SharePoint site, under Alternate names, select the checkbox. Then, in the field provided, enter the name that is used on the other site, and select Add. Names for alternate content types appear in the list underneath.
-
-
In the Conditions section, select the conditions that a submission’s properties must meet for the rule. For example, you may want the rule to apply to all documents that have the word “budget” in the title. To add more conditions, select the Add another condition link.
Note: The properties available from the Property dropdown differ according to the content type that you selected in step 6.
-
In the Target Location section, enter or browse to a location to place content that matches the rule. To group similar documents together in folders, select the Automatically create a folder checkbox. For example, if you have a property that lists all documents for projects in your organization, you can force the Content Organizer to create a separate folder for each project.
Note: The rules of the Content Organizer are meant to route documents to different locations. We do not support using rules to re-post files to the same location during collaboration.


