Sign in with Microsoft
Sign in or create an account.
Hello,
Select a different account.
You have multiple accounts
Choose the account you want to sign in with.

We're sorry that you're having trouble syncing your Microsoft OneDrive. 

The following steps will ensure your OneDrive is running correctly, that you are able to access your files online, and that you have enough room for the right files to sync.

Use our guided support troubleshooting tool, or follow the steps in the sections below.

Start

Note: This article is for users who sign in with a personal Microsoft account. If you sign in with an Office 365 work or school account, please read how to Fix OneDrive sync problems.

  1. Select the white or blue OneDrive cloud icon in the notification area, at the far right of the taskbar.

    OneDrive SyncClient with blue cloud and white cloud icons

    Note: You might need to click the Show hidden icons arrow The Show hidden icons button. next to the notification area to see the OneDrive icon. If the icon doesn't appear in the notification area, OneDrive might not be running. Select Start, type OneDrive in the search box, and then select OneDrive in the search results.

  2. Select OneDrive Help and Settings icon Help & Settings.

  3. Select View online.

    Note: If you're having problems signing in to OneDrive.com online, check the status of Microsoft Office Online Services at the Service Health portal

OneDrive and Windows are frequently updated and keeping your PC up-to-date can help sync problems.

  1. Download the latest Windows updates to get the most out of OneDrive. The Windows 10 Fall Creators Update enables OneDrive Files On Demand which can help resolve sync problems. Learn more about OneDrive Files On-Demand.

  2. Download the latest version of OneDrive and install it. 

    Notes: 

    • If you already have the latest version, the installer setup will end automatically.

    • For more information on the latest version, read the release notes.

  3. Press  Press the Windows key, search for OneDrive and then open the OneDrive desktop app

  4. When OneDrive Setup starts, enter your Microsoft account email address, and then select Sign in to set up your account.

You won't lose files or data by disabling, uninstalling or unlinking OneDrive on your computer. You can always access your files by signing in to your OneDrive account online.

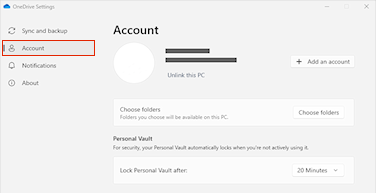
  1. Open OneDrive settings (select the OneDrive cloud icon in your notification area, and then select the OneDrive Help and Settings icon then Settings.)

  2. Go to the Account tab.

  3. Select Unlink this PC.

If you are seeing the sync icon stuck for a long period of time, moving some files out of a sync folder can help clear any sync issues.

  1. Open OneDrive settings (select the OneDrive cloud icon in your notification area, and then select the OneDrive Help and Settings icon )

  2. Select Pause syncing.

  3. Choose how long you want to pause OneDrive.

After choosing the time, perform the following:

  1. Select a file from one of your sync folders and move it to a folder that's not part of OneDrive, e.g. C:\users\

  2. Select OneDrive Help and Settings icon again and select Resume syncing... 

  3. Once sync is complete, move the file back again.

There are three types of constraint with OneDrive files and filenames:

  1. Make sure that none of the files you want to sync are larger than 20 GB. If you see an error message such as "This file is too big to upload" or "Reduce the size of this file to upload to..." try reducing the size of a file by zipping it. You may be able to reduce the file size of a picture.

  2. Make sure the entire file path, including the file name, contains fewer than 400 characters. An example of a file path is: 
    C:\Users\<UserName>\Pictures\Saved\2017\December\Holiday\NewYears\Family… 

    To resolve this, shorten the name of your file or the name of subfolders in OneDrive, or select a sub-folder that's closer to the top-level folder.

  3. Make sure that your file doesn't contain any illegal or characters (such as <, >, :, ", |, ?, *, /, \) or that the folder includes any unsupported file types. Learn more about Restrictions and limitations when you sync files and folders.

If you use your device both at home and at work, try turning off the proxy settings in Microsoft Edge or Internet Explorer before you install Microsoft 365. If you’re using a different browser, check their help to find out how to turn off proxy settings.

Microsoft Edge

  1. Click the Start button Windows Start button in Windows 8 and Windows 10 (lower-left corner), and choose Settings.

  2. Select Network & Internet, go to the bottom of the selections on the left side, and click Proxy.

  3. In Automatic proxy setup, automatically detect settings or use setup script, by sliding to On or Off.

  4. In Manual proxy setup, you can choose to use a proxy server. Generally, it will be off and if you slide it to On, be sure to select Save. And if it was off by default before you turned it on, be sure to slide back to Off when you've finished using it.

Internet Explorer 7, 8, 9, 10, or 11

  1. In Internet Explorer, click Tools (upper-right corner) > Internet options.

  2. Click the Connections tab, and then click the LAN settings button.

  3. Under Proxy server, clear the option "Use a proxy server for your LAN (These settings will not apply to dial-up or VPN connections)."

  4. Click Apply and OK to save changes. Restart your computer.

Note: There might be more proxy settings that you need to bypass. If this doesn't work, and you’re installing Office from work or school, check with your IT department for more information. For IT administrators, please see Microsoft 365 URLs and IP address ranges.

For information about how to turn off your antivirus software, check your antivirus manufacturer's website. Uninstalling your antivirus software may also help. Don't forget to reinstall it after Office is finished installing and if you turned it off, be sure to turn it on again.

If you're not sure which antivirus software you have, use the following instructions to get to Control Panel to find the name of your antivirus software.

Tip: Windows 10 comes with default antivirus software, Windows Defender. If you determine that you're using it, select the Start button > Settings > Update & Security, and then select Windows Defender on the left. Slide the button to Off. Remember to turn it On again.

  1. On the Start Windows Start button in Windows 8 and Windows 10 menu, enter Control Panel in the search box and select Control Panel from the results.

  2. Do one of the following:

    • In Category view, select System and Security > Security and Maintenance, and then select the down arrow next to Security.

    • In Large icons or Small icons view, select Security and Maintenance, and then select the down arrow next to Security.

If Windows can detect your antivirus software, it's listed under Virus protection.

  1. Go to the Control Panel by right-clicking the Start button Windows Start button in Windows 8 and Windows 10 (lower-left corner), and choosing Control Panel.

    Options and commands list see after pressing Windows logo key + X

  2. Do one of the following:

    • In Category view, select System and Security > Action Center, and then select the down arrow next to Security.

    • In Large icons or Small icons view, select Action Center, and then select the down arrow next to Security.

If Windows can detect your antivirus software, it's listed under Virus protection.

  1. Go to Control Panel by choosing the Start button Windows 7 Start button (lower-left corner), and choosing Control Panel.

  2. Do one of the following:

    • In Category view, select System and Security > Action Center, and then select the down arrow next to Security.

    • In Large icons or Small icons view, select Action Center, and then select the down arrow next to Security.

If Windows can detect your antivirus software, it's listed under Virus protection.

If you're using a firewall from another manufacturer, visit the manufacturer's website for information about how to temporarily disable the firewall. For Windows Firewall, please see below.

Windows 11 and Windows 10

Windows 8.1 and 7

Resetting OneDrive can sometimes resolve sync issues, and resets all OneDrive settings. OneDrive will perform a full sync after the reset.

Notes: 

  • Resetting OneDrive disconnects all your existing sync connections (including personal OneDrive and OneDrive for work or school if set up).

  • You won't lose files or data by resetting OneDrive on your computer.

Learn how to Reset OneDrive.

Repairing or reinstalling Office can sometimes fix sync conflicts between Office and OneDrive. Read how to Download and install or reinstall Office 365 or Office 2016 on a PC or Mac.

Hints and tips

Follow these hints and tips to get the most out of your OneDrive and to make sync as trouble-free as possible.

OneDrive Files On-Demand helps you access all your files in OneDrive without having to download all of them and use storage space on your device. Learn more about OneDrive Files On-Demand.

You can also download or sync fewer files by choosing which OneDrive folders to sync to your computer.

Note: You won't lose files or data by disabling, uninstalling or unlinking OneDrive on your computer. You can always access your files by signing in to your OneDrive account online.

If OneDrive sync seems to be stuck for a long time or the status shows "Processing 0KB of xMB" it could be because you have a lot of files in your OneDrive or a lot of new files to be uploaded. If you have more than 100,000 files, sync can take a long time.

Note: For transferring large files or lots of files, we recommend adding the files to the OneDrive desktop app rather than the using Upload button on the website.

To see how many files you have in your OneDrive:

  1. Open File Explorer.

  2. Right-click the OneDrive folder and select Properties.

  3. If the Contains number is more than 100,000 you should consider which OneDrive folders to sync to your computer.

If the sync is already in process, you can Pause and Resume your sync to get things going again.

  1. Open OneDrive settings (select the OneDrive cloud icon in your notification area, and then select the OneDrive Help and Settings icon )

  2. Select Pause syncing.

  3. Choose how long you want to pause OneDrive.

Select OneDrive Help and Settings icon again and select Resume syncing

Check and compare the size of your OneDrive storage to the available disk space on your PC. If you don't have enough space on your OneDrive or your PC, you will have to move or delete some files, or reduce the number of files and folders.

If you don't have enough space on your OneDrive, you can:

You may have sync conflicts if you're uploading multiple files on the OneDrive website at the same time, or if you made changes in your OneDrive folder on another PC that is syncing at the same time. Sync issues can also occur if you edit files offline.

To reduce sync conflicts, rename the edited files or folders to something new or unique, and then save it again.

Learn more

Need more help?

Contact support icon

Contact Support
For help with your Microsoft account and subscriptions, visit Account & Billing Help.

For technical support, go to Contact Microsoft Support, enter your problem and select Get Help. If you still need help, select Contact Support to be routed to the best support option.

Work or school badge

Admins
Admins should view Help for OneDrive Admins, the OneDrive Tech Community or contact Microsoft 365 for business support.

Need more help?

Want more options?

Explore subscription benefits, browse training courses, learn how to secure your device, and more.

Communities help you ask and answer questions, give feedback, and hear from experts with rich knowledge.

Was this information helpful?

What affected your experience?
By pressing submit, your feedback will be used to improve Microsoft products and services. Your IT admin will be able to collect this data. Privacy Statement.

Thank you for your feedback!

×