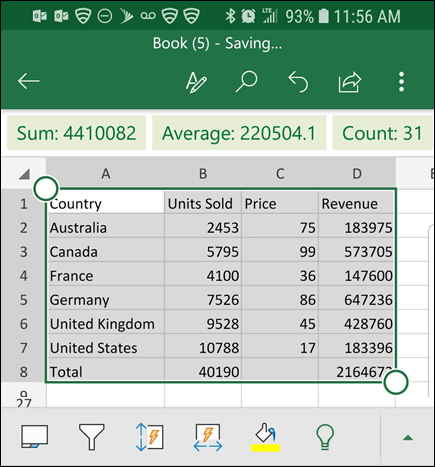
Want to turn images that have table data into data that you can edit in Excel? With the Data from Picture feature, it's a snap.
Use Data from Picture

With the Data from Picture feature, you can insert data from a screen capture on your clipboard, or an image file from your computer.
Important: Only the following character sets are supported: English, Bosnian, Croatian, Czech, Danish, Dutch, Finnish, French, German, Hungarian, Italian, Norwegian, Polish, Portuguese, Romanian, Serbian, Slovak, Slovenian, Spanish, Swedish, and Turkish.
Important: Data from Picture in Excel for Windows is only supported on Windows 11 or Windows 10 version >=1903 (must have Microsoft Edge WebView2 Runtime installed).
How it works
-
Capture your data from an image. There are two methods:
Method
Steps
Tips
Use an existing picture file
Click Data > From Picture > Picture From File.
-
The image should only depict the data you want to import. If necessary, crop the image.
-
Avoid images that depict data from an angle - the perspective should be head-on and focused.
Take a screenshot
Take a screenshot of the table, then click Data > From Picture > Picture From Clipboard.
-
Make sure your screenshot only includes the data you want to import.
-
-
After you have selected the picture, the Data from Picture dialog box shows Excel's progress analyzing the image for data.
-
Review the results, make any data corrections necessary, and then click Insert Data.
Scenarios to try
-
Import data from a sample image file Right-click the following image and "Save image as..." a local copy, then in Excel click Data > From Picture > Picture From File and follow the on-screen instructions to convert the picture to data.
-
Screen capture a table from a website If you've ever tried to copy and paste some data from a web site, you've likely noticed that the formatting looks different after you've pasted it than it did on the website. Instead, try to capture a screen clipping of the table (by pressing Windows logo key + Shift + S), then in Excel select Data > From Picture > Picture From Clipboard. Then, follow the instructions on screen.
-
Take a picture of some printed data Maybe you'd like to get data from your previous tax returns into Excel and you only have printed copies. Just take a picture of each one, transfer the pictures to your computer (OneDrive is great for this). Then in Excel click Data > From Picture > Picture From File and follow the on-screen instructions to convert picture to data.
With the Data from Picture feature, you can insert data from an image file from your computer.
Important: Only the following character sets are supported: English, Bosnian, Croatian, Czech, Danish, Dutch, Finnish, French, German, Hungarian, Italian, Norwegian, Polish, Portuguese, Romanian, Serbian, Slovak, Slovenian, Spanish, Swedish, and Turkish.
How it works
-
To capture your data from an image, do the following:
Method
Steps
Tips
Use an existing picture file
Click Data > Data From Picture > browse and select the picture file > Open.
-
The image should only depict the data you want to import. If necessary, crop the image.
-
Avoid images that depict data from an angle - the perspective should be head-on and focused.
-
-
After you have selected and opened the picture file, the Data from Picture dialog box shows Excel's progress analyzing the image for data.
-
Review the results, make any data corrections necessary, and then click Insert Data.
Scenarios to try
-
Import data from a sample image file Right-click the following image and "Save image as..." a local copy, then in Excel click Data > Data From Picture and follow the on-screen instructions to convert the picture to data.
-
Take a picture of some printed data Maybe you'd like to get data from your previous tax returns into Excel and you only have printed copies. Just take a picture of each one, transfer the pictures to your computer (OneDrive is great for this). Then in Excel click Data > Data From Picture and follow the on-screen instructions to convert picture to data.

With the Data from Picture feature, you can insert data from a screen clipping on your clipboard, an image file from your computer, or from your iPhone camera.
Important: Only the following character sets are supported: English, Bosnian, Croatian, Czech, Danish, Dutch, Finnish, French, German, Hungarian, Italian, Norwegian, Polish, Portuguese, Romanian, Serbian, Slovak, Slovenian, Spanish, Swedish, and Turkish.
How it works
-
Capture your data from an image. There are three methods:
Method
Steps
Tips
Use an existing picture file
Click Data > Data From Picture > Picture From File.
-
The image should only depict the data you want to import. If necessary, crop the image.
-
Avoid images that depict data from an angle - the perspective should be head-on and focused. If applicable, consider fixing the perspective using your iPhone controls.
Take a screenshot
Take a screenshot of the table, then click Data > Data From Picture > Picture From Clipboard.
-
Make sure your screenshot only includes the data you want to import.
Scan data using your iPhone (Requires iPhone configured to use Continuity Camera.)
-
In Excel, right-click a cell, then click Scan Documents.
-
Aim your iPhone camera at the data.
Adjust the lighting and focus, then tap the button to take a picture.
-
Make any further adjustments to the image, then tap Save.
-
The document you are scanning should be as well-lit as possible.
-
Make sure you scan only the data you want to import.
-
Don't scan from an angle - aim directly at the data. If necessary, use your iPhone controls to make adjustments to the scanned image.
-
-
After you have captured the picture, the Data from Picture dialog box shows Excel's progress analyzing the image for data.
-
Review the results, make any data corrections necessary, and then click Insert Data.
Scenarios to try
-
Import data from a sample image file Right-click the following image and "Save image as..." a local copy, then in Excel click Data > Data From Picture > Picture From File and follow the on-screen instructions to convert the picture to data.
-
Scan some data from a book or magazine If you see some interesting data in a book and want to use it in Excel, this is a great way to skip the typing. If you have an iPhone, right-click in Excel on your Mac and select Scan Documents. Your iPhone will light up. Then you can take a picture of the data, and follow the on-screen instructions to bring the data into Excel in no time.
-
Screen capture a table from a website If you've ever tried to copy and paste some data from a web site, you've likely noticed that the formatting looks different after you've pasted it than it did on the website. Instead, try to capture a screen clipping of the table (by pressing SHIFT+CTRL+CMD+4 on your Mac), then in Excel select Data > Data from Picture > Picture From Clipboard. Then, follow the instructions on screen.
-
Take a picture of some printed data Maybe you'd like to get data from your previous tax returns into Excel and you only have printed copies. Just take a picture of each one, transfer the pictures to your Mac (OneDrive is great for this). Then in Excel click Data > Data From Picture > Picture From File and follow the on-screen instructions to convert picture to data.

Get Started
Open Excel on your phone or tablet and tap Insert > Data from Picture.
Next, narrow in on your data until you see it surrounded by a red border, then tap the capture button. If needed, you can use the sizing handles around the edges of the image to crop it to size first.
Excel's powerful AI engine will process the image and convert it to a table. When it first imports your data, it will give you a chance to correct any issues it discovered during the conversion process. Tap Ignore to move on to the next issue or tap Edit to correct the issue.
Press Insert when you're done, and Excel will finish the conversion process, and display your data.
Use the Microsoft 365 app
If you prefer using the Microsoft 365 app, you can do the same thing from there.
-
Open the Microsoft 365 app on your phone and select Actions > Image to Table.
-
Point the camera at the table you need and tap the capture button. The app automatically crops the picture so that only the table is included. If necessary, adjust the crop with the sizing handles around the edges of the image. Select Confirm when you are done. The app extracts the data from the picture and displays a preview of the table.
-
Select Open to open the table in Excel. If the Microsoft 365 app found any issues in the table, such as typos caused by the extraction process, it asks how you want to handle them. Do one of the following:
-
Select Open Anyway to open the table in Excel and fix any issues there.
-
Select Review to fix issues in the Microsoft 365 app. For each issue, select Ignore to move on to the next issue, or use the on-screen keyboard to correct the problem. After you have dealt with every issue, the table opens in Excel.
-
-
After editing the table to your liking, remember to save it.
Important: Only the following character sets are supported: English, Bosnian, Croatian, Czech, Danish, Dutch, Finnish, French, German, Hungarian, Italian, Norwegian, Polish, Portuguese, Romanian, Serbian, Slovak, Slovenian, Spanish, Swedish, and Turkish.


