You can set a Sensitivity level on your messages to help recipients know your intentions when you send a message.
However, the Sensitivity level doesn't stop recipients from taking any actions on a message. People who receive your email can take any action on the message that they want to, such as forwarding a confidential message to another person. To restrict the actions that recipients can take on the messages you send, we recommend that you use Office 365 Message Encryption or Information Rights Management (IRM) if they're available in your organization.
Note: A Sensitivity level, described in this article, is different from a Sensitivity label. A sensitivity label is a Microsoft 365 feature that lets you apply a label to emails or files so they're compliant with your organization's security policies. For more information on sensitivity labels, see Apply sensitivity labels to your files and email in Office.
Set the sensitivity level of a message
-
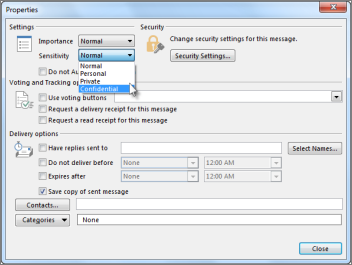
From your draft email message, select File > Properties.
-
Under Settings, in the Sensitivity list, select Normal, Personal, Private, or Confidential. The default value is Normal.
-
Select Close. When you're done composing your message, select Send.
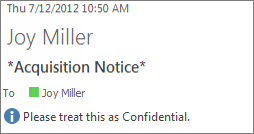
The recipients see the following text displayed in the InfoBar of the received message, depending on the Sensitivity setting:
-
For Normal, no sensitivity level is assigned to the message. Therefore, no text is displayed in the InfoBar.
-
For Private, the recipient sees Please treat this as Private in the InfoBar.
-
For Personal, the recipient sees Please treat this as Personal in the InfoBar.
-
For Confidential, the recipient sees Please treat this as Confidential in the InfoBar.
Note: A message that has a sensitivity level of Private isn't forwarded or redirected by a recipient's Inbox rules.
Set a default sensitivity level for all new messages
-
Select File > Options > Mail.
-
Under Send messages, select Normal, Personal, Private, or Confidential in the Default Sensitivity level list.
Use IRM to restrict permission to a message
Note: This feature is only available if you're using a work or school account with a qualifying Microsoft 365 subscription.
To restrict what recipients can do with a message that you send, you have to use Information Rights Management (IRM). Your system administrator must install IRM before you can apply restrictions to an email message. If you don't see the Encrypt button on the Options tab, IRM probably isn't set up.
In your email message, select Encrypt on the Options tab.
Outlook sets the Do Not Forward permission (which also prevents printing) and adds the following text to the top of your message:
Important: IRM can't prevent content from being erased, stolen, corrupted, or captured and transmitted by malicious programs or computer viruses. It also can't stop people from writing the content out by hand, retyping it, or taking a digital photograph or screen capture of the message.
Tip: Outlook has a variety of other permission settings to choose from. To see the list, select the down arrow beneath the Encrypt button.


